darkroom sink sump pump pics

Roses

A
Roses

  • 1
  • 0
  • 36
Rebel

A
Rebel

  • 3
  • 1
  • 46
Watch That First Step

A
Watch That First Step

  • 1
  • 0
  • 46
Barn Curves

A
Barn Curves

  • 1
  • 1
  • 38
Columbus Architectural Detail

A
Columbus Architectural Detail

  • 4
  • 2
  • 41

Forum statistics

Threads
197,486
Messages
2,759,812
Members
99,515
Latest member
falc
Recent bookmarks
0

Monophoto

Member
Joined
Aug 27, 2004
Messages
1,690
Location
Saratoga Spr
Format
Multi Format
I don't have (or even want) pictures of my setup, but perhaps words will do - - -

I drain my sink into a large Rubbermaid tub with a cover - I cut a hole in the cover for the plastic waste line from the sink.

In the tub I have an ordinary Home Despot sump pump with a float switch. A key design requirement was that the height of the tub had to be greater than the float depth so that the pump would come on before the tub overflowed. My current design has about 2" of 'freeboard'. In our former home, I used a 5 gallon plastic pail as the reservoir, and found that it gave me less than 1/2' of freeboard - just a bit close for comfort.

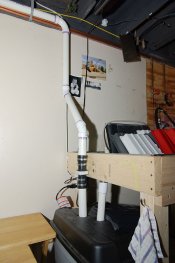
The outflow from the pump goes through a 3/4" diameter flexible hose that terminates into a 1.5" PVC drain line above the darkroom ceiling I used a length of nylon-reinforced plastic tubing (essentially, high quality garden hose) for this purpose.

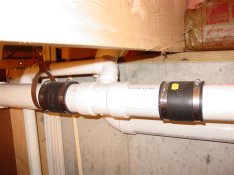
I was fortunate that my sink is directly below the shower in the master bath. The 2" waste line from the shower runs above the darkroom ceiling, directly above the sink, before turning a corner and dropping down to the main 3" waste line. I cut a section out of the 2" shower waste line just before it enters the 3" main drain and installed a 45deg Y fitting with a 1.5" bushing in the side inlet. Then, I fabricated a "p-trap" from a couple of 1.5" 90 deg elbows. As a result, the 1.5" waste line from the darkroom runs horizontally next to the 2" waste line from the shower, turns the same corner, and then drops down, through the "p-trap" and then into the side of the Y.

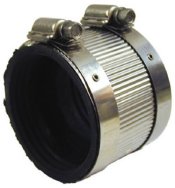
The design of my drain reduces, but does not eliminate the prospect that a backup in the house system could cause household waste to flow backwards into the darkroom reservoir. The keep that from happening, I put a check valve at the point where the flexible nylon-reinforced hose connects to the 1.5" PVC waste line. And of course the 'p-trap' prevents sewer gases from flowing back into the darkroom.

The dwell time for gray water in the reservoir depends on how much work I am doing in the darkroom, and if things are slow, its possible for some strange things to start growing in the tub. To manage that problem, I dump some ordinary hypochlorite bleach (Chlorox) into the sink every few months - whenever I notice the funky smell associated with biological action in the reservoir. Unless the pump fails, I don't take the cover off the tub - I really don't want to know what's in there!

I designed my darkroom such that the electrical circuit enters the room next to the door, circles the room ending at the sink. I installed a GFCI in a receptacle next to the sink so that all of the receptacles in the sink area, including the one serving the pump, are on the GFCI.
 

Frank Hoerauf

Member
Joined
Jan 14, 2006
Messages
159
Format
Medium Format
Hello I dont have a pic to send , but what I did for my drain was go to home depot. They have a boxed sump pump kit that was easy to hook up with pvc piping. Works great with no problems. My darkroom is in my basement so it needs to pump the water up about 7 feet to the kitchen drain pipe and from there it goes to the main drain. Hope this info helps , if not pm me and I will get pics to you.......frank
 
OP
OP
pesphoto

pesphoto

Member
Joined
Mar 30, 2005
Messages
479
Location
Providence R
Format
35mm RF
thanks guys, especially monophoto. Wow, in my dreams I could do that. I have a lot to learn about this. ug!
 

Monophoto

Member
Joined
Aug 27, 2004
Messages
1,690
Location
Saratoga Spr
Format
Multi Format
An important point here is that the situation in your home determines what you will have to do. Ultimately, the key is to look at the situation and devise solutions for your unique problems.

I've already described what I've done in our new home. Let me contrast that with a description of the arrangement in our former home, an older structure constructed around 1950.

The home faced north, with the kitchen in the southwest corner, and the bath on the east side. The main sanitary drain (cast iron, of course) ran down the eastern wall of the basement and out the southeast corner to the septic tank. There was a secondary drain (galvanized steel) from the kitchen that ran along the southern wall of the basement to join the main drain just before it left the house. The laundry was directly underneath the kitchen, and had a separate drain to a dedicated drywell outside the southwest corner of the house.

I built the darkroom in the southeast corner of the basement. Because the basement had a tendency to be damp, I framed all four walls and and lined the darkroom with sheet rock rather than use the basement walls for two sides of the darkroom. That meant that there was a space between the darkroom wall and the basement wall - a few inches on the east side, and about a foot on the south side. There was a cleanout in the main drain just before it penetrated the basement wall that would have been hidden behind the darkroom wall - to provide access in the event we ever needed to get to that cleanout, I framed in a removable section of the wall in front of the cleanout.

There was also a basement window on the east side. I was concerned that if I merely framed over the window, there was a risk of something breaking the glass and not being able to get at it to do a repair, so I first removed the window and filled the space with cinder blocks.

Initially, I used an ordinary sump pump in a reservoir (a 5-gal plastic pail) that exhausted via an old garden hose that I draped along the southern wall of the basement and dumped into the laundry sink.

This was an older home, and eventually the pipe from the laundry sink to its drywell clogged. Neither the plumber or I could open the line, so I had the plumber install a reservoir and pump to lift the graywater from the laundry sink up and into the kitchen drain.

It didn't make a lot of sense to have the graywater from the darkroom collect in a reservoir in the darkroom, and then be transferred to a second reservoir at the laundry area. So I purchased a "saddle tee" fitting of the appropriate size for the kitchen drain pipe. A saddle tee is simply a fitting that clamps around the outside of a pipe, and that has a rubber gasket at the area where the liquid transfers into the pipe. I drilled a hole in the galvanized steel kitchen drain and attached the saddle tee - this was done in that one foot space between the south darkroom wall and the basement wall.. I used a shorter length of the old garden hose to join the sump pump to the saddle tee. I also used a check valve to prevent backflow.
 

selenium96

Member
Joined
Sep 15, 2007
Messages
49
Location
Maine
Format
35mm
For my basement darkroom, I have a Liberty pump (libertypumps.com) under my darkroom sink which goes through a checkvalve and empties into the waste pipe which happens to be on the other side of the wall. A liberty pump is "for gray wastewater applications, the 404 is perfect for laundry tray sinks, bar sinks, washing machines and other basement remodeling projects. The system arrives fully assembled and ready to install." The scary part was cutting into the waste pipe to install a fitting into which the pump drains. The annoying part is the THUMP when the check valve closes.
 

matt miller

Subscriber
Joined
Feb 11, 2004
Messages
825
Location
Iowa
Format
Multi Format
My pump (standard home type sump pump from Home Depot) sits in a big rubbermaid tub under my sink. I have two holes cut in the lid. The sink drains into one hole. The pvc you see here, from the sink, stops open ended just inside the lid. The pump drains out the other hole, through a check valve (the black rubber piece), and up where it turns to fall towards the sewer connection. It's hard piped with pvc all the way. I don't use a p trap. There is always water sitting on top of the check valve, so sewer gas isn't an issue.

The float on the pump (and pretty much any pump) can be adjusted to allow the water to fill to a level with which you are comfortable. Mine fills to about 4 inches from the top before the pump kicks on.
 

Attachments

  • IMGP4517.jpg
    IMGP4517.jpg
    73.1 KB · Views: 397
  • IMGP4518.jpg
    IMGP4518.jpg
    80.9 KB · Views: 408
OP
OP
pesphoto

pesphoto

Member
Joined
Mar 30, 2005
Messages
479
Location
Providence R
Format
35mm RF
Matt, thank you for the pics! Nice setup you have there. Very helpful info, much appreciated.
I have bought that same check valve. I was wondering if I need a P trap (or S trap).
Also, I like that you can see the liquid in the tub so you can see where its level is.


Steve,
the pump I have is Liberty pump 403. Bought it off craigslist. It is sitting right next to my sink and I connected the sink drain right to
the pump inlet. There is an S trap in the PVC before it connects to the pump. Should I keep the S trap?
Next I'll connect PVC to the discharge outlet and up the wall to the house drain. WHich is a whole other adventure to figure out connecting to that.
 

selenium96

Member
Joined
Sep 15, 2007
Messages
49
Location
Maine
Format
35mm
I kept the s trap under the sink & drained into the liberty pump, also a 403. Out from the liberty pump thru the darkroom wall. Up toward the ceiling thru the checkvalve. The waste pipe is near the ceiling so I cut into it and spliced in a fitting with a couple of those large rubber "no-hub soil pipe couplings." The pipe from the liberty pump should go up and over the waste pipe and enter the waste pipe from above to prevent any water from the waste pipe from going back down toward the liberty pump.

The scary part is cutting into the waste pipe but the no-hub couplings (see images below) are pretty easy to work with.

Good luck.
 

Attachments

  • getimage_new_25821_1.asp.jpg
    getimage_new_25821_1.asp.jpg
    19.9 KB · Views: 245
  • July 020.jpg
    July 020.jpg
    44.1 KB · Views: 276
  • July 021.jpg
    July 021.jpg
    49.3 KB · Views: 354
  • July 023.jpg
    July 023.jpg
    42.8 KB · Views: 300
Last edited by a moderator:

Ai Print

Subscriber
Joined
May 28, 2015
Messages
1,292
Location
Colorado
Format
Multi Format
Great info guys. I may finally have found a proper space for a darkroom, about 280 square feet of semi finished basement. All I need to sort out is if it can be plummed and if I have access to a way to drain.

Here is to hoping!
 

DREW WILEY

Member
Joined
Jul 14, 2011
Messages
13,686
Format
8x10 Format
No pics. But my commercial building, where my little lab is, originally had no plumbing. I didn't want to jackhammer the slab up for drainage, so just
installed a huge thick polyethylene garbage can under the sink with a tight lid and inlet and outlet holes, then put in a good quality sump pump with
a corrosion-resistant housing and impellers, which I bought from Grainger. These cost somewhat more than the usual hardware or home center variety, but last much longer. Darkroom work involves a lot of potentially corrosive waste water, including acetic acid.
 

Trond

Subscriber
Joined
Jul 21, 2004
Messages
854
Location
Harestua, Norway
Format
Multi Format
I also use a home made drainage pump, which is just a large plastic storage box and a pump with a float switch. I have used this setup for six years now, and it works well. Good advice to use some money on a quality pump. My first pump had to be replaced because the float switch failed.
 

Luis-F-S

Member
Joined
Sep 19, 2013
Messages
774
Location
Madisonville
Format
8x10 Format
The photo below shows my drainage setup in the blue tub (Goulds Sink Drain System) underneath the utility sink. Both the utility and the darkroom sinks drain into it, and there is a small submersible pump inside the blue tub that pumps to the sewer. Just to the right of the sink is a 10 gal water heather, and to the right of that is the pressure tank for an irrigation well. Since this photo was taken, I've run a potable water line and tied it before the water filter, so I can use either city water or well water in the darkroom. The filter on the common line before it splits to go to the water heater so both cold and hot lines get filtered.

GouldsPump.jpg DSC_0208s.jpg
 
Last edited:

MTGseattle

Subscriber
Joined
Dec 8, 2013
Messages
1,344
Location
Seattle
Format
Multi Format
Hello.
You all have thought of some good options.
I thought I would share another pump option.

Dead Link Removed

It seems to be a pretty solid design (I'm not sure about overall chemical resistance though), and is a clean all-in-one style unit. No need to modify a tub or bucket.
 
Photrio.com contains affiliate links to products. We may receive a commission for purchases made through these links.
To read our full affiliate disclosure statement please click Here.

PHOTRIO PARTNERS EQUALLY FUNDING OUR COMMUNITY:


Ilford ADOX Freestyle Photographic Stearman Press Weldon Color Lab Blue Moon Camera & Machine
Top Bottom