Cyanotype help

3 Columns

A
3 Columns

  • 6
  • 6
  • 118
Couples

A
Couples

  • 4
  • 0
  • 96
Exhibition Card

A
Exhibition Card

  • 6
  • 4
  • 137
Flying Lady

A
Flying Lady

  • 7
  • 2
  • 147

Recent Classifieds

Forum statistics

Threads
199,055
Messages
2,785,512
Members
99,792
Latest member
sepd123
Recent bookmarks
0

Erikagof

Member
Joined
Jan 10, 2024
Messages
5
Location
Melbourne
Format
Digital
Hi everyone I hope you are all doing well.

I'm new here and new to cyanotypes and I am of course starting with a very complicated beginning.

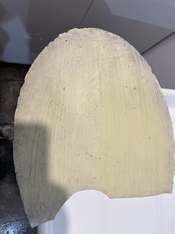
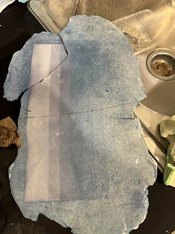
I have made very thin porcelain sheets and am now trying to use them for cyanotypes. Ive got a load that I can test on but just can't seem to get it right.

I have prepared a number of them at the same time as preparing a couple of sheets of Arches WC paper. Used the same solution and left them to dry for 24 hours. The paper worked. The porcelain didn't :sad:

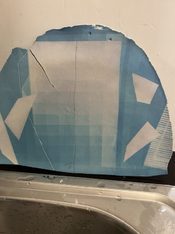
The paper was a yellow green before exposure, the porcelain had gone a violet colour.
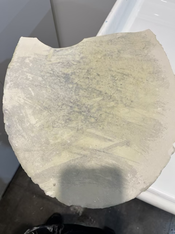
tempImagejb8bMY.png tempImagepKY5j6.png

Ive prepared another couple of sheets and after a couple of hours they are already going violet.(see above front and back)

I did an expose on one after only a few hours after I applied solution so it wasn't really completely dry but it has been the best result.
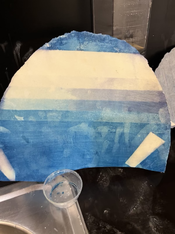
tempImageQhuNku.png

Im wondering is it possible that the porcelain is really alkaline? If so, is there anything I could do to fix that? Any other ideas?

some other
tempImageSCvZVW.png tempImageQ9UGck.png
 

koraks

Moderator
Moderator
Joined
Nov 29, 2018
Messages
23,207
Location
Europe
Format
Multi Format
Welcome to Photrio, @Erikagof !

That's a very neat concept you're working on. I'd love to see it work.

My first thought is that the (unglazed?) porcelain is too absorbent and the cyanotype emulsion simply ends up too deep inside the material to form a visible image. Indeed, it may also chemically fog.

One thing you could try is to size your porcelain with a thin layer of e.g. gelatin. Dissolve let's say 2g per 100ml of gelatin, add some hardener (a few drops of formalin, chrome alum solution, glutaraldehyde, etc.) and pour that over the porcelain plate. Let set and allow to harden, depending on the needs of the hardener, which may be up to a few weeks. Then sensitize the plate with your cyanotype sensitizer, let dry and print as soon as dry. The gelatin sizing will help with the absorbency of the porcelain, but also chemically seal off the surface.

If the approach helps, but not sufficiently so, try a heavier gelatin size (more gelatin per surface area). The downsize is that a heavy gelatin size will affect the surface sheen of the material. If this is problematic, try adding a matting agent to the gelatin size.
 

koraks

Moderator
Moderator
Joined
Nov 29, 2018
Messages
23,207
Location
Europe
Format
Multi Format
Yes, a commercial product may work. I can't tell for sure; just give it a try. Acrylic ground is another option beside the one you mentioned. Or plain gesso.
 

BrianShaw

Member
Joined
Nov 30, 2005
Messages
16,544
Location
La-la-land
Format
Multi Format
Another inexpensive sizing to try would be spray starch, the kind used for laundry and dress shirts.

Many decades ago I experimented with cyanotype on poured concrete. Absorption definitely was an issue. Once that was controlled the process somewhat worked. It was coarse and I feel your work on porcelain will be much more successful.

Since porcelain is basically a glass coating, though, I’d think it much more inert than other potential bases and possibly less absorbent. Could it be that the porcelain needs to be cleaned/prepared like glass does when used as a base? Perhaps it needs a bit of tooth. The sizing should help with that but perhaps a mild etching of the porcelain would too.

Also consider a laquer spray on top as a protective measure.
 
Last edited:

koraks

Moderator
Moderator
Joined
Nov 29, 2018
Messages
23,207
Location
Europe
Format
Multi Format
Since porcelain is basically a glass coating

The question is whether we're talking about porcelain in the strict sense of the word and what kind of surface treatment may have been applied to it. The photos suggest this is a kind of fairly porous earthenware rather than the shiny smooth porcelain we associate with teacups etc.
 

BrianShaw

Member
Joined
Nov 30, 2005
Messages
16,544
Location
La-la-land
Format
Multi Format
The question is whether we're talking about porcelain in the strict sense of the word and what kind of surface treatment may have been applied to it. The photos suggest this is a kind of fairly porous earthenware rather than the shiny smooth porcelain we associate with teacups etc.

Yes….

For “”porcelain dolls”, for instance, the term porcelain is often used when the material is actually a fired clay bisque. Clarity would help.
 
Last edited:

BrianShaw

Member
Joined
Nov 30, 2005
Messages
16,544
Location
La-la-land
Format
Multi Format
Digging into the term “porcelain ” I just learned that perhaps I’ve been quite mistaken for many years in assuming that the glass coating is the real porcelain. It seems that the fired ceramic, of several types, is:

“Though definitions vary, porcelain can be divided into three main categories: hard-paste, soft-paste, and bone china. The categories differ in the composition of the body and the firing conditions.”

Ignore my comments about fused glass as the are most likely not applicable at all in this situation. My apologies for throwing a red herring into the pot.
 

rwyoung

Member
Joined
Apr 18, 2006
Messages
708
Location
Lawrence, KS
Format
Multi Format
There is a photographer on Instagram, Lina Bessanova (spelling? but the Instagram search should find her) that did a series of liquid emulsion on concrete/stone. She experimented a lot with sealing methods and there may be some help in her posts.
 

titrisol

Subscriber
Joined
Aug 2, 2004
Messages
2,071
Location
UIO/ RDU / RTM/ POZ / GRU
Format
Multi Format
Thank you korak. id love to see it work too!!!

I was wondering that too. there are some products for sizing watercolour paper like this
https://www.jacksonsart.com/en-au/d...MIr5D3vbnSgwMVpKlmAh1YdQM2EAQYBSABEgLHffD_BwE
I wonder if that might work?

There are several options to size your surfaces. Arrowroot/ tapioca starch is used extensively and will allow your to fill those pores and make the earthware more accessible to the cyanotype.
Leather and plastic surface prep for cyanotype use it.

Keep us posted, this sounds like fun!
 

VinceInMT

Subscriber
Joined
Nov 14, 2017
Messages
1,887
Location
Montana, USA
Format
Multi Format
I’ve done a bit of ceramics, including using porcelain and it doesn’t get that shiny surface until glazing and a second firing. Yours look like the bisque stage and is likely still porous and I’m guessing that the cyanotype solution is reacting with an alkaline in the clay. There are some good suggestions as to how to seal the porcelain and another thought I had would to try an acid wash like one uses before painting/staining concrete to neutralize the alkalinity.
 
OP
OP
Erikagof

Erikagof

Member
Joined
Jan 10, 2024
Messages
5
Location
Melbourne
Format
Digital
Oh wow everyone! thank you so much, lots to take in.
It is a mid fire porcelain so has been fired to a temperature that is meant to vitrified and therefore should be watertight but obviously the fact that it is permitting through to the back suggests this hasn't happened so I guess I will treat it like it is super absorbent. There seems like there might be a couple of things happing then. Over absorbency and possibly too alkaline.

I have another question too. My water is very alkaline. will this effect the cyanotype solution (the test on paper that did work probably suggests not) and how would I wash out the sheet with running water? I have a large tray that I have added vinegar to and agitated for a few minutes. then what do I do? can I then run tap water over from then or does the water need to have vinegar in it all the time?
 

VinceInMT

Subscriber
Joined
Nov 14, 2017
Messages
1,887
Location
Montana, USA
Format
Multi Format
In the book "Cyanotype: The blueprint in contemporary practice " by Christina Anderson, she provide a recipe for acidifying paper. It might work on the porcelain as well.

Start with 750 ml water
Add 100 g sulfamic acid and dissolve
Add water to bring up to 1000 ml

For paper, pre soak in water for 20-30 minutes.
Soak in acid solution 15-20 minutes.
wash for 20-30 minutes.
 

fgorga

Member
Joined
Aug 31, 2015
Messages
776
Location
New Hampshire
Format
Multi Format
Oh wow everyone! thank you so much, lots to take in.
It is a mid fire porcelain so has been fired to a temperature that is meant to vitrified and therefore should be watertight but obviously the fact that it is permitting through to the back suggests this hasn't happened so I guess I will treat it like it is super absorbent. There seems like there might be a couple of things happing then. Over absorbency and possibly too alkaline.

I have another question too. My water is very alkaline. will this effect the cyanotype solution (the test on paper that did work probably suggests not) and how would I wash out the sheet with running water? I have a large tray that I have added vinegar to and agitated for a few minutes. then what do I do? can I then run tap water over from then or does the water need to have vinegar in it all the time?

Regarding, your second paragraph, you might take a look at this thread... https://www.photrio.com/forum/threa...the-washing-of-traditional-cyanotypes.177366/

Bottom line, adding a bit of vinegar to all of your washes is probably a good thing if you have hard/alkaline tap water.
 
OP
OP
Erikagof

Erikagof

Member
Joined
Jan 10, 2024
Messages
5
Location
Melbourne
Format
Digital
struggling to findsulfamic acid near me what about Sodium Bisulphate like what they put in pools to reduce alkalinity?
 

fgorga

Member
Joined
Aug 31, 2015
Messages
776
Location
New Hampshire
Format
Multi Format
struggling to findsulfamic acid near me what about Sodium Bisulphate like what they put in pools to reduce alkalinity?

At least in the US, sulfamic acid is sold in hardware/building supply stores as a masonry cleaner. Thus, you might take a look at the ingredients of those products.

Sulfamic acid (which is a solid) is used as a 'safer' alternative in place of muriatic acid aka concentrated hydrochloric acid (which is a liquid) for this use. One can also use muriatic acid to remove alkali from paper and maybe ceramic as well.

Bisulfite might work as well, it is a weak acid as compared to those mentioned above and thus the capacity for neutralizing alkali will be less than the strong acids. Actually any weak acid (including vinegar) will work, one just needs to keep in mind they will run out of neutralizing power more quickly than the strong acids. Folks have also used citric acid and oxalic acid in this application.

There is lots of information about acid pretreatment of paper for alt process printing out there much of this information is adaptable to ceramics.

Neither the specific acid nor its concentration is particularly important for this application. The differences will be in capacity, i.e. how much alkali cane be neutralized before the solution looses effectiveness.

With carbonate buffered paper, it is easy to tell if an acid solution has run out of capacity, the paper will not bubble, as it does in fresh solution, when added to spent solution.

I am not sure what the source of alkalinity in ceramics is, thus the bubbling idea might not be applicable. Furthermore, I might guess that there will be a lot more alkali in a piece of ceramic than there is in a sheet of paper. Something to keep in mind.

Lastly, and this is speculation on my part (I'm a biochemist not a material scientist 🙂), one should watch for changes in the properties (e.g. strength) of your ceramic after acid treatment just in case the alkali plays an important role in the properties of this material.
 

nmp

Member
Joined
Jan 20, 2005
Messages
2,027
Location
Maryland USA
Format
35mm
I am not sure acid pre-treatment will work or not. The culprit may not be alkali per se because the paper would have a plenty of it as well. There is something in the ceramic/porcelain that has the power to reduce iron thermally (same as what happens optically with UV,) hence the formation of some Prussian blue. I notice you are allowing the plates to dry for 24 hours before exposing. I would cut it down to bare minimum. Only coat when you are ready to expose (the Sun is out,) let it sit by itself until the liquid gets absorbed (for my paper it is about 10 minutes or less) and the surface becomes matte. Then you can continue drying on its own for 1/2 hour so or shorter with a fan or blow-dryer at low/no heat until it can no longer impart any sensitizer to the negative and you are good to go. That way you will simply won't give enough time for the "dark" reaction (fog) to occur to any appreciable degree.

Other recommendations about sizing, ground etc are valid as it will restrain the sensitizer near the surface which should increase your Dmax and it should also reduce the propensity to get fog by limiting direct contact with the material surface.

:Niranjan.
 

VinceInMT

Subscriber
Joined
Nov 14, 2017
Messages
1,887
Location
Montana, USA
Format
Multi Format
…. I notice you are allowing the plates to dry for 24 hours before exposing. I would cut it down to bare minimum. Only coat when you are ready to expose (the Sun is out,) let it sit by itself until the liquid gets absorbed (for my paper it is about 10 minutes or less) and the surface becomes matte. …

This has also been my experience, even when working with watercolor papers that work fine when used right after drying. I usually coat a few extra test strips and don’t use them all and by the next day, after being kept in the dark, they’ve gone bad.
 
OP
OP
Erikagof

Erikagof

Member
Joined
Jan 10, 2024
Messages
5
Location
Melbourne
Format
Digital
Yet again amazing everyone! I have prepared a bunch of the sheets to dry over night and am heading to the studio to try this morning. I think you might be onto something too nmp the image of the brighter blue one is one I didn't let dry overnight the only trouble was that some of the emulsion did come off where I touched it ill fiddle around with this too today. OMG I am having fun but also have an exhibition deadline looming so am running out of time to get this to work! plan B may have to be enacted :sad:
 
Photrio.com contains affiliate links to products. We may receive a commission for purchases made through these links.
To read our full affiliate disclosure statement please click Here.

PHOTRIO PARTNERS EQUALLY FUNDING OUR COMMUNITY:


Ilford ADOX Freestyle Photographic Stearman Press Weldon Color Lab Blue Moon Camera & Machine
Top Bottom