Creating digital negatives using Canon print driver and Composer

Hole

D
Hole

  • 1
  • 0
  • 34
Contemplation - Rome

A
Contemplation - Rome

  • 2
  • 0
  • 107
Permitted nature

D
Permitted nature

  • 4
  • 0
  • 70

Recent Classifieds

Forum statistics

Threads
200,454
Messages
2,808,301
Members
100,265
Latest member
凯旋的士兵
Recent bookmarks
0

richyd

Member
Joined
Jul 24, 2012
Messages
209
Location
London UK
Format
Medium Format
{Moderator note: this post was split off from another thread}
I've used the specific InkOwl inks that suit my Canon Pro10s printer.

They do work for me making Negs for Kallitypes but only with the third party PrintFab driver.
Canon printer drivers do not give sufficient print density.
And only tested with GoldUp USA silk screen film.

I don't know if the same inks are used for different printer models.

After your post I've just downloaded the Printfab driver for Canon on a Mac which I hope to test soon and also see they have a new beta version, Composer. I would appreciate if you could outline any settings to use for creating digital negs. I had a quick look at the manual but not sure from that how all the functions work. Also they have different versions, Home , Pro etc with different features. Is one particular version necessary to do this?

Many Thanks
 
Last edited by a moderator:

gbroadbridge

Subscriber
Joined
Nov 18, 2004
Messages
716
Location
Sydney, Australia
Format
Medium Format
{Moderator note: this post was split off from another thread}


After your post I've just downloaded the Printfab driver for Canon on a Mac which I hope to test soon and also see they have a new beta version, Composer. I would appreciate if you could outline any settings to use for creating digital negs. I had a quick look at the manual but not sure from that how all the functions work. Also they have different versions, Home , Pro etc with different features. Is one particular version necessary to do this?

Many Thanks

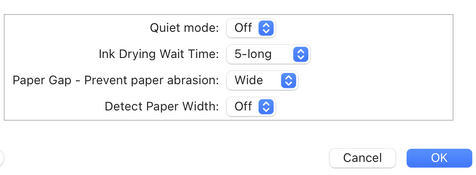
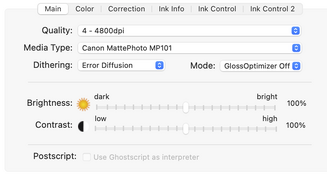
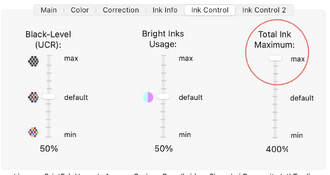
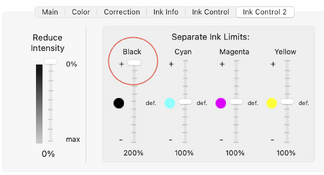
I can give you my settings for the Pro10S printer.

Some of the settings are adjusted by manually editing a PrintFab configuration file, and that file I believe is printer specific.
The settings to modify were given to me by Printfab support by email.

The version of PrintFab you use depends on the maximum page size you wish to print, and also dependent on other features you may wish to use. I use the 'L' version as it offers printing up to A3 and also allows me to use custom ICC profiles for paper prints (I generate custom Paper profiles myself for some papers). If you're just wishing to print 8 x 10 and do not use custom profiles you could use the Home version.

Note: I feed from the manual feed tray.

Some screenshots of settings:

Screenshot 2025-11-04 at 9.43.26 am.png

Screenshot 2025-11-04 at 9.43.36 am.png

Screenshot 2025-11-04 at 9.43.53 am.png
Screenshot 2025-11-04 at 9.44.10 am.png
Screenshot 2025-11-04 at 9.44.19 am.png

Finally the configuration file.


This is a quote from the support email.
-!--

The file path is
/library/printers/printfab/colors/CLI72.tpm

You can edit the file e.g. by opening the application "Terminal" from the "Utilities" folder and entering

sudo pico /library/printers/printfab/colors/CLI72.tpm

(your login password will be requested). Then go to the section

[4800_pro10]
Channels=k,c,m,y,c2,m2,k3,r,w
Gamma=500
Saturation=43
Bits=4

and change the value "Saturation", the value can go up to 100.

Use the key combination "control"+"O" to save the modified file and "control"+"X" to exit the text editor.

This will affect all prints on matte paper with 2400dpi and 4800dpi resolution.


-!--

I set that saturation setting to 75 which provides ample print density for anything I've tried.
 
Photrio.com contains affiliate links to products. We may receive a commission for purchases made through these links.
To read our full affiliate disclosure statement please click Here.

PHOTRIO PARTNERS EQUALLY FUNDING OUR COMMUNITY:


Ilford ADOX Freestyle Photographic Stearman Press Weldon Color Lab Blue Moon Camera & Machine
Top Bottom