Converting an 8 x 10 camera into an 8 x 10 enlarger

Forum statistics

Threads
199,643
Messages
2,794,615
Members
99,976
Latest member
Traderjax
Recent bookmarks
0

Dan Dozer

Subscriber
Joined
Dec 10, 2004
Messages
413
Format
Large Format
Someone asked to see photographs of my project to convert my 8 x 10 Kodak 2D enlarger into an 8 x 10 enlarger so here are some images of it.

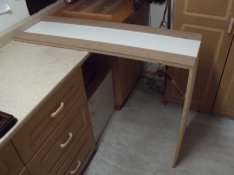
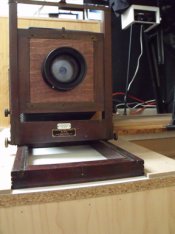
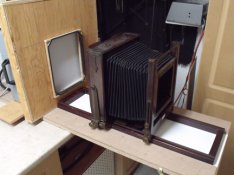
Image 1 shows the table base that sits on my darkroom countertop (and clamped down). Base is hinged for easy storage and vertical piece sits on the floor. The base is made out of 3/4" melamine surfaced partical board which has two thin masonite pieces on top that forms the track that the camera base sits/slides in.

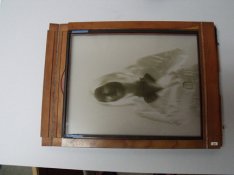
Image 2 shows the 10 x 10 cold light head that sits on the back end of the base.

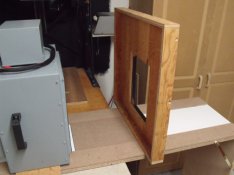
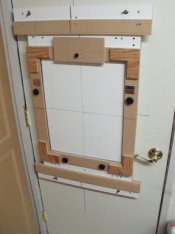
Image 3 shows the vertical panel with the 8 x 10 hole cut in it that slides in the track that the camera slides in. The vertical panel is pushed up against the front of the Cold Ligtht head.

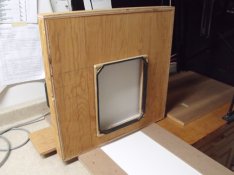
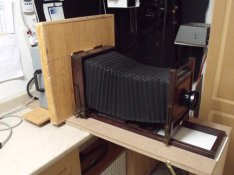
Image 4 shows the front side of the panel that the camera is pushed up against. I made a little frame with a foam rubber seal that sort of seals up against the camera back (see image 5).

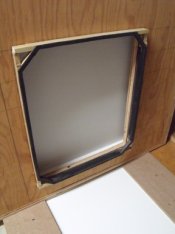
Image 5 shows a close up view of the frame that closes up against the camera back. It was a little tricky to figure out how to make the frame and get a reasonably good seal to the camera back.

More images to follow.
 

Attachments

  • 2010_06260001.small.jpg
    2010_06260001.small.jpg
    120.6 KB · Views: 410
  • 2010_06260002.small.jpg
    2010_06260002.small.jpg
    119.3 KB · Views: 528
  • 2010_06260003.small.jpg
    2010_06260003.small.jpg
    122.3 KB · Views: 495
  • 2010_06260004.small.jpg
    2010_06260004.small.jpg
    124.3 KB · Views: 437
  • 2010_06260015.small.jpg
    2010_06260015.small.jpg
    102.3 KB · Views: 428
OP
OP

Dan Dozer

Subscriber
Joined
Dec 10, 2004
Messages
413
Format
Large Format
8 x 10 enlarger continued

Image 6 shows the 8 x 10 camera in placed with the front and rear beds down. Note that you need the rear bed to make this enlarger work because of the extension needed to do your enlargements. The camera bed sits on the base between the two pieces of masonite.

Image 7 shows the camera front and rear extended to about the normal working positions for enlarging an 8 x 10 negative up to about an 11 x 14 print. The camera back is extended to the back of the rear bed and pushed up against the vertical panel frame piece.

Image 8 shows my negative carrier - a simple 8 x 10 film holder with the center paper septum cut out to be just a little smaller than the film. The film holder is the type that has the removable wood/metal frame that holds the negative in place. The holder is just inserted into the camera back as you normally would.

Image 9 shows my home made adjustable easel mounted on the darkroom door. Note that the distance from the front of the base to the Darkroom door is probably less than 3'. The easel is built to accommodate 16 x 20 film and also with a couple of spacer blocks accommodate my 11 x 14 enlarging easel. Horizonal movement of the negative is done on this easel. Vertical movement of the negative is done with the vertical rise/fall of the camera front. General focusing of the image is done manually pushing the camera/vertical panel/cold light head forward and backward. Fine tuning of the focusing is done with the horizontal adjustement of the camera front.

This easel look like of complicated and it probably is (I got a little carried away). You can also probably use a piece of steel and magnets to hold your paper in place. I believe I saw such a steel unit with magnets on Freestyle Photo's website.

Image 10 shows the front of the camera with the 300 mm Rodenstock enlarging lens.

One final photo to follow.
 

Attachments

  • 2010_06260010.small.jpg
    2010_06260010.small.jpg
    114.9 KB · Views: 361
  • 2010_06260008.small.jpg
    2010_06260008.small.jpg
    95.1 KB · Views: 377
  • 2010_06260007.small.jpg
    2010_06260007.small.jpg
    100.1 KB · Views: 400
  • 2010_06260006.small.jpg
    2010_06260006.small.jpg
    134.1 KB · Views: 337
  • 2010_06260005.small.jpg
    2010_06260005.small.jpg
    136.3 KB · Views: 377
OP
OP

Dan Dozer

Subscriber
Joined
Dec 10, 2004
Messages
413
Format
Large Format
8 x 10 enlarger

Final image shows the whole enlarger set up for printing. Note that since there are no bolted connections between the cold light head, the vertical panel assembly, and the camera back, there are light leaks. To remedy that, I just throw a big piece of fabric over it all to block out all the leaking light.

The enlarger works beautifully. It is a little awkward while at the same time reaching back to adjust the fine tune focusing on the camera front, but it does work. Luckily I have long arms. However, this would be an issue with any horizontal enlarger.

There was nothing I had to do physically to the camera so it is still completely usable for photography work. One thing you need to do is if the ground glass on the camera back has clipped corners, you need to remove it. Otherwise you will get darker diagonal corners in your print if you print full frame.

After I got the Cold Light head and picked up two enlarger lenses, the total cost of the whole enlarger was less than $20. The Enlarger lenses I got were a 240mm Nikon and the 300mm Rodenstock. I tried my 360mm G Claron in it, and to get a large enough image for enlarging, I needed about 3 more feet in the darkroom (didn't have it). That would also have put the easel too far away from the camera for me for easy focusing. Just about everything you see here I had laying around my workshop and really only had to buy the hinge and brackets on the base plus a few screws.

The cold light head is supposedly from an old Durst Enlarger. It is made by Reinhel. It is a real beast with it's own separate power supply (on top in the photos) and the whole unit weighs about 40 pounds. However, it has it's own internal fan and runs on 110 volts so it works great for this project.

Feel free to ask questions if you have any.
 

Attachments

  • 2010_06260009.small.jpg
    2010_06260009.small.jpg
    143.9 KB · Views: 307

2F/2F

Member
Joined
Apr 29, 2008
Messages
8,031
Location
Los Angeles,
Format
Multi Format
NICE
 

Curt

Member
Joined
Sep 22, 2005
Messages
4,618
Location
Pacific Nort
Format
Multi Format
Nice going there Dan, it's the kind of working that I like to see. I've seen some others in the same design setup. If you have the light source and a lens then why not go for it like you did. Didn't a fellow down there in Carmel by the Sea do something like it with a studio camera? His name was Adams or the like. Anyway have a great time with it. Enlarging 8X10 will be a lot of fun.

Curt
 

nick mulder

Member
Joined
May 15, 2005
Messages
1,212
Format
8x10 Format
Interesting,

Might give this a crack one day - I have a Rodenstock 420mm APO-Ronar here and a 360mm Symmar-S (the one with heaps of coverage)

Although it'll have less DOF I'm assuming the Rodenstock being a process lens would be the way to go for use as an enlarging lens ?
 

ron mcelroy

Member
Joined
Dec 13, 2003
Messages
60
Location
memphis
Format
4x5 Format
Interesting concept. Do you use glass in the negative holder to help maintain a flat film plane?
 
OP
OP

Dan Dozer

Subscriber
Joined
Dec 10, 2004
Messages
413
Format
Large Format
I don't seem to need glass to keep the negative flat. The negative is vertical so there isn't really any sagging at all due to gravity. Since the cold light head has it's own internal fan unit, it doesn't really heat up much at all.
 

ic-racer

Member
Joined
Feb 25, 2007
Messages
16,619
Location
USA
Format
Multi Format
Nice setup. Thanks for posting.

It looks like one of the keys to success here is your use of a 'real' enlarger light source.

I like your printing easel on the door. I'm thinking of something similar for some proposed horizontal images, but my enlarger projects right at a door's hinges and the enlarger wheels don't allow movement parallel to the door.
 
OP
OP

Dan Dozer

Subscriber
Joined
Dec 10, 2004
Messages
413
Format
Large Format
Before I found the cold light head, I did a lot of searching and was discouraged on the possible cost for one on places like "the bay". Also, it seemed that some of the cold light heads out there need 208 volts. I was even looking at trying out one of my UV light boxes that I use for Platinum printing to see if it would work. I figured that if I kept the gound glass back on the camera, it might work. That is why the vertical panel unit between the cold light head and the camera back is as large as it is. I built the panel unit, but before I tried it out with the UV light box, I was offered the cold light head at a reasonable price.
 
Photrio.com contains affiliate links to products. We may receive a commission for purchases made through these links.
To read our full affiliate disclosure statement please click Here.

PHOTRIO PARTNERS EQUALLY FUNDING OUR COMMUNITY:


Ilford ADOX Freestyle Photographic Stearman Press Weldon Color Lab Blue Moon Camera & Machine
Top Bottom