


Man from moon
Member
- Joined
- Jan 9, 2011
- Messages
- 44
- Format
- 35mm
Dears
I am facing a continuously problem with my film
Always my result appear harsh+ poor dynamic range+ lot of noisy grain
I develop my own film using decent films and chemicals
Films: hp5+tri-x+panf50+delta100+delta400 (all both 35mm and 120 size)
Chemicals: developer: DD-x + ilfosol3 + Rodinal
Stop bath: ilford stop bath
Fixer : ilford rapid fixer
Kodak photoflo
Scanner: Epson v600 with original mount and software(I turned off all the extra setting like dust removal and unmask sharp ,,,etc.)
My way to develop films:
- getting the official information about developing time from the manufacture chart
-make fresh developer for each time
- For stop bath and fixer I re-use them , 1ltr= 13-15 rolls
- I am keeping the temp for developer accurate at 20C , for the stop bath and fixer within -2/+2c
After finishing my work I keep the stop bath and fixer in blower bottle with no air and save it in refrigerator
Developing method :
Pour the developer and just agitation without covering the tank (with the stick only) 1 minute continuously for first minute then 10 sec begin of each minute
Stop bath: 1 minute, agitate for first 30 sec then Pour it back on the bottle
On this stage and after I finish the stop bath I just make single wash with tap water
Fixer: 5 minute, agitate for 1 minute then 10 second every begin of minute then pure the fixer back to the bottle
Final wash for 10 minute with tap water within +2/-2c proses temp and after 10 minute I wash the film with distilled water 2 times and put some drop from Kodak photoflo for 2 minute then wipe it with squeegee and hang it to dray for 6-8 hours
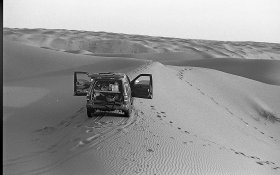
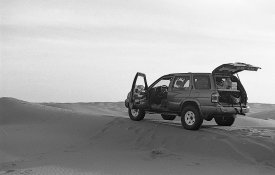
Like what you see guys , I am sharp as a knife when it's come to to the process and timing but I am still facing poor result let me think sometimes to give up and sell what I make a huge investment on
Finally, Attached photos for some of my recently result ( and pay attention that you see a resized image , if i can upload the original size you will see the problem clearly )
Thanks in advance guys
I am facing a continuously problem with my film
Always my result appear harsh+ poor dynamic range+ lot of noisy grain
I develop my own film using decent films and chemicals
Films: hp5+tri-x+panf50+delta100+delta400 (all both 35mm and 120 size)
Chemicals: developer: DD-x + ilfosol3 + Rodinal
Stop bath: ilford stop bath
Fixer : ilford rapid fixer
Kodak photoflo
Scanner: Epson v600 with original mount and software(I turned off all the extra setting like dust removal and unmask sharp ,,,etc.)
My way to develop films:
- getting the official information about developing time from the manufacture chart
-make fresh developer for each time
- For stop bath and fixer I re-use them , 1ltr= 13-15 rolls
- I am keeping the temp for developer accurate at 20C , for the stop bath and fixer within -2/+2c
After finishing my work I keep the stop bath and fixer in blower bottle with no air and save it in refrigerator
Developing method :
Pour the developer and just agitation without covering the tank (with the stick only) 1 minute continuously for first minute then 10 sec begin of each minute
Stop bath: 1 minute, agitate for first 30 sec then Pour it back on the bottle
On this stage and after I finish the stop bath I just make single wash with tap water
Fixer: 5 minute, agitate for 1 minute then 10 second every begin of minute then pure the fixer back to the bottle
Final wash for 10 minute with tap water within +2/-2c proses temp and after 10 minute I wash the film with distilled water 2 times and put some drop from Kodak photoflo for 2 minute then wipe it with squeegee and hang it to dray for 6-8 hours
Like what you see guys , I am sharp as a knife when it's come to to the process and timing but I am still facing poor result let me think sometimes to give up and sell what I make a huge investment on
Finally, Attached photos for some of my recently result ( and pay attention that you see a resized image , if i can upload the original size you will see the problem clearly )
Thanks in advance guys
Attachments


Last edited:

 ?
?


 !
! ..?
..? ...
... ! A picture from forrest at rainy days is the same - as with (wrong) information
  from a grainy negative.
 ) !
) !