Contamination?

Flow of thoughts

D
Flow of thoughts

  • 2
  • 0
  • 40
Rouse st

A
Rouse st

  • 5
  • 2
  • 57
Plague

D
Plague

  • 0
  • 0
  • 48
Vinsey

A
Vinsey

  • 3
  • 1
  • 82

Recent Classifieds

Forum statistics

Threads
199,159
Messages
2,787,243
Members
99,827
Latest member
HKlongzzgg
Recent bookmarks
0
Joined
May 3, 2011
Messages
57
Location
Houston, TX
Format
Medium Format
In the last 36 hours I completed my first darkroom build, and subsequently spent several hours inside it making prints. For the most part the results were quite pleasing. One of my prints has some strangeness going on in the bottom right of the frame, and I'm not sure what caused it. I'm thinking perhaps I didn't clean the chemicals off of my hands very well before I grabbed a new sheet out of the box and got something on the emulsion before I made my exposure, but I've no way to be sure of that. If someone could speculate what the issue might be, and how to resolve it, that would be great.


Rick A

Subscriber
Joined
Mar 31, 2009
Messages
9,951
Location
Laurel Highlands
Format
8x10 Format
Not cleaning your hands good enough is always a problem. I personally use tongs and keep my fingers out of the soup. I use three different tongs, one for developer only, stop only, and fix only. On prints larger than 8x10 I use gloves to handle paper in the chems, and remove them to handle clean paper. I keep a box of vinyl food handling gloves on stock for that. Exposing your skin to chems could lead to dermatitis, and constant washing leaves mine chapped, especially in winter.
 

Marco B

Subscriber
Joined
Jan 13, 2005
Messages
2,736
Location
The Netherla
Format
Multi Format
One of my prints has some strangeness going on in the bottom right of the frame, and I'm not sure what caused it.
...
If someone could speculate what the issue might be, and how to resolve it, that would be great.

Looking at the low contrast of the resultant print, with no real black in it, I am pretty sure the stains are actually caused by incomplete development. If you pull the print to early (e.g. less than about 1-1 1/2 minute with RC, and 2 to 2 1/2 for FB paper), there is a big risk of such a result, as the developer dripping from the print tong that you use to remove the print, will continue to add "fresh" developer to the print at the edge you pull it. This will cause darker flow patterns at that corner, as more complete development takes place.

So, always keep the print in the developer long enough to have full development, per the recommended times on the bottles you bought.

Similar issues can happen with almost exhausted developer, and is to me a sign I badly need to change my developer.

Do also make sure you keep your hands clean. If in any doubt you had contact with any of the liquids, wash them before taking out the next fresh paper sheet from its box.
 
OP
OP
Joined
May 3, 2011
Messages
57
Location
Houston, TX
Format
Medium Format
The actual print is far closer to black than the resulting scan, but your theory certainly makes sense. I may have pulled the print out of the developer before it finished. At the moment I'm using a metronome app on my phone for timing (I'll have a real timer soon) and almost certainly wasn't keeping very good track of the clicks before I pulled it.

I'll be going back into the darkroom when I finish making this pizza dough, and trying to print this again without artifacts from me screwing the process up! To say I'm a total newbie at the whole darkroom thing would be an understatement. Last night was the second time I'd ever been in a darkroom.
 

MattKing

Moderator
Moderator
Joined
Apr 24, 2005
Messages
53,223
Location
Delta, BC Canada
Format
Medium Format
An inexpensive battery powered kitchen clock with a sweep second timer makes an easy to acquire and use process timer. Just make sure to get one with clear numerals and a black (not red) sweep second hand.

To reinforce your discipline, I'd suggest that much of the development time be spent with the image facing down, not up!
 

RalphLambrecht

Subscriber
Joined
Sep 19, 2003
Messages
14,660
Location
K,Germany
Format
Medium Format
The actual print is far closer to black than the resulting scan, but your theory certainly makes sense. I may have pulled the print out of the developer before it finished. At the moment I'm using a metronome app on my phone for timing (I'll have a real timer soon) and almost certainly wasn't keeping very good track of the clicks before I pulled it.

I'll be going back into the darkroom when I finish making this pizza dough, and trying to print this again without artifacts from me screwing the process up! To say I'm a total newbie at the whole darkroom thing would be an understatement. Last night was the second time I'd ever been in a darkroom.


How long is your development time?
 

winger

Subscriber
Joined
Jan 13, 2005
Messages
3,975
Location
southwest PA
Format
Multi Format
An inexpensive battery powered kitchen clock with a sweep second timer makes an easy to acquire and use process timer. Just make sure to get one with clear numerals and a black (not red) sweep second hand.

To reinforce your discipline, I'd suggest that much of the development time be spent with the image facing down, not up!

I use a digital kitchen timer with an LCD screen. It isn't always easy to read (needs a little light), but it won't fog my paper. +1 for face down (though I do watch some things just 'cause it's still cool).
Keep in mind that it could be chemicals on your fingers, too, and I second the tongs.
 

Rick A

Subscriber
Joined
Mar 31, 2009
Messages
9,951
Location
Laurel Highlands
Format
8x10 Format
I use cheap digital count down timers from Dollar Tree($1.00 ea). I have one for developing and one for fixing. I preset the times I want for each procedure, then hit the start button, then they beep when they get to zero. These are very convenient.
 
OP
OP
Joined
May 3, 2011
Messages
57
Location
Houston, TX
Format
Medium Format
I use cheap digital count down timers from Dollar Tree($1.00 ea). I have one for developing and one for fixing. I preset the times I want for each procedure, then hit the start button, then they beep when they get to zero. These are very convenient.

I've got something similar for my film development. It's got a temp probe too. I should grab a few more for the paper dev.
 

RalphLambrecht

Subscriber
Joined
Sep 19, 2003
Messages
14,660
Location
K,Germany
Format
Medium Format
A minute.

Anthony

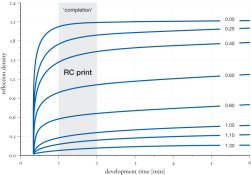
Development will not necessarily reach Dmax after just one minute (see attached graph). Try to double your development time to 120 s, including the drop-off time, to get consistency and full blacks.
 

Attachments

  • FactorialDev1.jpg
    FactorialDev1.jpg
    61.8 KB · Views: 98

ozphoto

Subscriber
Joined
Apr 2, 2006
Messages
1,918
Location
Adelaide, SA, Australia
Format
Multi Format
I agree with Ralph - I develop for 2 mins and consistently get nice deep blacks with my developer of choice.

Note if your developer is on the cold side, you'll need longer to achieve the same. My processing temp is 68F/20C, +/-1C. (Sorry don't know that figure in F.:blink:)
 
OP
OP
Joined
May 3, 2011
Messages
57
Location
Houston, TX
Format
Medium Format
Anthony

Development will not necessarily reach Dmax after just one minute (see attached graph). Try to double your development time to 120 s, including the drop-off time, to get consistency and full blacks.

Thanks, I was just going off what the little sheet of paper in the paper box said. That graph is very useful. My inner engineering student likes tables and graphs. I will extend my time in the developer and see where that takes me.
 
OP
OP
Joined
May 3, 2011
Messages
57
Location
Houston, TX
Format
Medium Format
Initially I stuck to the same exposure time/aperture and the only change was my development time, that eliminated the streaking in the corner and made the darks notably darker but it still wasn't quite black. I ended up having to increase exposure a bit to get to pure black, but that obviously brought the highlights down as well. I would like a bit more range, so I'll probably be printing this again once I have the enlarging lamp automated so I can dodge my face a bit.
 

Marco B

Subscriber
Joined
Jan 13, 2005
Messages
2,736
Location
The Netherla
Format
Multi Format
I ended up having to increase exposure a bit to get to pure black, but that obviously brought the highlights down as well. I would like a bit more range, so I'll probably be printing this again once I have the enlarging lamp automated so I can dodge my face a bit.

Instead of trying to dodge, you should first try increasing your contrast by using contrast filters.

Contrast filters come in half grades, going from 0 (or 00) = softest to 5 = hardest contrast and 2 = about "standard" contrast with a normally developed film. Do you have them?

If you have a condenser enlarger, there should be a small filter drawer where you can insert them. Ilford sells appropriate Multigrade filters for this purpose. If you don't use filters, the standard lamp usually gives about a standard contrast grade of 2. The only way to change this single fixed value is to use filters with your condenser head..

For color or B&W multigrade heads, you need to change the settings of the build in filters either using the CMY dials (color head), or settings on the controller of the B&W multigrade head. Just use a filter setting with a harder contrast grade (so above 2), and see what results you get.
 
OP
OP
Joined
May 3, 2011
Messages
57
Location
Houston, TX
Format
Medium Format
I do have sets of contrast filters, but they're at least a decade old and I'm not sure they're terribly useful anymore. Though I have no idea what they are supposed to look like there are two sets (both Ilford Multigrade) in two different sizes and the coloration of these filters is nowhere near the same for the same number in either set. Should the filters at least be a single solid color from edge to edge, because several of these seem to graduate to clear as they go out from the center. They spent a long time in a central Texas outdoor storage unit, and while I have no idea what they're supposed to look like I suspect that wasn't kind to them.
 

Marco B

Subscriber
Joined
Jan 13, 2005
Messages
2,736
Location
The Netherla
Format
Multi Format
They should be some pinky color for Ilford Multigrade filters, as you suspected as a single solid color across the filter surface. Each grade has a different color, going from very light to dark for grades 0 to 5.

Silverprint has two versions for sale. One set for below the lens if you don't have a suitable filter drawer, and one set of "normal" sheet style filters for insertion in a filter drawer. You most likely need the latter:

http://www.silverprint.co.uk/ProductByGroup.asp?PrGrp=1089

You definitely should buy a set, you can't properly work without them on modern Multigrade papers. Once you have them, you will be amazed what you can do to change contrast of these modern Multigrade papers, it's very effective.
 
Last edited by a moderator:

RalphLambrecht

Subscriber
Joined
Sep 19, 2003
Messages
14,660
Location
K,Germany
Format
Medium Format
Marco is right. You may need more contrast. I'm an advocate of finding the right exposure for the highlights and then finding the contrast for the shadows. Try your filters, they are pretty resilient. Mine are 30 years old (stored in the dark at 70F) and work just fine.
 
OP
OP
Joined
May 3, 2011
Messages
57
Location
Houston, TX
Format
Medium Format
These are what I have, they allegedly spent the last 10 years in a storage unit in Brownwood, TX where the temperature is prone to swinging from below freezing to above 80F in a single day (and summers break 100F with ease).

Dead Link Removed
Dead Link Removed by Anthony J. Martinez, on Flickr

#1 and #2 are very slightly different shades of yellow. #3 is a very light grey, #4 is purple

this is #5
Dead Link Removed
Dead Link Removed by Anthony J. Martinez, on Flickr

this is #6
Dead Link Removed
Dead Link Removed by Anthony J. Martinez, on Flickr

#7 is dark purple.

Use them, or just buy new ones?
 

Marco B

Subscriber
Joined
Jan 13, 2005
Messages
2,736
Location
The Netherla
Format
Multi Format
WILCO. Thanks again for all the advice.

"WILCO", that's one piece of (internet) jargon I didn't know yet, but yes, do comply, as, as Ralph said, these filters are completely done.

Once you have them, start experimenting with them to get some feeling of the impact on paper contrast. You will see huge differences. Post an updated photo once you have some final result :wink:
 
OP
OP
Joined
May 3, 2011
Messages
57
Location
Houston, TX
Format
Medium Format
It's really military jargon, my first name used to be Sergeant and I spent more than a little bit of time acknowledging orders over the radio. Old habits die hard I guess. Tomorrow I'll head into town and get some contrast filters and give it another go!
 
Photrio.com contains affiliate links to products. We may receive a commission for purchases made through these links.
To read our full affiliate disclosure statement please click Here.

PHOTRIO PARTNERS EQUALLY FUNDING OUR COMMUNITY:


Ilford ADOX Freestyle Photographic Stearman Press Weldon Color Lab Blue Moon Camera & Machine
Top Bottom