• Welcome to Photrio!
    Registration is fast and free. Join today to unlock search, see fewer ads, and access all forum features.
    Click here to sign up

Contact frame

Flooded woodland

Flooded woodland

  • 6
  • 0
  • 52
Babylon

D
Babylon

  • 2
  • 1
  • 57

Recent Classifieds

Forum statistics

Threads
202,836
Messages
2,846,230
Members
101,557
Latest member
IshKabibble
Recent bookmarks
0

VinceInMT

Subscriber
Allowing Ads
Joined
Nov 14, 2017
Messages
1,951
Location
Montana, USA
Format
Multi Format
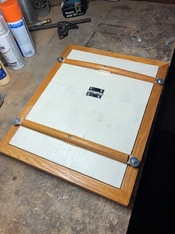
I’ve been wanting a contact printing frame since I got into cyanotypes a bit ago and hadn’t gotten around to it until last week. I wanted to build this using only scrap that I had on hand and I was able to do just that except for 2 of the 4 fender washers I used and the clear finish I shot the frame with. And those washers, they are 1”, the size of a quarter, were 25 cents each. I should have just used a couple quarters but I guess I wasn’t paying for the whole washer, just the hole.

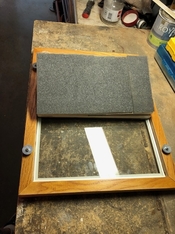
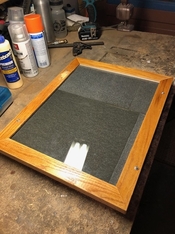
The frame wood came from some glider chairs we got rid of and I’d knocked them down and kept the frames since it was nice, solid oak. I had to patch a few spots where dowels had been. The plywood back came from my scrap pile and the rest of the hardware came from my junk box. The glass was a piece I’d had in my darkroom for a while. The foam was from some packaging I had laying around.
 

Attachments

  • IMG_6466.jpeg
    IMG_6466.jpeg
    201.2 KB · Views: 97
  • IMG_6467.jpeg
    IMG_6467.jpeg
    224.8 KB · Views: 100
  • IMG_6468.jpeg
    IMG_6468.jpeg
    222.3 KB · Views: 86
Very nice! I have built a similar frame with a split backer. However I am struggling with makeshift cross pieces to provide pressure. I see how your cross peices are captured by the washers, however how do you remove the cross peices? Just wondering if I could do the same with mine. Thanks
Dave
 
Very nice! I have built a similar frame with a split backer. However I am struggling with makeshift cross pieces to provide pressure. I see how your cross peices are captured by the washers, however how do you remove the cross peices? Just wondering if I could do the same with mine. Thanks
Dave

Those cross pieces are oak and they bend just enough. I press on them and rotate/pivot the piece away from the washers. They have a screw in the middle that keeps them attached to the backer.
 
However I am struggling with makeshift cross pieces to provide pressure.

There are many ways to approach that; one particularly quick & dirty, and surprisingly effective way is this one:
1688847033570.png

The wedges I took from a laminate flooring kit; they're used as spacers between the laminate boards and the wall. I figured I could 'borrow' two from the flooring kit.
 
Since I do not have a workshop or the tools, I purchased one.
 
Those cross pieces are oak and they bend just enough. I press on them and rotate/pivot the piece away from the washers. They have a screw in the middle that keeps them attached to the backer.

Vince,

Nice work. If I may offer an unsolicited piece of advice, I’d recommend that you swing those arms out of place to a “neutral” position when you aren’t actively in a print session. If you keep the arms locked into place, applying pressure to the glass continuously while not in use, the wood in the arms can eventually start to creep and lose its elasticity, which will reduce the pressure applied to the glass in future print sessions (although this problem may not manifest itself for quite some time).

All I make are contact prints, and I follow this self-imposed rule religiously. Enjoy your new frame!
 
Those cross pieces are oak and they bend just enough. I press on them and rotate/pivot the piece away from the washers. They have a screw in the middle that keeps them attached to the backer.

Ahhh I see, so you push down on the ends and slide the under the washers. Essentially a wooden version of the metal leaf springs on some frames...thanks I may try that.
 
Vince,

Nice work. If I may offer an unsolicited piece of advice, I’d recommend that you swing those arms out of place to a “neutral” position when you aren’t actively in a print session. If you keep the arms locked into place, applying pressure to the glass continuously while not in use, the wood in the arms can eventually start to creep and lose its elasticity, which will reduce the pressure applied to the glass in future print sessions (although this problem may not manifest itself for quite some time).

All I make are contact prints, and I follow this self-imposed rule religiously. Enjoy your new frame!

Thanks, will do. The upside is that the design is adjustable by how many washers I put under the fender washers, not to mention that after cutting down those chair frames I have quite a bit of that arm material left over.
 
Ahhh I see, so you push down on the ends and slide the under the washers. Essentially a wooden version of the metal leaf springs on some frames...thanks I may try that.

Yes, that’s it. I saw a guy online who did this with maple. I figured it would work well with oak.
 
Photrio.com contains affiliate links to products. We may receive a commission for purchases made through these links.
To read our full affiliate disclosure statement please click Here.

PHOTRIO PARTNERS EQUALLY FUNDING OUR COMMUNITY:


Ilford ADOX Freestyle Photographic Stearman Press Weldon Color Lab Blue Moon Camera & Machine
Top Bottom