Read up on color temperature and mired (micro reciprocal degree) adjustments. This will help you understand what you're trying to do, and to learn how to calculate adjustment customized to fit your needs.
You need to either convert the color temperature of the light falling on the subject by putting gel filters on the photofloods, or to filter at the camera lens to adjust the light getting to the film.
For the photofloods, you could go to a CTB filter, which is a blue color temperature adjustment filter. A full CTB converts a 3200K tungsten light source to about 5500-5700K for daylight film. There are also 3/4, 1/2, 1/4 and 1/8 CTB filters available for less agressive adjustments. (CTO filters, in orange, or CTS filters, in straw colors, convert in the other direction.) These gel filters are heat resistant and available for under $7 in 20x24 inch sheets, the most common brands being Lee and Rosco. The web sites for Lee and Rosco will have information on how to use the CTB/CTO/CTS filters, and all the major suppliers will normally have these common filters in stock. This is likely the most efficient, adjustable, and inexpensive route to take outside of using software that you already own.
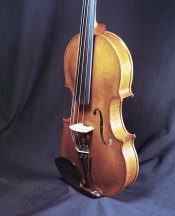
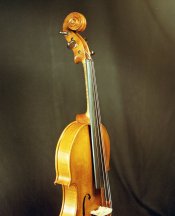
For your camera lens, the suggested 80B would be the correct filter for shooting daylight film under 3200K tungsten lights. An 80A would be slightly less correction, and you might find that preferable because it won't turn the wood as cold looking.
Only adjust the light source, or at the camera lens, not both, unless using partial correction for each, totaling to the correct overall adjustment.
As you can see, your scanning software or image editing software is trying to do its own color correction, which is the reason your posted image colors don't match. That's a separate issue in the digital domain, which we don't really talk about here. However, a color standard target in a test shot will allow you to correct on a frame with the color standard in it, then save and apply those corrections to another frame without the standard included. Good standards would be something like a MacBeth Color Checker (now X-rite), an X-rite Passport color checker (
http://www.xrite.com/home.aspx), something like a Kodak Q-13 step wedge and color target, or a card with good clean white, gray, and black patches on it, such as one of the WhiBal products (or a home brew equivalent) or some of the Photoflex or Westcott flexible targets.
Software can correct color temperature across the range of densities, despite what others might tell you. It just needs to be done properly, and black/gray/white patches in a test target will help with that. I highly recommend the X-rite Passport Color Checker, as it can be used for traditional printing, digital editing, and has patches for a slight warming effect in one of the rows, which can be used to lend a bit of warmth to things like skin and your instruments. Several image editing programs will also allow you to place a grid over the X-rite Color Checkers (all versions) and produce a more comprehensive and accurate color adjustment profile. The Passport version includes software for this adjustment.
Lee