frobozz
Subscriber
My motor was pretty gummed up and squeaky, and I'm pretty mechanically inclined, so I figured what the heck. Even though there is no information at all about these things that I can find on the internet, I'm going to tear into this thing. But I took pictures along the way so now there will be information on the internet, next time someone goes looking!
First thing to do is remove the knob and its matching knurled plate and spring, from the top of the drum. It just unscrews in the normal direction. Next up, remove the single setscrew that holds the drum shaft to the motor. To do this you need to spin the drum that is now freewheeling until the film latch is on top, which leave the big gap at the bottom to see the setscrew through. Then run the motor until you can see the setscrew and stop it. This should be your view at the bottom of the drum:

Carefully unscrew the setscrew. It may drop into the drum. Either retrieve it now, or remember to get it later when it's easier with more stuff out of the way. You have to completely remove it, not just loosen it, because it acts by putting a little pin on its end down into a hole in the shaft. Now you should be able to just pull the rod out from the top end where the knob was. Mine was a little stuck because the hole in the shaft was a bit mushroomed out from where the pin had pressed against it. Gently with pliers, or maybe by screwing the knob back on, or somehow you should be able to slowly twist and pull it out. Before reinstalling later, lightly file off any mushrooming around the hole, then it goes right in easily.
Next run the motor all the way down - this will be important later, when it would be much harder to do! Then turn the on/off switch about halfway, which will let you get to a little pin that is shoved through the shaft of the switch as seen here:

I used small needlenose pliers to shove it from the pointy end (on the left in the above picture) partway out of its hole (towards the right in the above picture) by squeezing on the pointy end with one side of the pliers, and the shaft with the other side of the pliers, until the pointy end is flush with the hole. Then use the pliers to grasp the other end which is now standing above the hole, and gently yank it out of the hole. Then you should be able to rotate the switch without rotating the internal lever that actuates the slit shutter, which should allow you to pull it out from the side of the camera (towards the bottom in the above picture.) I pried gently on the plate for the switch, and then gently pried between the halves of the shaft as it came apart. It's pretty tight.
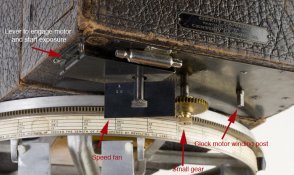
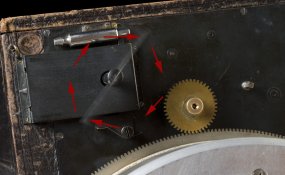
Next you need to remove the shutter speed lever screw, and the 2 screws that hold on its surrounding plate, as seen here:

The plate will just gently pry out, and then you can grasp the shaft with some pliers and pull it out too, separating its gear from the speed limiting pawl thingy.
Now remove the 12 screws holding the motor into the body of the camera, as seen here:

Now you should be able to pull the whole motor out of the camera body. The slot shutter lever will slide off of the shutter pin, the pawl thingy may drop out, but it should all be out in your hands now. Careful, it's heavy!
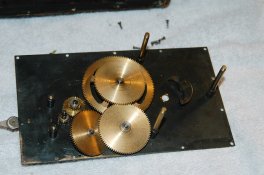
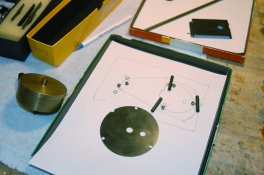
Some pictures of the motor (mine had some corrosion spots on the main plates):


More disassembly pictures and instructions in the following posts..
Duncan
First thing to do is remove the knob and its matching knurled plate and spring, from the top of the drum. It just unscrews in the normal direction. Next up, remove the single setscrew that holds the drum shaft to the motor. To do this you need to spin the drum that is now freewheeling until the film latch is on top, which leave the big gap at the bottom to see the setscrew through. Then run the motor until you can see the setscrew and stop it. This should be your view at the bottom of the drum:

Carefully unscrew the setscrew. It may drop into the drum. Either retrieve it now, or remember to get it later when it's easier with more stuff out of the way. You have to completely remove it, not just loosen it, because it acts by putting a little pin on its end down into a hole in the shaft. Now you should be able to just pull the rod out from the top end where the knob was. Mine was a little stuck because the hole in the shaft was a bit mushroomed out from where the pin had pressed against it. Gently with pliers, or maybe by screwing the knob back on, or somehow you should be able to slowly twist and pull it out. Before reinstalling later, lightly file off any mushrooming around the hole, then it goes right in easily.
Next run the motor all the way down - this will be important later, when it would be much harder to do! Then turn the on/off switch about halfway, which will let you get to a little pin that is shoved through the shaft of the switch as seen here:

I used small needlenose pliers to shove it from the pointy end (on the left in the above picture) partway out of its hole (towards the right in the above picture) by squeezing on the pointy end with one side of the pliers, and the shaft with the other side of the pliers, until the pointy end is flush with the hole. Then use the pliers to grasp the other end which is now standing above the hole, and gently yank it out of the hole. Then you should be able to rotate the switch without rotating the internal lever that actuates the slit shutter, which should allow you to pull it out from the side of the camera (towards the bottom in the above picture.) I pried gently on the plate for the switch, and then gently pried between the halves of the shaft as it came apart. It's pretty tight.
Next you need to remove the shutter speed lever screw, and the 2 screws that hold on its surrounding plate, as seen here:

The plate will just gently pry out, and then you can grasp the shaft with some pliers and pull it out too, separating its gear from the speed limiting pawl thingy.
Now remove the 12 screws holding the motor into the body of the camera, as seen here:

Now you should be able to pull the whole motor out of the camera body. The slot shutter lever will slide off of the shutter pin, the pawl thingy may drop out, but it should all be out in your hands now. Careful, it's heavy!
Some pictures of the motor (mine had some corrosion spots on the main plates):


More disassembly pictures and instructions in the following posts..
Duncan


