No rubbers on my lens.. Maybe you've got the other version that is f/3.5-5.6?
No, i am talking about the 35-105/3.5 fixed aperture Canon FD deluxe killer sharpness fantastic super duper zoom which back in the times showed how far advanced Canon was in the zoom technique, made specifically for pissing off Nikon. Also, corrected for chromatic abberrations specifically for taking pictures of the beautiful iceskapes of Finland so white ice correctly renders as white (and not as violet or green.)
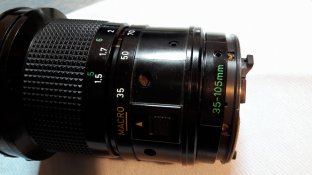
Antti, fellow Canon FD shooter, the rubber striped ring that covers the zoom ring is removable. You can pry it off by putting a knife or something below it. NOW, for the repair you are attempting, i think it is not necessary to do. Or is it? Anyways, when you remove that rubber, you will see there are three or four tiny screws which couple the zooming ring with the inner zooming barrel. Removing them lets you remove the ring.
They told me that probably there are some disks or rings around the aperture unit that have gone off from their correct position and possibly some spring missing.
Seems they don't know about canon FD lenses.
You can do it, go dissasemble it yourself. It's not THAT complex. Just do not remove the two zooming groups (the ones who rock back and forth when you move the zooming ring.) They are not necessary to remove, for the repair you are attempting.
Now, how should you proceed with this lens? My suggestion is the following:
0. Place the lens facing down (lens mount up)
1. Remove the three tiny screws at the side of the lens mount, which hold the "chrome" part of the lens mount.
2. Remove chrome part from the lens mount
3. Remove the rotating part of the lens mount by simply pulling.
4. You will see that there are three or four relatively big screws, that hold the rest of the lens mount. Remove carefully holding the aperture ring in place.
5. Invert the lens while holding the aperture ring in place.
6. Remove the aperture ring by pulling it down. This makes sure the tiny lever spring that couples with the button next to the "A" setting on the aperture ring is held in place and will save you time.
7. You can place again the lens facing down if you want.
8. Now my memory fades here. If you see an obvious way to remove the ring that sits above the aperture ring and says "35-105" then remove it. Otherwise:
9. Remove rubber from zooming ring
10. Remove the three (or four?) tiny screws that couple the zooming ring with the inner zooming barrel.
11. Remove the zooming ring (pull it towards the lens mount side and slide it off)
12. Now at this point in time three or four chromed screws should be visible, remove them to be able to separate the assembly at precisely that joint.
13. At this point in time you should be able to see the levers from the lens mount side that should connect with the lens' aperture assembly levers. And you will be able to figure out how to make them work again.
TIP 1: Before attempting step 3, take a long look at how this part connects with the rest of the lens, so you have an easier time reassembling it later.
TIP 2: Go get a FD 50/1.8 (bayonet mount version) and disassemble it from the mount. The disassembly steps for the mount are almost identical, and the aperture assembly should be identical.
TIP 3: The aperture assembly on the lens (the assembly that actually holds the aperture blades) has a basically two levers:
lever A - lever that sets the aperture value (this is a lever that is part of a cam, let's call it "cam A")
lever B - lever that stops down / opens up the diaphragm.
Usually, on practically ALL "new FD" lenses, lever A can be moved (by the repairman) beyond its working range and then it will "locked" or "parked" on a value that is always minimum aperture (f22 or f32). To be able to "unlock" it, just take a look and you will see that there is a plastic pin that rides on "cam A". This pin is the pin that actually moves the diaphragm. It will be OBVIOUS that you need to raise this pin and move "lever A" so it unlocks.
TIP 4: Tip 3 was so obvious you can just ignore it, you'll figure it out by examining.
TIP 5: Another obvious tip. At one point in your steps you will find shim rings, they set the correct distance between the lens to the film plane, so don't forget to put them back when reassembling.
Universal tips :
1. Never force anything
2. Force it if you know how it should come out
3. Wash your hands before touching lens elements or getting close to lens elements
4. Make sure you know how the lens mount levers of a Canon FD lens work before
disassembling
5. Canon "new FD" (bayonet) lenses do not need lubrication, save perhaps for the rare cases in which the focus helicoid has "play".
6. Prevent screws from rolling and then falling down the floor by disassembling over a rag or cloth. This is very important, because finding tiny screws on the floor is the WORST part of lens repairing.
7. Lens elements are almost always held by a retaining ring that uses a spanner wrench.
8. When removing a lens element, take it off using masking tape. In this way you'll know which side of the element faces up.


 I hope to find some kind of service manual of the lens. No luck yet though..