Canon Lens Tool

Self portrait.

A
Self portrait.

  • 3
  • 1
  • 68
There there

A
There there

  • 4
  • 0
  • 81
Camel Rock

A
Camel Rock

  • 7
  • 0
  • 174

Recent Classifieds

Forum statistics

Threads
198,973
Messages
2,783,940
Members
99,760
Latest member
Sandcake
Recent bookmarks
0

tmannion87

Member
Joined
Aug 8, 2019
Messages
30
Location
Chicago, IL
Format
35mm
Hi all,

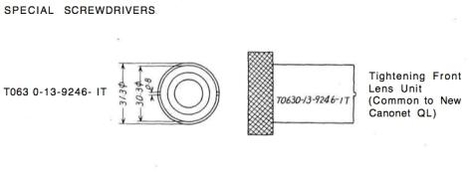
I have a friend who has been looking for Canon tool T063 0-13-9246-IT. He has been searching for the last two years with no luck. We're in the process of trying to get one fabricated, but I thought I would post here in case any one had leads on where to find one. Schematic is attached. Thanks!
 

Attachments

  • Resized_screen-shot-2017-11-09-at-7-02-50-pm_20230104_165219.jpg
    Resized_screen-shot-2017-11-09-at-7-02-50-pm_20230104_165219.jpg
    9.2 KB · Views: 151
OP
OP

tmannion87

Member
Joined
Aug 8, 2019
Messages
30
Location
Chicago, IL
Format
35mm
Front lens ring removal. He had previously been using a traditional spanner wrench but it was causing marring.
 

4season

Member
Joined
Jul 13, 2015
Messages
1,990
Format
Plastic Cameras
Odds of finding it are slim, as it’s decades old, and specialized. But a set of rubber cups from the likes of Japan Hobby Tools can be had at reasonable cost, and it’s more versatile. In instances where the JHT product can’t be used, I’ve 3D-printed tools (PLA resin body, steel or brass pins) to good effect.
 

Dan Daniel

Subscriber
Joined
Jul 4, 2009
Messages
2,895
Location
upstate New York
Format
Medium Format
This is for the Canonet QL-17 and such, right? I've actually seen them listed on Ebay. It actually isn't a complex part to make for a competent machinist. But probably needs to be just that- machined from metal, not 3d-printed. It's a half millimeter thick wall, and embedding pins like 4season mentions strikes me as difficult, but maybe they know how to do it. Here is a home-made one, nicely made-


koraks

Moderator
Moderator
Joined
Nov 29, 2018
Messages
23,073
Location
Europe
Format
Multi Format
embedding pins like 4season mentions strikes me as difficult

In a situation like this, I usually print the part with holes for the pins that are slightly undersized. I then take the pins, heat them and push them into the holes, where they tend to embed themselves firmly. It's pretty straightforward. The assembly won't be as durable as an all-metal, machined part, but it will get the job done and it's easy and quick to make if you happen to have a 3d printer.

The approach shown in the video using plies is extremely tricky, as it takes only a small slip of the hand to snap the pliers closed, severely marring the lens element in the process. I would NOT recommend this approach.
 

Dan Daniel

Subscriber
Joined
Jul 4, 2009
Messages
2,895
Location
upstate New York
Format
Medium Format
In a situation like this, I usually print the part with holes for the pins that are slightly undersized. I then take the pins, heat them and push them into the holes, where they tend to embed themselves firmly. It's pretty straightforward. The assembly won't be as durable as an all-metal, machined part, but it will get the job done and it's easy and quick to make if you happen to have a 3d printer.

The approach shown in the video using plies is extremely tricky, as it takes only a small slip of the hand to snap the pliers closed, severely marring the lens element in the process. I would NOT recommend this approach.
Good to know.

Uh, the pliers were for the initial removal of a retaining ring, and agreed, dangerous. The tool under discussion is at 1:32 ff. There is a groove of 1/2mm width with two notches. Common 3d printers are at what tolerance now, +/- .oo4" (.1mm)? It'd be great if printers are able to make such a tool, with the addition of metal pins as you describe.
 

koraks

Moderator
Moderator
Joined
Nov 29, 2018
Messages
23,073
Location
Europe
Format
Multi Format
The tool under discussion is at 1:32 ff.

Alright, sorry, I was referring to the plier trick used around the 3:10 mark to disassemble the front group.

Common 3d printers are at what tolerance now, +/- .oo4" (.1mm)? It'd be great if printers are able to make such a tool, with the addition of metal pins as you describe.

Something like that, yes. The main issue will be the correct positioning of the pins. The printer plays a role in positioning the holes which will function as a guide for placing the pins. No doubt a bit of jiggling and bending here and there will make for a decent fit. Again, a machined part will be better in many ways, but today, I think more people have access to a 3d printer and are able to use it than machine tools.
 

gone

Member
Joined
Jun 14, 2009
Messages
5,504
Location
gone
Format
Medium Format
The approach shown in the video using plies is extremely tricky, as it takes only a small slip of the hand to snap the pliers closed

I agree, one slip and you could make a deep scratch on the lens element. But this is exactly how I've been doing it for a decade or two and have never scratched a lens. My tool has longer arms (Dollar Tree purchase), two springs that stabilize it and the ends were filed to assure proper seating in the retainer slots or holes. The cool thing is that the tool is adjustable and works on large front retainers as well as the much smaller rear element retainers.

You can always put multiple layers of duct tape on the front element before hand just in case. For more protection, cut a piece of thick plastic to the correct size and place it under the tape. Unlike the guy in the video though, I place the camera on a rubber mat that grips the camera and prevents it from moving or shifting around. You also have to make sure the tool is 100% straight when you apply pressure and twist it counter clockwise.

This method is probably not for everyone, but if you have very steady hands, a good eye and pay attention it works and is safe. When I worked as a machinist and auto tech we would often build a tool for something like this out of metal. Ours were adjustable to fit different size jobs, but needle nose pliers work fine for this sort of simple, light duty work. The pliers in the video above are the wrong type though. They're too short and the arms are built wrong, it could easily slip and close up on you. You want something that's made like this.

0djlwIu.jpg
 
Last edited:

koraks

Moderator
Moderator
Joined
Nov 29, 2018
Messages
23,073
Location
Europe
Format
Multi Format
one slip and you could make a deep scratch on the lens element. But this is exactly how I've been doing it for a decade or two and have never scratched a lens.

While I haven't scratched a lens (yet), I've scratched several components such as front retaining rings this way. All old beater lenses, so no great loss of value to mankind, but it has taught me enough that at least I shouldn't be doing this when lens elements are actually too close by for comfort!
 

Dan Daniel

Subscriber
Joined
Jul 4, 2009
Messages
2,895
Location
upstate New York
Format
Medium Format
Another approach to the spanner wrench issue (other than getting a spanner wrench :smile: ) is a machinist divider. There are adjustable but more stable than pliers. They are not the strongest for rotational force, but you can grab the two legs with pliers (slip joint better than needle nose) or an adjustable wrench to keep the legs from splaying, etc. They come in different sizes.
1673121220990.png
 
Last edited:
Photrio.com contains affiliate links to products. We may receive a commission for purchases made through these links.
To read our full affiliate disclosure statement please click Here.

PHOTRIO PARTNERS EQUALLY FUNDING OUR COMMUNITY:


Ilford ADOX Freestyle Photographic Stearman Press Weldon Color Lab Blue Moon Camera & Machine
Top Bottom