Calibrating digital negatives with BTNS

Texting...

D
Texting...

  • 0
  • 0
  • 5
The Urn does not approve...

D
The Urn does not approve...

  • 3
  • 2
  • 46
35mm in 616 test

A
35mm in 616 test

  • 0
  • 1
  • 69
Smiley

H
Smiley

  • 0
  • 1
  • 47

Recent Classifieds

Forum statistics

Threads
197,482
Messages
2,759,912
Members
99,385
Latest member
z1000
Recent bookmarks
0

jisner

Member
Joined
Sep 16, 2017
Messages
102
Location
Tucson, Arizona
Format
35mm
BTNS is a brand new way of calibrating digital negatives. If you go all the way back to Burkholder, "the father of the digital negative," you will find nothing like it. I found my inspiration for BTNS in the work of Phil Davis. In his 1981 classic Beyond the Zone System, Davis revolutionized silver gelatin darkroom printing by proposing the use of fundamental measurements from sensitometry (how emulsions respond to exposure) and densitometry (how film density controls exposure). Like BTZS, BTNS is based on fundamental measurements, but it has been updated for the hybrid digital/analog darkroom.

A complete BTNS calibration requires only one trip to the darkroom. Any other method, whether Photoshop-based or QTR-based, requires at least four trips. You can do a BTNS calibration in an afternoon. This low calibration overhead encourages experimentation.

Here is a link to Chapter 1 of my book "Calibrating Digital Negatives with BTNS." If you read the chapter and are interested in following up, let me know. I'm always looking for more beta testers, and I'll be happy to give a live demo to anyone who's simply interested in learning more.
 
Last edited:

MattKing

Moderator
Moderator
Joined
Apr 24, 2005
Messages
51,954
Location
Delta, BC Canada
Format
Medium Format
Your link requires access.
 

MattKing

Moderator
Moderator
Joined
Apr 24, 2005
Messages
51,954
Location
Delta, BC Canada
Format
Medium Format
It looks interesting, and I'll probably pass it on to my Digital Negative friends, but I expect the requirement for post 2016 Excel will be a deal breaker for many of them.
By the way, is "BTNS" an acronym, or just a coined label?
 
OP
OP
jisner

jisner

Member
Joined
Sep 16, 2017
Messages
102
Location
Tucson, Arizona
Format
35mm
It requires Excel 2016 or later. The software runs on Mac and Windows.

BTNS is BTZS with the N rotated 90 degrees. It's not an acronym.
 

nmp

Member
Joined
Jan 20, 2005
Messages
1,995
Location
Maryland USA
Format
35mm
Doesn't it also require a UV densitometer which is another tool that the average person (like myself) is unlikely to have or unlikely to purchase considering it could cost over $500 if you can find one used. I do have a spectro for reflective measurements but that is also something most people do not have.

:Niranjan.
 
OP
OP
jisner

jisner

Member
Joined
Sep 16, 2017
Messages
102
Location
Tucson, Arizona
Format
35mm
Yes, BTNS requires a UV densitometer, and you are right that most people don't have one. But consider that BTNS does a complete calibration in one trip to the darkroom, while any other method requires a minimum of four trips. If you are printing with Pt/Pd, you'll save not only time but enough money to quickly justify the cost of the densitometer.
 

nmp

Member
Joined
Jan 20, 2005
Messages
1,995
Location
Maryland USA
Format
35mm
Yes, BTNS requires a UV densitometer, and you are right that most people don't have one. But consider that BTNS does a complete calibration in one trip to the darkroom, while any other method requires a minimum of four trips. If you are printing with Pt/Pd, you'll save not only time but enough money to quickly justify the cost of the densitometer.

Agreed. It would make sense for someone who is doing expensive process like Pt/Pd and doing a lot of variations. However, I am not sure I understand the number of trips to darkroom in the old way vs the BTNS. If I understand it right, please correct me if I am wrong, the one less trip in the latter is the exposure for Dmax calculation. In BTNS you get it out of the Stouffer together with the process profile. For that one has to make sure to overexpose by a few steps in order for the program to see a plateau in the density. And if the process latitude is fairly long (comparable to 21-step Stoffer's 3.3, for example) as in salted paper, then the other end gets stained in which case the paper-white end point can not be arrived at. In that scenario you would have to redo the Stouffer with the correct exposure to open up the highlights. Probably not a big deal for processes such as cyanotype or Pt/Pd which have shorter tonal scale. The other trips in the old process is really if you don't get it right the first time. Perhaps, BTNS is superior in that regard. Theoretically, one print to to get the exposure and the second print at that exposure to get the tones - whether it is ChartThrob or EasyDN or any other suitable template.

A question regarding the densitometer, don't you have to characterize the UV transmission of the Stouffer step wedge in order to match them with the printer numbers - or are you taking the densities provided by Stouffer as is?

Also, it seems to me you need to get the printer profile only once (for a given set of printer parameters) so why not provide a service whereby someone can send in a printed transparency and then get back the profile - in the same fashion as folks get icc profiles for digital printing. May not be your cup of tea. Just a thought...🙂

:Niranjan.
 
Last edited:
OP
OP
jisner

jisner

Member
Joined
Sep 16, 2017
Messages
102
Location
Tucson, Arizona
Format
35mm
Niranjan,
You clearly have a good grasp of the problem. In BTNS, we calibrate our Stouffers with the UV densitometer and store the results in the Step Wedge Calibrator, one of the four BTNS workbooks. For process profiling, we make one trip to the darkroom in which we overexpose three Stouffers on a single sheet of sensitized paper: TP4x5-21, TP4x5-31, and T2120. The T2120 has a maximum density range of 4.00, so it would be unusual to overexpose by so much that you fail to capture the full exposure scale of the process, from EMax to EMin. But if that happened, yes, you would need to make a second trip. From spectro measurements of the three Stouffer prints, we get the process profile and the minimum exposure for maximum black, which BTNS calls the printmaking exposure.

Other methods use various ways of matching negative density range to process exposure scale. Most of the Photoshop-based methods are based on colorization, and require the user to print a color palette to choose the color. That's another trip to the darkroom. This step often requires iteration in which the printer's ink density is increased or decreased. In the QTR methods, we must limit the ink curve. Again, one or more trips to the darkroom. In BTNS, the printer profile gives the UV transmission density for every digital tone from 0 to 255. When a printer profile and process profile are combined, Calibrator simply uses the portion of the printer profile up to the density that matches the process exposure scale.

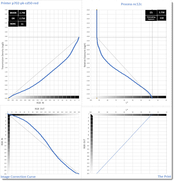
Finally, there's linearization. Other methods require a minimum of one trip to the darkroom to print a calibration target (e.g., a 255-step table). BTNS is based on a mathematical model of tone reproduction, so linearization is simply a computation that runs the model backward from a linear print. The Calibrator displays a graphical model of the TRC (attached). If you really want to understand calibration, this picture says it all.
 

Attachments

  • nc12c TRC.jpg
    nc12c TRC.jpg
    148.4 KB · Views: 113
OP
OP
jisner

jisner

Member
Joined
Sep 16, 2017
Messages
102
Location
Tucson, Arizona
Format
35mm
Also, it seems to me you need to get the printer profile only once (for a given set of printer parameters) so why not provide a service whereby someone can send in a printed transparency and then get back the profile - in the same fashion as folks get icc profiles for digital printing. May not be your cup of tea. Just a thought...🙂

:Niranjan.

I thought about that, but there's a problem: Inkjet prints lose density fairly rapidly. So if a client mails me a printed transparency and I receive it and measure it 72 hours after it was printed, then 72 hours becomes a printer variable which I call the negative drying time (the time between printing and measuring). The same negative drying time must be used for every negative made with this calibration. There's also print drying time, which is a process variable. In any method, not just BTNS, you need to hold drying times constant for a calibration.

I had many "bad" calibrations before I realized that I was being wildly inconsistent with my drying times. The way I know if I a calibration is good is by printing a step table with the calibration results and plotting L* against RGB tone. Calibrator has a worksheet where you can do this, as well as generate ICC profiles for soft proofing. So if you want to check your calibration and optionally create an ICC profile, you need to make a second trip to the darkroom. But it's the same with any other method.
 

nmp

Member
Joined
Jan 20, 2005
Messages
1,995
Location
Maryland USA
Format
35mm
I thought about that, but there's a problem: Inkjet prints lose density fairly rapidly. So if a client mails me a printed transparency and I receive it and measure it 72 hours after it was printed, then 72 hours becomes a printer variable which I call the negative drying time (the time between printing and measuring). The same negative drying time must be used for every negative made with this calibration. There's also print drying time, which is a process variable. In any method, not just BTNS, you need to hold drying times constant for a calibration.

I am not sure I understand why the same drying time is necessary for the transparency as well as the print once they reach their equilibrium allowing for solvent evaporation and pigment consolidation on the media - however long it may be. 72 hours seems to be a little excessive - I normally let it dry overnight and use the negative a next day. If in a hurry, I give it a gentle hair dryer treatment for half a minute. Are you saying the optical property of the negative continues changing significantly long after the initial period? If that was the case, this whole thing will be like shooting at a moving target. Then all of these precise measurements and modeling will be moot. Hopefully I am misunderstanding.

:Niranjan.
 
Last edited:
OP
OP
jisner

jisner

Member
Joined
Sep 16, 2017
Messages
102
Location
Tucson, Arizona
Format
35mm
I am not sure I understand why the same drying time is necessary for the transparency as well as the print once they reach their equilibrium allowing for solvent evaporation and pigment consolidation on the media - however long it may be. 72 hours seems to be a little excessive - I normally let it dry overnight and use the negative a next day. If in a hurry, I give it a gentle hair dryer treatment for half a minute. Are you saying the optical property of the negative continues changing significantly long after the initial period? If that was the case, this whole thing will be like shooting at a moving target. Then all of these precise measurements and modeling will be moot. Hopefully I am misunderstanding.

:Niranjan.

Good point. The negative drying time is only really important when you make a calibrated negative for the purpose of checking a calibration and generating an ICC profile. I typically print a calibrated 51-step negative, print it, and measure the print with a spectro (the print should be linear in L*). If the drying time of the negative used to create the original printer profile dried for 2h, then the negative used to check the calibration must also be allowed to dry for two hours -- no more and no less. If you let it to "dry" for a week before you make the print, it will have lost density and the print you make for checking the calibration will say the calibration did not produce a linear print. And of course the print used to check the calibration must be allowed to dry for the same drying time as the print used to profile the process.

I became aware of the loss-of-density problem in an early version of BTNS, which did process profiling using "custom step wedges." These are true step wedges, having steps linear in uv transmission density. We were able to print them from Photoshop on an inkjet printer using the BTNS software itself. Custom step wedges were a great idea (we thought) because (1) you can make them in any physical dimension (2) they can have any number of steps (3) you can print more than one of them on a single sheet of transparency, and (4) you can save a lot of money by not buying Stouffers. It turned out to be not-such-a-great idea when our calibration checks told us our prints weren't linear. The step wedges were losing density. Even a small loss of density is significant when the step wedge is used as a measuring tool. Like a yardstick that's gradually shrinking, your measurements get farther and farther off. To continue using custom step wedges, we would have had to calibrate them immediately prior to every use. So we started using Stouffers.

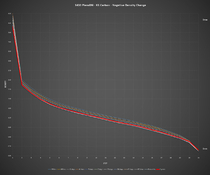
As far as "reaching equilibrium" goes, I am not aware of any point in time when the negative stops losing density. Keith Schreiber once tracked the densities of a step table negative with 21 steps for two years. His results show continuous loss.

Negatives that you use in normal printmaking also lose density, so a print made with a year-old negative will be darker than one that was made a year before. It's why I never save negatives. I re-make them if I want another print.
 

Attachments

  • Keith Schreiber's Negative Density Loss experiment.jpg
    Keith Schreiber's Negative Density Loss experiment.jpg
    117.7 KB · Views: 116

nmp

Member
Joined
Jan 20, 2005
Messages
1,995
Location
Maryland USA
Format
35mm
Good point. The negative drying time is only really important when you make a calibrated negative for the purpose of checking a calibration and generating an ICC profile. I typically print a calibrated 51-step negative, print it, and measure the print with a spectro (the print should be linear in L*). If the drying time of the negative used to create the original printer profile dried for 2h, then the negative used to check the calibration must also be allowed to dry for two hours -- no more and no less. If you let it to "dry" for a week before you make the print, it will have lost density and the print you make for checking the calibration will say the calibration did not produce a linear print. And of course the print used to check the calibration must be allowed to dry for the same drying time as the print used to profile the process.
OK...I am sorry I asked...🙂 Now I have to wonder about one more variable when things don't look right. But seriously though, I can understand the need for consistency when one is doing/checking the calibration but there is no way I can guarantee exact same dwell time between printing the negative and using it to make the alt process print. Then, it would seem that even if the calibration is done correctly, the correction curve will still be an approximation in making of the real print.

I became aware of the loss-of-density problem in an early version of BTNS, which did process profiling using "custom step wedges." These are true step wedges, having steps linear in uv transmission density. We were able to print them from Photoshop on an inkjet printer using the BTNS software itself. Custom step wedges were a great idea (we thought) because (1) you can make them in any physical dimension (2) they can have any number of steps (3) you can print more than one of them on a single sheet of transparency, and (4) you can save a lot of money by not buying Stouffers. It turned out to be not-such-a-great idea when our calibration checks told us our prints weren't linear. The step wedges were losing density. Even a small loss of density is significant when the step wedge is used as a measuring tool. Like a yardstick that's gradually shrinking, your measurements get farther and farther off. To continue using custom step wedges, we would have had to calibrate them immediately prior to every use. So we started using Stouffers.

Regarding the Stouffers, what is the correlation between what you measure with UV and what they provide - I think we discussed this before but I don't remember if we came to any conclusion. Do UV steps more or less follow the visible steps, preserving the 0.7 stop distance between them in the 21-step wedge, for example.


As far as "reaching equilibrium" goes, I am not aware of any point in time when the negative stops losing density. Keith Schreiber once tracked the densities of a step table negative with 21 steps for two years. His results show continuous loss.

Negatives that you use in normal printmaking also lose density, so a print made with a year-old negative will be darker than one that was made a year before. It's why I never save negatives. I re-make them if I want another print.

Nice set of data. Looks like, if I am reading it correctly, it might have stabilized after 60 days or going in the other direction even - perhaps oxidative degradation of the the transparency material (and/or the ink binder) adds some UV absorption to the background. Don't know. It would be interesting if a suitable heat treatment routine can be found to accelerate the initial density change. May be blow-drying the negative isn't such a bad thing to do, after all.

Thanks for taking time to explain these issues in details.


:Niranjan.
 
Last edited:
OP
OP
jisner

jisner

Member
Joined
Sep 16, 2017
Messages
102
Location
Tucson, Arizona
Format
35mm
OK...I am sorry I asked...🙂 Now I have to wonder about one more variable when things don't look right. But seriously though, I can understand the need for consistency when one is doing/checking the calibration but there is no way I can guarantee exact same dwell time between printing the negative and using it to make the alt process print. Then, it would seem that even if the calibration is done correctly, the correction curve will still be an approximation in making of the real print.


Regarding the Stouffers, what is the correlation between what you measure with UV and what they provide - I think we discussed this before but I don't remember if we came to any conclusion. Do UV steps more or less follow the visible steps, preserving the 0.7 stop distance between them in the 21-step wedge, for example.


Nice set of data. Looks like, if I am reading it correctly, it might have stabilized after 60 days or going in the other direction even - perhaps oxidative degradation of the the transparency material (and/or the ink binder) adds some UV absorption to the background. Don't know. It would be interesting if a suitable heat treatment routine can be found to accelerate the initial density change. May be blow-drying the negative isn't such a bad thing to do, after all.

Thanks for taking time to explain these issues in details.


:Niranjan.

You're right. Consistency in drying time is not critical once you've done the calibration and you're making prints. Just don't stray too far from the times used in the calibration.

I attached a screenshot from my Step Wedge Calibrator where I periodically record UV densities of my Stouffers (I have six of them). I always put the "nominal ortho" densities (the ones that Stouffer gives you) in the first column so I can compare. As you can see, the UV densities are somewhat higher and the step size somewhat larger. I have not done any calibrations that actually use the nominal ortho densities, but I'm sure it would be a disaster.

The best thing about BTNS, in my opinion, is that calibration can be done so quickly that you don't hesitate to try things. Thanks to these experiments, you quickly perfect your process. A conventional calibration is so time consuming that the average user does it only once and then keeps everything constant to avoid doing another calibration. If their process is mediocre, they will produce perfectly calibrated mediocre prints. In BTNS, you can also experiment with the decisions you make in process profiling. I found that by extending the toe of the process profile all the way to Base+Fog, it really opens up the highlights. In hindsight it seems obvious, but without BTNS I never would have discovered it.
SWC - nom vs UV for TP4x5-21n.jpg
 

nmp

Member
Joined
Jan 20, 2005
Messages
1,995
Location
Maryland USA
Format
35mm
You're right. Consistency in drying time is not critical once you've done the calibration and you're making prints. Just don't stray too far from the times used in the calibration.

I attached a screenshot from my Step Wedge Calibrator where I periodically record UV densities of my Stouffers (I have six of them). I always put the "nominal ortho" densities (the ones that Stouffer gives you) in the first column so I can compare. As you can see, the UV densities are somewhat higher and the step size somewhat larger. I have not done any calibrations that actually use the nominal ortho densities, but I'm sure it would be a disaster.

The best thing about BTNS, in my opinion, is that calibration can be done so quickly that you don't hesitate to try things. Thanks to these experiments, you quickly perfect your process. A conventional calibration is so time consuming that the average user does it only once and then keeps everything constant to avoid doing another calibration. If their process is mediocre, they will produce perfectly calibrated mediocre prints. In BTNS, you can also experiment with the decisions you make in process profiling. I found that by extending the toe of the process profile all the way to Base+Fog, it really opens up the highlights. In hindsight it seems obvious, but without BTNS I never would have discovered it. View attachment 332469

Thanks for sharing the data.

:Niranjan.
 
Photrio.com contains affiliate links to products. We may receive a commission for purchases made through these links.
To read our full affiliate disclosure statement please click Here.

PHOTRIO PARTNERS EQUALLY FUNDING OUR COMMUNITY:


Ilford ADOX Freestyle Photographic Stearman Press Weldon Color Lab Blue Moon Camera & Machine
Top Bottom