
Hey everyone - I've been working on a DIY f-stop enlarger timer for my home darkroom and recently put together a 10-minute walkthrough video of it in action. I'm sharing it here because I'd genuinely love to hear what the darkroom community thinks. This is not a sales pitch. I'm still very much in the development and feedback stage, and I want to know whether this solves a real problem for other printers, what features matter most to you, what I've missed, and whether a kit or assembled version is something you'd actually want. If you have thoughts - positive, critical, or otherwise - please share them. That kind of honest input is exactly what I'm looking for at this stage.
-
Welcome to Photrio!Registration is fast and free. Join today to unlock search, see fewer ads, and access all forum features.Click here to sign up
You are using an out of date browser. It may not display this or other websites correctly.
You should upgrade or use an alternative browser.
You should upgrade or use an alternative browser.
Built an f-stop enlarger timer and want honest feedback from people who actually print
-
A
- Thread starter johnjones4
- Start date

Recent Classifieds
-
For Sale Kodak Ektachrome Infrared EIR aka Aerochrome
- Started by YoIaMoNwater
-
Want to Buy Old Kodak 101 roll film
- Started by blee1996
-
For Sale Schneider Kreuznach Super Angulon MC 120mm f8
- Started by RoboRepublic
-
Sold JOBO MultiTank 2 2521 4 X 5
- Started by Inayat Noor
-
For Sale Ilford 5X7 Paper Lot
- Started by davela
Forum statistics
- Status
- Not open for further replies.
- Joined
- Oct 31, 2004
- Messages
- 388
- Format
- Multi Format
It seems a nice timer, but I have some questions...
Most of the time, I prefer to do localised test strips, from the same area of the neg, this means I need the full f-stop times and not interval times.
How can these be programmed, stored or even automated?
What do you mean by +1, +2, +3?
I don't believe you mean stops but the number of plus or minus f-stop interval times?
Looks like a very interesting and useful timer. Is this something you plan to sell? FWIW, I print with an Aristo VC coldlight head and I know that not every electronic timer out there can support it. Something about the induction loads, maybe?
I'm still very much in the development and feedback stage
Welcome aboard @johnjones4 !
For transparency's sake, can you indicate whether this will indeed be a commercial product later on? I.e. are you engaging with the community as a kind of focus group/consumer involvement in new product development?
I agree with MARTIE that the +1, +2, etc. is a bit confusing, as it's not clear if you're talking about stops or the chosen interval (1/2 stop, 1/3 stop, etc.).
I like that you can easily fine-tune the time at 1/10th of a second without having to dive into a menu. Printing at 74 seconds rather than at 73.6 seconds won't make much of a difference. Also very practical for dodge and burn if, say, 2/3 of a stop comes to 3.91 seconds, going straight to 4 does makes it simpler.
I don't think 1/8th stops is enough for intervals. With the Stopclock Pro, I find myself always going to 1/12th for fine tuning, and for very long exposure times, it does make a difference.
Looking forward to more detailed videos.
I agree with koraks, though. Would be nice if you could answer this.
For transparency's sake, can you indicate whether this will indeed be a commercial product later on? I.e. are you engaging with the community as a kind of focus group/consumer involvement in new product development?
- Joined
- Feb 9, 2010
- Messages
- 9,584
- Format
- 4x5 Format
@johnjones4 welcome to Photrio.
Sure looks nice for DIY.
I’d prefer a single continuous exposure with metronome beeps when you should move the cover strip.
So in third stops starting at 50 seconds the paper is mostly covered except that sky piece. After 10 seconds a beep tells you to uncover more. Then 8 seconds, beep. 5, beep. By the time you get to 13 seconds remaining it can go quiet.
Are you going to give the device an app? Then for example you could give options and updates.
The one feature I wish my Stopclock Pro had was a physical knob (like you have) to choose the intervals (half stop, quarter stop, etc.). So great to see that. One of the best Stopclock features is that it can store complex sequences of burns and then adjust those up or down if you change the base exposure. I presume yours will do that?
Nice music!
Nice music!
@johnjones4 welcome to Photrio.
Sure looks nice for DIY.
I’d prefer a single continuous exposure with metronome beeps when you should move the cover strip.
So in third stops starting at 50 seconds the paper is mostly covered except that sky piece. After 10 seconds a beep tells you to uncover more. Then 8 seconds, beep. 5, beep. By the time you get to 13 seconds remaining it can go quiet.
Are you going to give the device an app? Then for example you could give options and updates.
Bill, might it be beneficial to you to first sound a 'warning' tone at t-1, then followed by the 'move it' beep at t-0, so that the issue of latency introduced by your own reaction time is minimized?!
OP
OP
It seems a nice timer, but I have some questions...
Most of the time, I prefer to do localised test strips, from the same area of the neg, this means I need the full f-stop times and not interval times.
How can these be programmed, stored or even automated?
What do you mean by +1, +2, +3?
I don't believe you mean stops but the number of plus or minus f-stop interval times?
Thanks!
For your first question: do you mean you physically adjust the enlarger head to do a test strip on a specific area and then back it down to do a full print?
And yes, the +1, 2, 3 aren't full stops - they are intervals of the chosen of 1/8, 1/4, 1/3, or 1/2 stops.
OP
OP
Looks like a very interesting and useful timer. Is this something you plan to sell? FWIW, I print with an Aristo VC coldlight head and I know that not every electronic timer out there can support it. Something about the induction loads, maybe?
I'm considering selling it. Just focusing on feedback to the idea right now. I need to learn more about your setup but I believe this could handle it because I do the actual switching of the main power with this.
OP
OP
Welcome aboard @johnjones4 !
For transparency's sake, can you indicate whether this will indeed be a commercial product later on? I.e. are you engaging with the community as a kind of focus group/consumer involvement in new product development?
All of the the parts to this are already actually open source. Right now I'm just focusing on feedback to see if this is something people might want as some form of product or kit. (So to be clear I'm not sure yet if this will be a commercial product but it might become that.)
OP
OP
@johnjones4 welcome to Photrio.
Sure looks nice for DIY.
I’d prefer a single continuous exposure with metronome beeps when you should move the cover strip.
So in third stops starting at 50 seconds the paper is mostly covered except that sky piece. After 10 seconds a beep tells you to uncover more. Then 8 seconds, beep. 5, beep. By the time you get to 13 seconds remaining it can go quiet.
Are you going to give the device an app? Then for example you could give options and updates.
Interesting idea! I definitely see how that could be preferable.
I am not planning to do an app mainly because I see so many abandoned or barely maintained film apps out there and I don't want to add to that noise. If this becomes something I sell I want to it to work without having to have any sort of network/wireless connection. That just feels like overkill and not something I could reasonably support and still be proud of as a project.
OP
OP
The one feature I wish my Stopclock Pro had was a physical knob (like you have) to choose the intervals (half stop, quarter stop, etc.). So great to see that. One of the best Stopclock features is that it can store complex sequences of burns and then adjust those up or down if you change the base exposure. I presume yours will do that?
Nice music!
Thanks! Yes I hate fiddling with my phone in the darkroom and wanted physical controls.
I have not really gone down the rabbit hole of building out complex dodge and burn functionality because I feel like everyone's process is a little bit different but maybe that's my limited perspective.
OP
OP
Bill, might it be beneficial to you to first sound a 'warning' tone at t-1, then followed by the 'move it' beep at t-0, so that the issue of latency introduced by your own reaction time is minimized?!
Also a very cool idea
I agree with MARTIE that the +1, +2, etc. is a bit confusing, as it's not clear if you're talking about stops or the chosen interval (1/2 stop, 1/3 stop, etc.).
It appears to refer to increments of the step size, so if the step size is 1/2 stop, then +1 is 1/2 stop, +2 is 1 stop, etc.
I don't think 1/8th stops is enough for intervals. With the Stopclock Pro, I find myself always going to 1/12th for fine tuning, and for very long exposure times, it does make a difference.
I agree, I also often use 1/12 of a stop when using the Analyzer Pro for fine tuning purposes. It's subtle, but changes at that level are visible.
As others have said, this looks great for a DIY project - as nice as many of the commercial projects I've seen.
A couple of quick comments while I watch the rest of the video...
1) The +1, +2, etc. LEDs that illuminate while making a test strip are useful, but it's still not 100% obvious to me - in the dark - when you're coming up on the last step or how many steps there are remaining. Maybe it's just me, but when I use my RH Designs Analyzer Pro I often lose track of the number of steps remaining and don't adjust my card optimally to account for the remaining steps. So I either fall short of using the whole paper or run out of space before the strip is done. OK, maybe I need to pay closer attention, but my mind tends to wander while doing mundane darkroom tasks like test strip creation What might be nice is if the LEDs are all illuminated at the start of the test strip process and incrementally extinguished after each step. A quick glance at the remaining illuminated LEDs would tell you how many steps remain to complete the test strip, and you could adjust the card accordingly. Just a thought...
2) A really minor UI suggestion, but when I see a switch or button labelled 'Test' on an electronic device, I think that mode is used to test the device itself. It might be more intuitive if you labelled it 'Strip' instead.
A couple of quick comments while I watch the rest of the video...
1) The +1, +2, etc. LEDs that illuminate while making a test strip are useful, but it's still not 100% obvious to me - in the dark - when you're coming up on the last step or how many steps there are remaining. Maybe it's just me, but when I use my RH Designs Analyzer Pro I often lose track of the number of steps remaining and don't adjust my card optimally to account for the remaining steps. So I either fall short of using the whole paper or run out of space before the strip is done. OK, maybe I need to pay closer attention, but my mind tends to wander while doing mundane darkroom tasks like test strip creation
What might be nice is if the LEDs are all illuminated at the start of the test strip process and incrementally extinguished after each step. A quick glance at the remaining illuminated LEDs would tell you how many steps remain to complete the test strip, and you could adjust the card accordingly. Just a thought...2) A really minor UI suggestion, but when I see a switch or button labelled 'Test' on an electronic device, I think that mode is used to test the device itself. It might be more intuitive if you labelled it 'Strip' instead.
- Joined
- Oct 31, 2004
- Messages
- 388
- Format
- Multi Format
I think showing an example of a localised test strip is easier than trying to explain it in words.Thanks!
For your first question: do you mean you physically adjust the enlarger head to do a test strip on a specific area and then back it down to do a full print?
And yes, the +1, 2, 3 aren't full stops - they are intervals of the chosen of 1/8, 1/4, 1/3, or 1/2 stops.
Here, it's clear to see that measurements to the left and right of the main subject would be pretty pointless.
Therefore, I need to set the complete/full f-stop times into the timer for each exposure and not interval times.
Ideally, I'd like to programme and/or automate this process.
Attachments
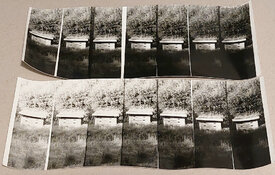
now if you also could have your unit control a step-and-repeat linear motor-controlled paper positioning device, you could choose a specific strip of the frame, and repeat the same frame segment at a specific exposure interval, to have side by side comparisons of identical image segments!
I hated doing traditional test strips that exposed different portions of the frame, when the revealed/hidden part of the frame varied in density across the image!
I hated doing traditional test strips that exposed different portions of the frame, when the revealed/hidden part of the frame varied in density across the image!
Last edited:
- Joined
- Jul 31, 2012
- Messages
- 3,481
- Format
- 35mm RF
I never got into the f-stop printing thing even though I knew Nocon who invented it. I just print by feel.
Your timer is pretty nice. I'd like to have a keypad. Turning a dial to get to a number is a drag. Also a footswitch would be good. Easy to integrate that. Your memory saves are nice and a must in my opinion. The more the merrier on memories.
Your timer is pretty nice. I'd like to have a keypad. Turning a dial to get to a number is a drag. Also a footswitch would be good. Easy to integrate that. Your memory saves are nice and a must in my opinion. The more the merrier on memories.
My primary enlarger has control timer and contrast control. On other enlargers I have VC cold lights, these require compensating timers as the light intensity varies slightly from the beginning to the end of the exposure. I use Metrolux II timers and I have a Stopclock Vario, just haven't used it much yet. As slow as I go I make a lot of test prints going through toning and to dry before I go to the next exposure adjustment.
I like what I see here just not sure it is something I would adapt to (69 years old )
)
I recall something about old dogs,
I like what I see here just not sure it is something I would adapt to (69 years old
)I recall something about old dogs,
Yes, and Welcome to Photrio, I look forward to hearing more about your projects!!
"Also a footswitch would be good."
Yes—a must in my experience!
Yes—a must in my experience!
Klaus Mähring
Member
Footswitch and a metronome!
OP
OP
Footswitch and a metronome!
Yes I'm adding a jack for a footswitch to the design, and it already beeps at one second intervals. Some folks have made some cool suggestions on ways to change that.
- Status
- Not open for further replies.
| Photrio.com contains affiliate links to products. We may receive a commission for purchases made through these links. To read our full affiliate disclosure statement please click Here. |
PHOTRIO PARTNERS EQUALLY FUNDING OUR COMMUNITY:  |