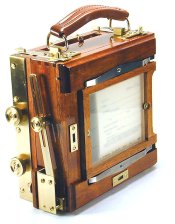
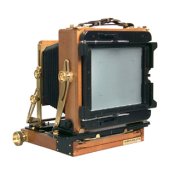
building a back that rotates, or you know, is turnable if not connected always...

3 Columns

A
3 Columns

  • 5
  • 6
  • 54
Couples

A
Couples

  • 4
  • 0
  • 78
Exhibition Card

A
Exhibition Card

  • 5
  • 4
  • 114
Flying Lady

A
Flying Lady

  • 6
  • 2
  • 126

Recent Classifieds

Forum statistics

Threads
199,045
Messages
2,785,310
Members
99,790
Latest member
EBlz568
Recent bookmarks
0

himself

Member
Joined
Apr 8, 2011
Messages
513
Format
Multi Format
mornin'

Just a quick question about building a back that could be turned to shoot landscape and portrait.

I'm not so bold as to try to build one of them rotating types. My plan is to make one that can come apart be turned and then just put back in. I have a basic idea of what I'd like to do and was looking for some ideas on how I can fix the 2 bits together so it's strong and can be done relatively quickly.

My only thought so far is nuts and bolts, so industrial, fiddly, but strong.

Attached is a very crude version of what I have in the brain, so please excuse its inaccuracy, I'll just say that the board will be square and so will the bellows, so there's no need to worry about anything getting the way - so to speak.
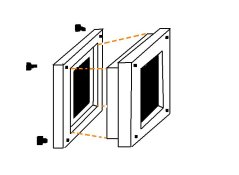
back.jpg
 

jp498

Member
Joined
Oct 5, 2009
Messages
1,525
Location
Owls Head ME
Format
Multi Format
If you get a chance to check out 8x10's and such, many have pins (facing out) on the removable back's edge. The camera has corresponding metal tabs with holes that line up with the pin. At the top, the tabs are slightly flexible so the back "snaps" in. Some have a hook&eye latch for extra safety.
 

Ian Grant

Subscriber
Joined
Aug 2, 2004
Messages
23,271
Location
West Midland
Format
Multi Format
You're attempting to reinvent the wheel the hard way :laugh:

Most LF cameras except Press cameras (Speed/Crown Graphics) have backs that are easy to remove and re-attach rotated 90°, 180°. 270°. It's dead easy !!!

Ian
 

Steve Smith

Member
Joined
May 3, 2006
Messages
9,109
Location
Ryde, Isle o
Format
Medium Format
Do a search for images of Wisner and Wista cameras. Wisners have pins which locate in brass strips at the top and bottom and Wistas have a similar arrangement but with pieces of brass bent to ninety degrees to hold the back in place. The back is stepped so it locates itself into the rear frame.

wisner_r.jpg

wista45dxiii.jpg

The back locates onto the bottom set of clips/brackets then two slides at the top draw it into place either by pulling in on the pins or directly onto the rear plate.


Steve
 
OP
OP

himself

Member
Joined
Apr 8, 2011
Messages
513
Format
Multi Format
so, but how do they do it smarty pants?
I've never used or actually gazed upon a "real" one, only the one I built myself.

And thanks jp, you gave me a good Idea (capital I good)
 

Ian Grant

Subscriber
Joined
Aug 2, 2004
Messages
23,271
Location
West Midland
Format
Multi Format
so, but how do they do it smarty pants?
I've never used or actually gazed upon a "real" one, only the one I built myself.

And thanks jp, you gave me a good Idea (capital I good)

You need to see how backs are fitted, it's so simple but diagrams and even photos don't tell you everything. What I'm saying is the fittings needed are so simple, nothing hi tech.

Ian
 
OP
OP

himself

Member
Joined
Apr 8, 2011
Messages
513
Format
Multi Format
thanks Steve, but I should add that I have very basic materials and tools, so anything that would require really detailed machining of metal is out of the question.
 
OP
OP

himself

Member
Joined
Apr 8, 2011
Messages
513
Format
Multi Format
You need to see how backs are fitted, it's so simple but diagrams and even photos don't tell you everything. What I'm saying is the fittings needed are so simple, nothing hi tech.

Ian

ok, I'll see if I can find one to take a proper look at...
thanks
 

Steve Smith

Member
Joined
May 3, 2006
Messages
9,109
Location
Ryde, Isle o
Format
Medium Format
You could make the brass bits similar to those used by Wista with hand tools. A hacksaw, file and drill would be enough. You would ideally use a vice to put the bends in but you could probably use a Mole grip wrench instead. You don't need any fancy machine tools to make them.


Steve.
 
OP
OP

himself

Member
Joined
Apr 8, 2011
Messages
513
Format
Multi Format
hmm, don't have a vice or mole grip...
I'm gonna have to get the holes drilled anyway because I don't have one of those either
 

Steve Smith

Member
Joined
May 3, 2006
Messages
9,109
Location
Ryde, Isle o
Format
Medium Format
You could also use strong magnets to hold the back in place.

Steve.
 

Diapositivo

Subscriber
Joined
Nov 1, 2009
Messages
3,257
Location
Rome, Italy
Format
35mm
Pardon my ignorance.
If your back has a square shape, why don't make it with a slot above, and a slot on the side?
You don't need rotating the back.
You would insert the sheet film from above for a portrait shot and from the side for a landscape shot.
Fixed "guides" would centre the sheet on the lens.
Considering that the back is square, and the sheet film is rectangular, the guides for portrait orientation would not interfere with landscape orientation and vice versa.
Am I missing anything? (never used a LF camera).
 

polyglot

Member
Joined
Jun 12, 2009
Messages
3,467
Location
South Australia
Format
Medium Format
Without even a drillpress you're going to struggle building a back whether rotating or not. However...

The Toyo back design is made of folded metal so would be hard to directly replicate but the idea is not. Consider the back to be a square wooden thing which rests in a square recess on the rear standard of the camera. You can put the back in in any of 4 orientations and it will sit in exactly the right place as long as something is clamping it in. Toyos use sliding metal latches similar to the ones that typically hold a lensboard onto the front standard. Steve's idea of using magnets to retain the back is excellent though, especially if the non-magnet side was constructed from a 1.5mm sheet of mild steel.

See this photo. While it's the front of the camera, you can see the sliding bit of metal at the top that retains the lensboard - that's how the backs are often clamped in. Think of the back as being like the lensboard - square thing in square hole and clamped in somehow, though of course the back protrudes from its "hole" a lot further so that you can get film holders in. That's all you need to do.
 

ic-racer

Member
Joined
Feb 25, 2007
Messages
16,555
Location
USA
Format
Multi Format
I'd consider making a little light trap with some thin strips of wood (5mm or so) and a corresponding routed groove. That way the two pieces don't have to be pressed together like you might have to do if you used felt. Then you can copy the simple metal clips used on many older view cameras.
 

Ian Grant

Subscriber
Joined
Aug 2, 2004
Messages
23,271
Location
West Midland
Format
Multi Format
Here's a Half plate back, before a new screen was installed. It ists on two brabkets at the bottom then gets held in place by two brackets that swing in/out of place at the top. OK this is old style book form but any back can be fitted in a similar way as long as the base part is square The parts would be simple to male but you'd need to make some small drill holes to attach them.

fc002.jpg


Ian
 
OP
OP

himself

Member
Joined
Apr 8, 2011
Messages
513
Format
Multi Format
thanks for all the tips.

I've now got a good idea of what my plan is.
The camera back won't be made of thick wood, so I don't need a drill press. I'm trying to keep it as light and compact as possible because it will be coming with me on a month long trip in Sri Lanka, so with this in mind I'd like to keep the back side and it's mate a similar size, or the back bigger if either has to be.
 
OP
OP

himself

Member
Joined
Apr 8, 2011
Messages
513
Format
Multi Format
just realised I made my bellows too small to be square, so the back my now not be square, but oblong...
but as long as where they join is square it shouldn't matter right?

edit: scratch all that, of course it's not gonna work...
bloody hell
 
Last edited by a moderator:

Steve Smith

Member
Joined
May 3, 2006
Messages
9,109
Location
Ryde, Isle o
Format
Medium Format
I think it takes a few cameras before you get it right. I have just started my fourth with numbers two and three not yet complete! You think of new ideas and solve problems as you go.

An example of this is the mechanism to rotate the front and back. For ages this was a mystery to me but after spending some time looking at pictures of cameras, mainly Wistas, I realise now how simple the mechanism is and have it drawn up to be included in the current camera.

It was also quite a help to see Ian's Wista a few months ago. If you know anyone near to you who owns a similar camera, try to have a look at it and get the owner to show you all of it's functions/movements.

My advice would be not to worry about getting it all perfect at first, just make a camera which you can use then learn from your mistakes and make a better one.

If you have managed to make a rectangular bellows then make a simple camera without a rotating back. Put a tripod thread on the bottom and on one side and rotate the whole camera instead of just the back. If you want light and compact for travelling, this might help.


Steve.
 
Last edited by a moderator:

jp498

Member
Joined
Oct 5, 2009
Messages
1,525
Location
Owls Head ME
Format
Multi Format
There are so many inexpensive ready-to-use cameras, I wouldn't build one unless it was for a yet unmet need.
 

Steve Smith

Member
Joined
May 3, 2006
Messages
9,109
Location
Ryde, Isle o
Format
Medium Format
But some of us enjoy the building.


Steve.
 
OP
OP

himself

Member
Joined
Apr 8, 2011
Messages
513
Format
Multi Format
Steve's right, it's the building that's a huge part of the fun, besides "inexpensive" is relative, non?

Steve,

yeah I guess the next one will the all singing, all dancing one, this will probably be the smallest view camera ever made.
it's funny because the first bellows I built was too big, so I scaled down - a bit too much I guess.
 
Photrio.com contains affiliate links to products. We may receive a commission for purchases made through these links.
To read our full affiliate disclosure statement please click Here.

PHOTRIO PARTNERS EQUALLY FUNDING OUR COMMUNITY:


Ilford ADOX Freestyle Photographic Stearman Press Weldon Color Lab Blue Moon Camera & Machine
Top Bottom