• Welcome to Photrio!
    Registration is fast and free. Join today to unlock search, see fewer ads, and access all forum features.
    Click here to sign up

Build-your-own mat cutter instructions??

Tree Farm

H
Tree Farm

  • 0
  • 0
  • 27
A long time ago...

A
A long time ago...

  • 0
  • 0
  • 72

Forum statistics

Threads
201,210
Messages
2,820,482
Members
100,589
Latest member
rando
Recent bookmarks
1

Steve Goldstein

Subscriber
Joined
Jul 8, 2007
Messages
1,801
Location
Northeastern US
Format
Multi Format
Some years ago I saw (or received) instructions on building a mat cutter similar to a Logan, but at significant savings. Now that I'd like to do so, of course I can't find the info! I know it's probably not worth my time and I should just buy one, but I've got some perfect scrap board to use as a base...

Does this ring any bells with anyone?

Thx.
 

rexp

Member
Allowing Ads
Joined
Oct 29, 2004
Messages
168
Location
Lincoln, Neb
Format
Med. Format RF
Hello Steve;

Some time ago I purchased the "Compact" cutter made by Logan. It works quite well (at least for me) but with one serious drawback I didn't think of when purchasing it - you are unable to make a cut on a 32" wide piece of mat. This makes it difficult to make that first cut on a 32x40 mat. The solution led to a more versatile tool.

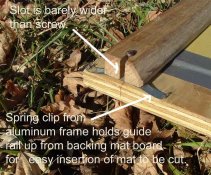
I purchased the Logan "Adapt-a-rule" which is a 44" long extrusion with the lip that the Logan cutters ride on. I found one of those old "laminated on each side" office dividers which I cut to about 36x44. To help understand the following, visualize this board laying flat on a table or other support with this Logan rule thingy laying across the middle of the board in the short direction (about 22" in from each side). I will be calling the "mat cutter" the thing used to slice mat material, not the bevel cutter. Make sure the rule is quite close to a right angle to one edge of the board (which will be the "front" of this thing) and route a 1/4" slot down the middle about 3/16" deep directly under where the mat cutter blade will protrude. On the front edge I attached a lip which sticks above the top surface about 3/4", with roughly a 6" gap in the middle, and put a short adjustable fence on the opposite side. These fences are positioned such that when the Logan rule is pushed against these fences, the cutter will slide directly above the slot in the board. The top fence is adjustable to allow me to precisely set the cut angle to 90 degrees.

Now I can lay a full sheet of mat material on this top, and with it against the "front" lip make a perfectly square cut across the width. Piece of cake. (I can give you instructions to easily square things up).

While this has been a dandy tool for making those initial cuts to a mat, I have also used it to cut more than one window in a mat, which would be a little more tricky on the Logan mat cutter I own. There have been a few large mats (24x36) for which using this table cutter was a breeze. The Logan rule is available in a longer version which if you adjusted some dimensions you could make a cut the "long" way on a full mat.

I suppose my description leaves a few questions, and if you want to see some photos just send me a note.

Last suggestion - make sure the router is pulling the tool TOWARDS the guide fence. I ended up with a little wandering groove on my top which doesn't affect anything, but doesn't look professional. I keep looking for another one of those nerdy office dividers...

good luck
rex
 

Jim Jones

Subscriber
Allowing Ads
Joined
Jan 16, 2006
Messages
3,740
Location
Chillicothe MO
Format
Multi Format
To cut a 32x40" sheet of mat board into halves or quarters, I attached channel aluminum (from a broken storm window) to a long edge of a 24x48" sheet of 1/8" hardboard. On one side of this sheet a strip of hardboard is mounted parallel to the channel aluminum and exactly 20 inches from its outside edge. On the other side of the big sheet another strip is mounted exactly 16" from the same outside edge. To use, this sheet is placed on the mat board with one of the hardboard strips butted against an edge of the mat board. The aluminum channel guides any utillity or mat knife without cutting into the hardboard. The cost of scrap materials for this project was negligible. It requires little storage space. It doesn't require a special mat cutter. It works on any thickness of mat board or foam core. Once the mat board is cut down to a managable size, small units can cut the bevel windows.
 

DWThomas

Subscriber
Joined
Jun 13, 2006
Messages
4,621
Location
SE Pennsylvania
Format
Multi Format
In the early 90s I took a one day workshop on fine art framing with an artist who had been curator of a private print collection that is now in the Smithsonian. He claimed that a tour through the non-public areas at places like the Philadelphia Museum of Art would disclose tables equipped with T-squares and one of those palm-sized Dexter mat cutters!

That's what I use, but I suspect practice helps make perfect, as there's a bit of a trick to lining up the start of the cut. I have recently splurged on one of those self-healing mats to put under things -- works better than chip board.

DaveT
 

Jim Jones

Subscriber
Allowing Ads
Joined
Jan 16, 2006
Messages
3,740
Location
Chillicothe MO
Format
Multi Format
Home-made mat cutter

This simple mat cutter can be improvised with basic tools and perhaps scrap material. The base is 24 x 25 x 9/16 inch plywood. It accomodates up to 20 inch mat board. Size and material aren't critical. A hardwood guide rail is secured by screws that fit with little play in slots. Spring clips from aluminum frames hold the guide rail away from the backing mat board to facilitate inserting the mat board. A stop block prevents slippage of the mat board while cutting. There is a gap between stop block and guide rail to clear the hand cutter when making narrow margin mats. If one uses a mat cutter that cuts towards rather than away from the operator, the stop block would be placed at the front of the base. A stop ridge beneath the base keeps it from sliding on a table top. I use a Logan model 2000 hand cutter. A Dexter won't work unless this system is modified.

First, the mat board must be marked on the back. Two strips of mat board glued together with an offset equal to the desired mat border margin makes this quick and easy. The mat board is placed on the cutter face down with its back edge butted against the stop block and a previously marked line at the edge of the guide rail. The guide rail is tightly held down while making the cut.
 

Attachments

  • MatCut1a..jpg
    MatCut1a..jpg
    120.3 KB · Views: 2,363
  • MatCut2a.jpg
    MatCut2a.jpg
    151.1 KB · Views: 3,009
OP
OP

Steve Goldstein

Subscriber
Joined
Jul 8, 2007
Messages
1,801
Location
Northeastern US
Format
Multi Format
Thanks for all the tips. As it happened, a new-in-the-box Logan 450 appeared on Craig's list in my area just a few days after my post for very reasonable money, so I bought it. Now it's off to the art supplies store to pick up a 100-pack of blades.
 

Jim Jones

Subscriber
Allowing Ads
Joined
Jan 16, 2006
Messages
3,740
Location
Chillicothe MO
Format
Multi Format
Steve -- Your Logan 450 should be much nicer than my improvised cutter. Unless you cut a large number of mats, consider single edge razor blades from a hardware store. With the backing removed they work perfectly in a Logan 2000 cutter, and last for many mats per blade.
 
Photrio.com contains affiliate links to products. We may receive a commission for purchases made through these links.
To read our full affiliate disclosure statement please click Here.

PHOTRIO PARTNERS EQUALLY FUNDING OUR COMMUNITY:


Ilford ADOX Freestyle Photographic Stearman Press Weldon Color Lab Blue Moon Camera & Machine
Top Bottom