Broken range-/viewfinder unit on Vito CLR

Musician

A
Musician

  • 1
  • 0
  • 28
Your face (in it)

H
Your face (in it)

  • 0
  • 0
  • 47
A window to art

D
A window to art

  • 3
  • 0
  • 50
Bushland Stairway

Bushland Stairway

  • 4
  • 1
  • 109

Recent Classifieds

Forum statistics

Threads
199,248
Messages
2,788,548
Members
99,842
Latest member
Phileas
Recent bookmarks
0

SalveSlog

Subscriber
Joined
Sep 29, 2013
Messages
270
Location
Southern Norway
Format
Medium Format
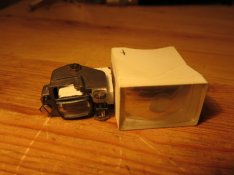
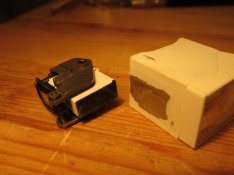
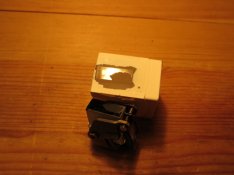
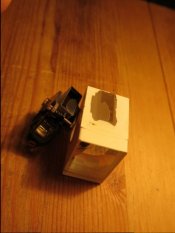
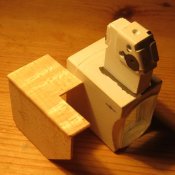
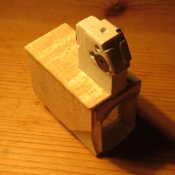
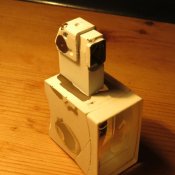
The rangefinder mecanism (to the left in the pictures) has broken off the viewfinder. Part of the once joined surfaces is clear glass that does not seem to have had glue on, and came apart with no damage to the glass. But the rangefinder part seems to have taken with it some part of the viewfinders glass surface. I hope this is visible in the pictures below.

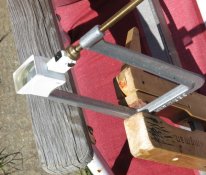
Still when I hold the two pieces together, the system seems to function as it should. I can see the full double image. I believe it would be possible to glue the parts together in alignment, but I'm afraid the the glue will obscure the image. Or that other things can go wrong.

Anyone here have experience or just opinions on this? What kind of glue, and so on...
 

Attachments

  • IMG_2269.JPG
    IMG_2269.JPG
    133.6 KB · Views: 158
  • IMG_2270.JPG
    IMG_2270.JPG
    127.6 KB · Views: 112
  • IMG_2271.JPG
    IMG_2271.JPG
    116.3 KB · Views: 104
  • IMG_2272.JPG
    IMG_2272.JPG
    36.7 KB · Views: 104

AgX

Member
Joined
Apr 5, 2007
Messages
29,973
Location
Germany
Format
Multi Format
If you would put the parts together and just put a line of epoxy-cement arround the seams chances are great in case you heat-set it that the cement runs into the slit. Thus either having it set cold or use the fast setting version. In short time it will get a viscosity too hgh for any creeping.


Alternatively you could use optical, UV-cured cement completely on the contacting surfaces.


But all would require some experience not to make a mess out of it.
If the rangefinder would sit on its own on the finder, that would be a great benefit for cementing.
 

bernard_L

Member
Joined
Feb 17, 2008
Messages
2,060
Format
Multi Format
Alternatively you could use optical, UV-cured cement completely on the contacting surfaces.
+1 that's the correct solution.
see, e.g.
http://www.thorlabs.de/newgrouppage9.cfm?objectgroup_id=196
Suggest you contact them for advice about the best variant in your case.
Or, approach a university lab involved in optics and beg a few drops of glue.
Or, I might be able to send you, for the cost of postage, outdated (but not too much) UV curing glue.
Note: you will need a UV source: HID lamp, Tanning lamp, or... sun (not much hope right now in Norway, even southern...

With epoxy, I would fear poor adhesion if epoxied only on the outside, or ugly creeping if teh glue gets inside (I bet it will).
 
OP
OP
SalveSlog

SalveSlog

Subscriber
Joined
Sep 29, 2013
Messages
270
Location
Southern Norway
Format
Medium Format
Thanks AgX and Bernard.

In fact I have a uv-box for drying varnish!

Do you know what kind of glass this is? And would the uv rays really reach the glue?
 

AgX

Member
Joined
Apr 5, 2007
Messages
29,973
Location
Germany
Format
Multi Format
The same way as the rays from the subject to the photographer. Via the respective windows.
When cementing a thick doublet the UV-rays will have to pass even more glass I assume.
 
OP
OP
SalveSlog

SalveSlog

Subscriber
Joined
Sep 29, 2013
Messages
270
Location
Southern Norway
Format
Medium Format
So I used the glue bernard_L sent me to glue these glass elements (see post #4). I made a wooden fixture to seat the small part in the right place for applying the glue and clamp. Then put it in the sun to harden.

attachment.php
attachment.php
attachment.php


Last picture: I'd like to replace the missing white paint. Anyone got a recommedation for type of paint?

attachment.php


***

The glue I got from bernard_L is expired but still usable, so if anyone need it I will send it for postage just like he did.
 

Attachments

  • rf_1.jpg
    rf_1.jpg
    36.5 KB · Views: 83
  • rf_2.jpg
    rf_2.jpg
    33 KB · Views: 88
  • rf_3.jpg
    rf_3.jpg
    201.1 KB · Views: 100
  • rf_4.jpg
    rf_4.jpg
    34.4 KB · Views: 95
Photrio.com contains affiliate links to products. We may receive a commission for purchases made through these links.
To read our full affiliate disclosure statement please click Here.

PHOTRIO PARTNERS EQUALLY FUNDING OUR COMMUNITY:


Ilford ADOX Freestyle Photographic Stearman Press Weldon Color Lab Blue Moon Camera & Machine
Top Bottom