Bleaching full the print in a bath

Table for four.

H
Table for four.

  • 5
  • 0
  • 37
Waiting

A
Waiting

  • 2
  • 0
  • 49
Westpier

A
Westpier

  • 1
  • 2
  • 51
Westpier

A
Westpier

  • 2
  • 0
  • 36
Morning Coffee

A
Morning Coffee

  • 7
  • 0
  • 75

Recent Classifieds

Forum statistics

Threads
197,583
Messages
2,761,474
Members
99,408
Latest member
Booger Flicker
Recent bookmarks
1

InExperience

Member
Joined
May 28, 2020
Messages
94
Location
Essex, UK
Format
35mm
Dear all,

I would like to bleach my print entirely in a bath, just to enhance contrast and highlights, but what is the quantity of ferry i should use for a litre of water?

Should I use drops from a stock formula at 10%, 1% or is better to dissolve a bit of powder in that litre? How many grams?

Thank you & keep safe.
 

ic-racer

Member
Joined
Feb 25, 2007
Messages
16,485
Location
USA
Format
Multi Format
Did your bleach come with an instruction sheet. I usually go by what the sheet indicates.
 
Last edited:

pentaxuser

Member
Joined
May 9, 2005
Messages
19,639
Location
Daventry, No
Format
35mm
If you are not looking to completely bleach back the whole print but just to affect the contrast and brighten highlights then it might make sense to dilute your bleach more than most instructions suggest. I'd make two identical prints, place one in a plain water bath and the other in a well diluted bleach bath and watch the change as it happens very carefully, taking the print out just before the change has quite reached what you are looking for. The bleaching will continue for a short time after removing the print but if the bleach is well diluted than it is easier to stop the bleach process in plain water before over-bleaching occurs. How long is "just before"? Well this may require a bit of experiment but if you pull the print too soon then you can re-immerse it. If you pull it too late and especially if the bleach is strong then you have passed the point of no return

If the bleaching is taking too long then the bleach can be made stronger but it is a process where patience and watchfulness is required.

pentaxuser
 

Vaughn

Subscriber
Joined
Dec 13, 2006
Messages
10,028
Location
Humboldt Co.
Format
Large Format
If you bleach too long, redevelop and try again.
 
OP
OP
InExperience

InExperience

Member
Joined
May 28, 2020
Messages
94
Location
Essex, UK
Format
35mm
If you are not looking to completely bleach back the whole print but just to affect the contrast and brighten highlights then it might make sense to dilute your bleach more than most instructions suggest. I'd make two identical prints, place one in a plain water bath and the other in a well diluted bleach bath and watch the change as it happens very carefully, taking the print out just before the change has quite reached what you are looking for. The bleaching will continue for a short time after removing the print but if the bleach is well diluted than it is easier to stop the bleach process in plain water before over-bleaching occurs. How long is "just before"? Well this may require a bit of experiment but if you pull the print too soon then you can re-immerse it. If you pull it too late and especially if the bleach is strong then you have passed the point of no return

If the bleaching is taking too long then the bleach can be made stronger but it is a process where patience and watchfulness is required.

pentaxuser

Thank you for your post.

But putting in bleach bath I am no sure it works, we need a bath of fix to see the effects.
 

pentaxuser

Member
Joined
May 9, 2005
Messages
19,639
Location
Daventry, No
Format
35mm
Thank you for your post.

But putting in bleach bath I am no sure it works, we need a bath of fix to see the effects.
I am not sure what you mean by this. You will see the bleach process working. If you could not see it then bleaching would be impossible to use to judge when the print had lightened enough for it to be satisfactory.

pentaxuser
 

bernard_L

Member
Joined
Feb 17, 2008
Messages
1,969
Format
Multi Format
The bleaching will continue for a short time after removing the print
Easy to overshoot. You will find out.
If you bleach too long, redevelop and try again.
Only if rehalogenating bleach. Ferri + Bromide. Farmer's reducer, Ferri + thiosulfate, is irreversible.

You might like to watch this, starting at about 10:15. See how she has the water hose in her left hand to stop ferri action asap.
 

Vaughn

Subscriber
Joined
Dec 13, 2006
Messages
10,028
Location
Humboldt Co.
Format
Large Format
One can see the bleaching action during the process, but until one fixes, one does not see the completed fixing. If you see the results you want before fixing, you have fixed too long.

I prefer to keep it reversable but having the fix in a separte bath.
 
Joined
Sep 10, 2002
Messages
3,566
Location
Eugene, Oregon
Format
4x5 Format
I use a rehalogenating potassium ferricyanide/potassium bromide bleach. For overall print bleaching, like you are wanting to do, I usually start with a scant 1/4 tsp of both ferricyanide and bromide per liter total (approx. 1g+ of each per liter). You can measure it out if you like, but since the proportions are not that critical, I cheat a bit and use approximate spoon equivalents. This bleach works rather quickly; in 30-60 seconds or so for most applications. If you want longer bleaching times, start with a weaker dilution. It's easy to just add water to the stronger bleach, e.g., if the 0.1% solution is too strong, add 50% more water (one liter becomes 1.5 liters) to make a 0.066% solution. The main thing is to have approx. equal amounts of ferri and bromide in your working solution. I find that longer bleaching times for entire prints can result in unevenness, hence the relatively short times.

Be sure to start with a print that is relatively free of fixer; at least five minutes of rinsing in running water first. Fixer will speed up the bleaching process and a less-than-well-rinsed print can end up with mottling.

I like to immerse the print gently in the solution and just let it sit without agitation for 30-45 sec., then pull the print and immediately get it into a tray of running water. Rinse there for several minutes with agitation and then return the print to the fix for at least one minute (rapid fixer). If the amount of bleaching is not enough, you can re-rinse the print and repeat the process. Once you have reached the desired amount of bleaching, rinse and re-fix the print fully before washing.

If you go too far, you can often save the print by returning it to the developer, watching carefully till enough of the density is recovered and then transferring the print to the stop bath and on from there. In my experience, however, I've found that it's better to err on the side of not enough bleaching than rely on the developer to save an over-bleached print. The redeveloped silver in the print tones differently and can even be a different color than the original image silver.

Keep in mind that a rehalogenating bleach does not contain any sodium thiosulfate. Ferricyanide bleaches with thiosulfate are not rehalogenating; they dissolve the silver away during the bleaching process and cannot be redeveloped. These can be used, but if you go to far, you've ruined the print. Re-fixing is necessary in any case.

Best,

Doremus
 
Last edited:
OP
OP
InExperience

InExperience

Member
Joined
May 28, 2020
Messages
94
Location
Essex, UK
Format
35mm
I use a rehalogenating potassium ferricyanide/potassium bromide bleach. For overall print bleaching, like you are wanting to do, I usually start with a scant 1/4 tsp of both ferricyanide and bromide per liter total (approx. 1g+ of each per liter). You can measure it out if you like, but since the proportions are not that critical, I cheat a bit and use approximate spoon equivalents. This bleach works rather quickly; in 30-60 seconds or so for most applications. If you want longer bleaching times, start with a weaker dilution. It's easy to just add water to the stronger bleach, e.g., if the 0.1% solution is too strong, add 50% more water (one liter becomes 1.5 liters) to make a 0.066% solution. The main thing is to have approx. equal amounts of ferri and bromide in your working solution. I find that longer bleaching times for entire prints can result in unevenness, hence the relatively short times.

Be sure to start with a print that is relatively free of fixer; at least five minutes of rinsing in running water first. Fixer will speed up the bleaching process and a less-than-well-rinsed print can end up with mottling.

I like to immerse the print gently in the solution and just let it sit without agitation for 30-45 sec., then pull the print and immediately get it into a tray of running water. Rinse there for several minutes with agitation and then return the print to the fix for at least one minute (rapid fixer). If the amount of bleaching is not enough, you can re-rinse the print and repeat the process. Once you have reached the desired amount of bleaching, rinse and re-fix the print fully before washing.

If you go too far, you can often save the print by returning it to the developer, watching carefully till enough of the density is recovered and then transferring the print to the stop bath and on from there. In my experience, however, I've found that it's better to err on the side of not enough bleaching than rely on the developer to save an over-bleached print. The redeveloped silver in the print tones differently and can even be a different color than the original image silver.

Keep in mind that a rehalogenating bleach does not contain any sodium thiosulfate. Ferricyanide bleaches with thiosulfate are not rehalogenating; they dissolve the silver away during the bleaching process and cannot be redeveloped. These can be used, but if you go to far, you've ruined the print. Re-fixing is necessary in any case.

Best,

Doremus

Thank you for your proof.

The bleach works also without fix. This morning I put over a bad print drops of 10% ferry and the image has been bleached, then destroyed. As you said in your speech fix, only speeds up the action of ferry.

For local bleach do you mix in a small pot ferry + fix or just use ferry and at the end fix everything?

Thank you.
 

Trey

Member
Joined
Dec 24, 2007
Messages
87
Location
NYC
Format
35mm
For local bleach do you mix in a small pot ferry + fix or just use ferry and at the end fix everything?

I keep the print wet with a working solution of fix and apply the ferricyanide with a brush or cotton swab. Spray with a hose to stop the action. Then occasionally place back into the tray of fix to charge it back up.
 
OP
OP
InExperience

InExperience

Member
Joined
May 28, 2020
Messages
94
Location
Essex, UK
Format
35mm
I keep the print wet with a working solution of fix and apply the ferricyanide with a brush or cotton swab. Spray with a hose to stop the action. Then occasionally place back into the tray of fix to charge it back up.
Thank you.

On this video of Tim Rudman


at the minute 5:22, I think he has already the fix ready in the glass and after put the ferry, isnt'it?
Otherwise doesn't make sense to have an hose playing water.
 

Vaughn

Subscriber
Joined
Dec 13, 2006
Messages
10,028
Location
Humboldt Co.
Format
Large Format
Thank you for your proof.

The bleach works also without fix...

Just to make sure you know -- you must eventually fix a bleached print or negative to be rid of the bleached silver, which will otherwise discolor. Also all this can soften the emulsion, so take care in handling.
 

pentaxuser

Member
Joined
May 9, 2005
Messages
19,639
Location
Daventry, No
Format
35mm
Thank you.

On this video of Tim Rudman


at the minute 5:22, I think he has already the fix ready in the glass and after put the ferry, isnt'it?
Otherwise doesn't make sense to have an hose playing water.

Did you mean to say ferry in the glass? He has a glass of ferricyanide i.e. bleach in the glass. There is no fix. He runs a hose under where he is bleaching to completely dilute any bleach run-off so it does not bleach other parts of the print that he does not want to bleach Once he has bleached the parts he wants to bleach he then places the whole print into a fixer tray.

pentaxuser
 
OP
OP
InExperience

InExperience

Member
Joined
May 28, 2020
Messages
94
Location
Essex, UK
Format
35mm
Did you mean to say ferry in the glass? He has a glass of ferricyanide i.e. bleach in the glass. There is no fix. He runs a hose under where he is bleaching to completely dilute any bleach run-off so it does not bleach other parts of the print that he does not want to bleach Once he has bleached the parts he wants to bleach he then places the whole print into a fixer tray.

pentaxuser

Yes, that one.
Because on his book, Master Printing Course, said to mix ferry + fix into a glass, etc etc. I thought he was following the same rule.

Thank you.
 
Joined
Sep 10, 2002
Messages
3,566
Location
Eugene, Oregon
Format
4x5 Format
... For local bleach do you mix in a small pot ferry + fix or just use ferry and at the end fix everything?
Thank you.

For local bleaching I use the same rehalogenating bleach mentioned above (no fixer), but mix smaller quantities, starting with 50-100ml of water and then adding ferricyanide and bromide. I have stock solution of each (10% ferricyanide solution and 3.3% solution of bromide, which I use for SLIMT techniques), which I add to the water with an eyedropper. I mix by eye these days, just getting the right color, but use three times the amount of the bromide solution as the ferricyanide so that I have roughly equal parts of ferricyanide and bromide.

My local bleaching technique is very similar to Barnbaum's.

Just so you know, the ferricyanide will work alone, mixed with bromide to form a rehalogenating bleach or mixed with sodium thiosulfate (fixer) to make Farmer's reducer. All of them work, the choice of which to use is yours. The only advantage to the rehalogenating bleach is that it is somewhat reversible; returning the print to the developer or applying developer with a brush or fingertip to the bleached area can retrieve much of the bleached-away image.

And, as Vaughn mentions, after bleaching, you need to fully fix your print again before washing.

Best,

Doremus
 

Vaughn

Subscriber
Joined
Dec 13, 2006
Messages
10,028
Location
Humboldt Co.
Format
Large Format
Doremus -- what is the purpose of the Potassium bromide, and how will results differ using just the ferricyanide?
 
Joined
Sep 10, 2002
Messages
3,566
Location
Eugene, Oregon
Format
4x5 Format
Doremus -- what is the purpose of the Potassium bromide, and how will results differ using just the ferricyanide?

Vaughn,

The potassium bromide together with the ferricyanide converts the bleached-away silver into silver bromide. This is a light-sensitive silver halide just like in your emulsion and, since we're bleaching with the lights on, it ends up being exposed to light, i.e., it's a latent image. So, if the bleaching goes too far, you can simply re-develop it by returning the print to the developer tray or applying developer locally (I just use my fingers).

One caveat: If there is a lot of carried-over fixer in the print, much of the rehalogenated silver will end up being fixed away (as with Farmer's reducer), so if you want to ensure as much potential for redevelopment as possible, the print needs to be well-rinsed before bleaching. Five minutes in running water works for me; it doesn't give full redevelopment, but enough to "undo" going to far with the bleaching. This is really helpful with tricky local bleaching.

Ferricyanide alone bleaches away the silver, but the resulting compound can't be redeveloped. I've used it both ways. Sometimes, if the bleach is a little slow, I'll even add a bit of fix to the rehalogenating bleach mix or not rinse my print as carefully to speed up the bleaching, knowing that I'm sacrificing redevelopment potential.

FWIW, I use this same type of ferri/bromide rehalogenating bleach for both SLIMTs, for contraction development of negatives, and for bleach-redevelopment of negatives for increasing contrast. In the former, the rehalogenating bleach bleaches away the latent image reduction points in a contrast-wise manner to reduce overall negative contrast. In the latter, I bleach the negative image completely away, then redevelop it in a staining developer (PMK) to add extra image stain along with the redeveloped image, thereby gaining about a zone of contrast.

I keep the SLIMT stock solutions and a stronger mix of ferricyanide and bromide on hand; they last forever.

Best,

Doremus
 

Vaughn

Subscriber
Joined
Dec 13, 2006
Messages
10,028
Location
Humboldt Co.
Format
Large Format
Thanks -- I have 'cheated in the past by using just the Part A of Sepia Toner or Part A of Farmer's Reducer, which I believe already contains Potassium bromide. I have been keeping the bleach/redevelop in pyro method in the back of my head since I first heard of it. I have bleached, fixed, washed, and then selenium toned negatives to increase contrast successfully -- the pyro method sounds interesting for negs I developed in non-staining developers...mostly older negs.
 
Joined
Sep 10, 2002
Messages
3,566
Location
Eugene, Oregon
Format
4x5 Format
Vaughn,

I like selenium intensification as well, and used it often before switching to PMK as my primary film developer. Unfortunately, selenium toner seems to remove the stain from PMK negs, effectively cancelling the intensification effect. That's why I switched to bleach/redevelop when I needed that one-zone extra separation. I use it only rarely; it's easier just to print with a #47 filter if I really need to amplify the contrast. If I can't get what I want with than, then I'll intensify.

One thing I really liked about selenium intensification of negatives is that one could intensify locally. That's not really practical with bleach/redevelop.

Best,

Doremus
 

Vaughn

Subscriber
Joined
Dec 13, 2006
Messages
10,028
Location
Humboldt Co.
Format
Large Format
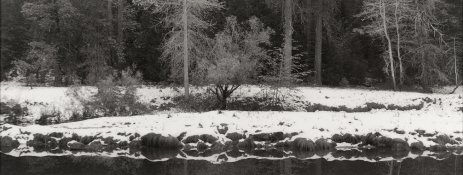
This 4x10 negative was selenium toned just on the upper half (made it a bit easier). No bleaching was needed...just wanted to affect the contrast of the upper half. Merced River, Yosemite Valley.

One might be seeing the intensification on the trunk of the center, closer aspen, but it still looks enough like natural shading to be acceptable...or might even actually be natural shading. I do not remember. If I were to be in the same situation again, I would use a small brush and get some selenium on the trunk beyond the area I was dunk-toning.

This is a carbon print -- I cannot have the fun you are having with the #47!
 

Attachments

  • MercedRiverSnow.jpg
    MercedRiverSnow.jpg
    472.7 KB · Views: 70
Last edited:

Vaughn

Subscriber
Joined
Dec 13, 2006
Messages
10,028
Location
Humboldt Co.
Format
Large Format
Some folks who worked with Portriga Rapid back in the day felt that paper needed a light over-all bleaching to snap up the highlights. I was happy without the bleaching...I felt it was more about avoiding safelight fogging, paying attention to dry-down, and making my first exposure a little light over-all, and then burning the print down as needed to allow the lighter areas to stand out. It was a lot of fun.

If I bleach a negative, it is usually to take the deepest shadow areas and allow them to clear. They are quite small on a contact print (too small to have detail in). Those little suckers are going to be a deep a black as the rebate!
 
Photrio.com contains affiliate links to products. We may receive a commission for purchases made through these links.
To read our full affiliate disclosure statement please click Here.

PHOTRIO PARTNERS EQUALLY FUNDING OUR COMMUNITY:


Ilford ADOX Freestyle Photographic Stearman Press Weldon Color Lab Blue Moon Camera & Machine
Top Bottom