Beseler Printmaker 35 Setup

20250427_154237.jpg

D
20250427_154237.jpg

  • 1
  • 0
  • 29
Genbaku Dome

D
Genbaku Dome

  • 3
  • 1
  • 44
City Park Pond

H
City Park Pond

  • 0
  • 1
  • 51
Icy Slough.jpg

H
Icy Slough.jpg

  • 1
  • 0
  • 47
Roses

A
Roses

  • 8
  • 0
  • 128

Recent Classifieds

Forum statistics

Threads
197,502
Messages
2,759,995
Members
99,519
Latest member
PJL1
Recent bookmarks
0

Thomas Walsh

Member
Joined
Apr 30, 2017
Messages
3
Location
Northeast USA
Format
35mm
Hi Everyone,
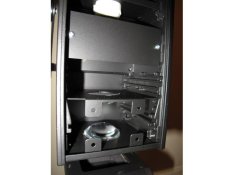
This is my first foray into the world of printing and I just picked up a Beseler Printmaker 35. I have a few questions for anyone that may have used one of these in the past or currently still uses it. Firstly, what are each of the slots in the units head/light box for? There looks to be 5 slots available (from top-to-bottom):
  1. Heat Absorbing Glass (slot closest to lamp)
  2. Not sure, maybe a filter holder
  3. 6X7 Condenser Lens #1, not used for 35mm
  4. Filter Holder (this slot is narrower than all the rest)
  5. 6X7 Condenser Lens #2, 35mm Condenser Lens
I came up with this from looking at the exploded diagram on Beseler's website (not sure why they wouldn't have the manual here) (http://www.beselerphoto.com/parts-pdf/printmaker-35-67/printmaker-35-67-ex.pdf) and searching around online (see attached pictures). Also from just doing tests with the 35mm condenser in each slot, I definitely get the best light coverage with it in the last slot (flat side facing down). All I have is the 35mm condenser and I just want to make sure I'm using it correctly. The one pic I attached with the 35mm condenser has two in there but I'm pretty sure only one is supposed to be used (does this enhance the light with two?). Also I was thinking of 3D printing the trays used for the heat absorbing glass and possibly the filter holder (thinking I'd stick it in slot 2 for 35mm), but maybe this isn't a good idea due to the heat causing the plastic to warp over time. Has anyone printed stuff like this and successfully used it?
 

Attachments

  • Beseler 35 Printmaker 2 Condenser Lenses.jpg
    Beseler 35 Printmaker 2 Condenser Lenses.jpg
    25.5 KB · Views: 454
  • Beseler 35 Printmaker 6X7 Conversion.jpg
    Beseler 35 Printmaker 6X7 Conversion.jpg
    423.7 KB · Views: 650

rpavich

Member
Joined
Aug 24, 2015
Messages
1,521
Location
West virginia, USA
Format
35mm
Hi,
this thread may help but I think you have it right.

(there was a url link here which no longer exists)


All you lack is the filter tray and the heat absorbing glass. They aren't 100% necessary, you can get the type filters that go under the lens with their own mount if you have to.
 

M Carter

Member
Joined
Jan 23, 2013
Messages
2,147
Location
Dallas, TX
Format
Medium Format
I still have a 35 in my attic, haven't used it in years - there should be a diagram on the inside of the sliding cover for the condenser case, do you have that?

Couple notes - if your enlarger uses the 75 watt opal bulb that looks like sort-of-a-regular light bulb but a bit narrower, you don't need the 35mm condenser - it was only needed on the original 35's that used a smaller bulb. You could always do a quick test and see.

The condensers go in where the curved sides face each other. Heat absorbing glass shows up on eBay from time to time, though you may not need it unless you're having trouble with negs popping out of flatness. Find an exploded diagram and google the part number, you may find one from one of the remaining enlarger suppliers.

You can make a filter holder from black cardboard - the filters don't really need to "clip" in and I tore the clip thing out of my holder, it was a pain. Just something the filters can rest on to slide in and out works fine.

That said, it's a decent enlarger to get started but very limited and flimsy (if you do things like split-filter printing, ghetto up some sort of brace for the top that attaches to the wall or ceiling, that'll help keep it stable). If you want to go 6x6 or 6x7 someday, there is a (pretty rare) 6x7 conversion kit for it, but I think that's a waste of money. If you ever want to upgrade, keep an eye out for a 67c. They're reasonably sized (vs. the 23c, so they ship affordable) and very stable, and show up on eBay often. They have some alignment capability (unlike the 35) and you can easily do 16x20 prints with them (I made a simple plywood box-type thing and braced the top of the column to my ceiling for big prints). I did take two lens boards and an old mouse pad and made a DIY "Besalign" lens board for mine when I had it, and I got perfect corner-to-corner sharpness on up to 30" prints. (I have an MXT now and passed the 67c along to a friend's daughter).

Best thing in your case - the 35 lens boards and neg carriers work with the 67, same parts, so you can eventually move right up to the 67, maybe even keep the 35 handy for flashing paper and so on.

Since your getting started with this, here's my favorite "next piece of gear" tip - keep an eye out for an audible repeating timer. The kind that "beeps" every second and you don't have to twirl a knob back every time you print. I found that being able to count out seconds for dodging and burning really helped my work. I also opened mine up and wired a 1/4" guitar jack to the switch, and got a musician's momentary footswitch ($15 or so) to plug into it. The footswitch is just killer for complicated dodging or burning, you have your hands ready and go rather than punching the timer and grabbing your tools.
 
OP
OP

Thomas Walsh

Member
Joined
Apr 30, 2017
Messages
3
Location
Northeast USA
Format
35mm
Thanks for the responses! I believe that I have the smaller bulb but I could be wrong. I'll do some tests with and without the condenser. I'm intrigued by the "Besalign" lens board and that audible timer/foot pedal idea sounds awesome. I'm going to get setup to print in the next few weeks and see how everything works out. Picked up some Ilford Multigrade paper and Sprint Systems Developer to start off. Going on vacation next week so I'm going to try and find a darkroom book at the library so I can hit the ground running when I return.

I picked up a Beseler 23C II a few days ago as well but I need to make a base-plate for it and clean it up as its pretty dirty/rusty. I have some room in my basement near my washing machine where I'm thinking of setting up a darkroom and maybe I can just mount this unit to the wall or try to find a cheap benchtop/door/kitchen counter as a working surface. The Printmaker 35 looks to be fully functioning so that is what I'll start on and mount it to a little cart that I can push into my bathroom for the time being. Hopefully I can get some decent results. I started off a few weeks ago looking for a scanner, but I already have a nice digital camera, so I figured if I'm going to work with film then I should work with it all the way to the print. Also I've never seen a large print appear out of nothing in front of me before and I can't wait to experience that!

If anyone has a scanned copy of the Beseler Printmaker 35 manual I'd love it if you could share it with me. I just can't get myself to buy one for $10 +shipping without even knowing if I'm going to be using this enlarger more than a few times.
 

M Carter

Member
Joined
Jan 23, 2013
Messages
2,147
Location
Dallas, TX
Format
Medium Format
The 23C is a really robust machine with wide parts availability - if it's not too trashed you could be very happy with it.

I'll add one suggestion, seeing you're new to printing - run, don't walk to google and find a used copy of Tim Rudman's "Master Printing Course" - by far my favorite darkroom book, it goes from basic beginner steps to darkroom setup and on into advanced masking, bleaching, toning, formulas, etc. All clearly explained (favorite quote in a bleaching recipe: "You don't have to understand what the complex chemistry does, just that it works on the print"). Just thumbing through it is a real mindblower of how far you can take a print. It's discontinued but widely available used (check Amazon) for ten to twenty bucks. (Tim's toning book goes for $100 and up these days). It's an insane amount of info packed into one accessible book.
 
Photrio.com contains affiliate links to products. We may receive a commission for purchases made through these links.
To read our full affiliate disclosure statement please click Here.

PHOTRIO PARTNERS EQUALLY FUNDING OUR COMMUNITY:


Ilford ADOX Freestyle Photographic Stearman Press Weldon Color Lab Blue Moon Camera & Machine
Top Bottom