Beseler 45MCRX - Disassembley

Farm to Market 1303

A
Farm to Market 1303

  • 0
  • 0
  • 438
Sonatas XII-51 (Life)

A
Sonatas XII-51 (Life)

  • 0
  • 2
  • 712
Lone tree

D
Lone tree

  • 3
  • 0
  • 591
Sonatas XII-50 (Life)

A
Sonatas XII-50 (Life)

  • 2
  • 1
  • 3K
Tower and Moon

A
Tower and Moon

  • 4
  • 0
  • 3K

Recent Classifieds

Forum statistics

Threads
199,740
Messages
2,795,972
Members
100,020
Latest member
oinkmoo32
Recent bookmarks
2

John Irvine

Member
Joined
Sep 23, 2007
Messages
110
Location
Central Virg
Format
4x5 Format
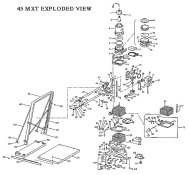
I need to remove the bellows and lens holder from my Beseler 45MCRX to strip and repaint the base and columns. I could use a good diagram or instructions.
 

ann

Subscriber
Joined
Sep 10, 2002
Messages
3,336
Format
35mm
the lens board is on a simple push spring device. push the lens toward the back of the enlarger and the board will drop out.

the bellows is screwed in at the top of the condensor housing and at the bottom of the negative stage. just push up or pull down and unscrew.
it looks more trouble than it is in reality.
 

Konical

Subscriber
Joined
Jun 1, 2003
Messages
1,824
Good Afternoon, John

I'm going strictly from memory here. I think I once found an exploded parts diagram on the Beseler web site. Somewhere (I think), I probably have the manual which came with my MCR-X. If you have no other responses, feel to PM me; I can't guarantee that I can find it, but if I can, I'll be glad to photocopy for you. On the other hand, everything is pretty much out in the open and obvious on the MCR-X; keeping a simple log of disassembly should help in getting everything back in proper order.

Konical
 

Papa Tango

Member
Joined
Oct 17, 2005
Messages
632
Location
Corning, NY
Format
Hybrid
Clarity?

It sounds to me as if you are seeking to seeking to remove the entire head, leaving just the crossmembers, frame, and base. If so, you simply take out the screws that hold the lower focus rack (on the lower part of the rack below the lens). These are attached to a bracket that connects to the bottom crossmember. Then remove the big bolt that is seen from the back. It is in the bracket that is attached to the top crossmember.

I have attached the exploded diagram of the enlarger, as well as the head/stage alignment instructions that you will need when you reassemble. If you are disassembling the head as well to strip or paint, this is slightly more daunting, but can be done.
 

Attachments

  • img49.jpg
    img49.jpg
    68.6 KB · Views: 233
  • 45mcrx alignment.pdf
    251.8 KB · Views: 165
Last edited by a moderator:
OP
OP

John Irvine

Member
Joined
Sep 23, 2007
Messages
110
Location
Central Virg
Format
4x5 Format
I am new to the use of a forum and am stumbling around figuring out how they work. I have no idea if this will show up as a reply or not. If it does, thank you above for the help. I now have it completely taken apart using your help. A little more sand blasting and it will be ready to repaint.
 
Photrio.com contains affiliate links to products. We may receive a commission for purchases made through these links.
To read our full affiliate disclosure statement please click Here.

PHOTRIO PARTNERS EQUALLY FUNDING OUR COMMUNITY:


Ilford ADOX Freestyle Photographic Stearman Press Weldon Color Lab Blue Moon Camera & Machine
Top Bottom