Bathroom necessities....

Sunset on the Wilmington

D
Sunset on the Wilmington

  • 1
  • 0
  • 1K
Rio_Bidasoa

H
Rio_Bidasoa

  • 2
  • 0
  • 2K
IMG_0675.jpeg

H
IMG_0675.jpeg

  • 7
  • 5
  • 3K
Six Arches Bridge

A
Six Arches Bridge

  • 13
  • 4
  • 3K

Recent Classifieds

Forum statistics

Threads
199,603
Messages
2,793,945
Members
99,962
Latest member
swatch
Recent bookmarks
1

ChristopherCoy

Subscriber
Joined
Aug 9, 2011
Messages
3,599
Location
On a boat.
Format
Multi Format
I'm planning on having my film developed at a local lab that still processes, but in the future I'd like to have a small hobby darkroom to process my own stuff.

The problem is that we rent a 1 bedroom, 1 bathroom house and I do not have a place to setup a darkroom. Our bathroom is literally the length of the bathtub, squared.

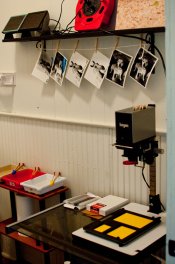
The good news is that I do have a studio with a larger bathroom. I would have enough room to put a shelf up, with enough room for the three trays, and an enlarger. The problem with the studio bathroom is that there is no bathtub - only a small sink.

When I was in high school, we used a sink, but it was a large basin type sink, not the very small hand sinks found in typical bathrooms.

I've been reviewing the bathroom darkroom sticky thread above, but I'm at a loss for solutions. I'm going to continue researching darkroom setups, but if anyone has any suggestions, I'd love to hear them.
 

BradS

Member
Joined
Sep 28, 2004
Messages
8,124
Location
Soulsbyville, California
Format
35mm
I went to the lumber yard and had them cut a piece of 3/4 inch plywood into three rectangles. One fits over the tub and four 8x10 trays sit a top this makeshift table. I had a table specially made that fits above and around the toilet - the enlarger sits on the table over the toilet. Safe lights screw into the existing bathroom light fixtures. Sink is usually also covered with a piece of plywood and is (ironically) used as the "dry side" work top - for cutting paper and such.

I've also thought of stacking the trays vertically as some others have done. Will need to do this to get up to 16x20 trays....someday (sigh).
 

stillsilver

Member
Joined
Jun 30, 2006
Messages
259
Location
Oakdale, CA
Format
Multi Format
My temporary dr is in our full bathroom and has to be back to a bathroom as soon as I'm done with the printing session. The window is blacked out with 4 mil thick black plastic sheeting that is doubled. This is taped with gaffers tape so as to not leave too much goo. The door is blacked out with weather stripping and the insulation for outdoor pipes. The pipe insulation is on the bottom.
I can develop film in there at noon with the hallway lights on. There is a piece of plywood over the tub and I used ABS pipe for legs to support a plywood table top(I need that because of my back). There is enough room for 3 8X10 and a 11X14 tray. I have a base that fits on the sink for the enlarger and my paper safe sits on a box on the toilet. The only thing permanent is the weather stripping. Every thing else is removed. I can set up and begin printing in 20 min. Breakdown takes about 30 min. as the trays have to be rinsed out.
My only advantage over you is that I have a half-bath if the family needs to use it.

As to the no sink problem, you do not need running water in a dr. You just need enough room for 3 processing trays and a water tray for holding your prints. When you are done printing, you rinse your trays in the bathtub or shower stall then wash your prints.

I hope this helps.

Mike
 

Mike Wilde

Member
Joined
Aug 10, 2006
Messages
2,903
Location
Misissauaga
Format
Multi Format
I have in the past , in one of my many darkroom incarnations, worked out of a 'half bathroom' - sink and toilet only. The water to wash prints was derived from the faucet on the sink, and the wash tray was on a shelf that sat just abouve the toilet. The Kodak tray syphon discharged into the toilet bowl.

The enlarger lived on a 'microwave cart'. Back in the 80's these were easy to find, as most people wanted a microwave oven, but there was no provision for them in their kitchen cabinet layout. It was a counter height cart with a drawer and shelf below that with front doors. The enlarger sat on the top, and the little shelf that would have sat above a typical microwave had baskets screwed on to allow focusser, safelight, etc to be safely stored in there while the cart was wheeled out of the bathroom.

Chems and film processing tanks lived in the bottom. The drawer and counter top enlarger baseboard was the 'dry side'.

The tray ladder that normally in use sat balanced over the toilet would be placed on the enlarger baseboard, with the head raised high, and the whole thing would be rolled into the spare room at the end of the night.

In the morning you would have to unclip the prints from the drying line before you could have a bath or a shower.
 

Paul Howell

Subscriber
Joined
Dec 23, 2004
Messages
9,826
Location
Scottsdale Az
Format
Multi Format
One option is to use color film drums and a motor base. The foot print is the same as an 8X10 or 11X14 tray, and (for B&W) 3 graduates for developer, stop, and fix, then to the bathtub or shower for wash. I would start with 35mm as you can get a small quaility 35mm enlarger such as a Drust that be taken apart and stored. If you are lucky you may be able to find a portable Federal enlarger that the base is also the storage, just need a new modern lens.
 

MattKing

Moderator
Moderator
Joined
Apr 24, 2005
Messages
53,505
Location
Delta, BC Canada
Format
Medium Format
Home Depot and similar sources sell wire shelving that they will cut to length.

If you put a piece of that over the back half of the tub, you will also be able to access the floor of the tub for washing.

The shelving has a "lip" that is approximately one inch. I use two pieces reversed and stacked on top of each other in order to have a flat surface that the trays can hang over at the edge.
 
OP
OP
ChristopherCoy

ChristopherCoy

Subscriber
Joined
Aug 9, 2011
Messages
3,599
Location
On a boat.
Format
Multi Format
As to the no sink problem, you do not need running water in a dr. You just need enough room for 3 processing trays and a water tray for holding your prints.


If I DONT need running water then that makes it much more easier for me to set up in our studio bathroom, or one of the empty offices in the studio building.
 

MattKing

Moderator
Moderator
Joined
Apr 24, 2005
Messages
53,505
Location
Delta, BC Canada
Format
Medium Format
You do need access to running water somewhere nearby - for many years I worked happily with just a flat shelf plus a wash basin out in an adjacent room about ten feet away from the darkroom door.
 

jeffreyg

Subscriber
Joined
Jun 12, 2008
Messages
2,673
Location
florida
Format
Medium Format
You really only need running water for washing film/prints as Matt mentioned above. Both of those procedures can be done in the light so you could print in another space that has more room possibly placing the enlarger on a sturdy support and the trays on a decent size folding table that can be moved when not in use.

http://www.jeffreyglasser.com/
 

grahamp

Subscriber
Joined
Mar 2, 2004
Messages
1,721
Location
Vallejo (SF Bay Area)
Format
Multi Format
If you stick to RC materials you could use a hand-held spray attachment at the kitchen sink for washing prints. Until recently I carried about 6 gallons of water from the house to the darkroom (and the reverse for the waste) for a session. Running water is definitely nice, but not critical. I have used a darkroom tent in a field several times.
 

Monito

Member
Joined
May 16, 2011
Messages
335
Location
Nova Scotia,
Format
Multi Format
You don't need running water for washing prints or film. Stand-and-change washes with some agitation or Ilford washes 5-10-20 inversions work well when properly integrated into a workflow.
 
OP
OP
ChristopherCoy

ChristopherCoy

Subscriber
Joined
Aug 9, 2011
Messages
3,599
Location
On a boat.
Format
Multi Format
Ok, I'm nearly ready to attempt my first print, and I think I have all the basics. Over the last few weeks I have purchased:

1 - Bogen enlarger with 35mm carrier
1 - GraLab Model 171 timer
2 - Premier 5x7 safelights (I have a 3rd coming from an APUG member now)
1 - Premier 4-in-1 easel
1 - Omega tank with two reels
D76 Developer
Kodak Rapid Fixer
Kodak Photo Flo

I'm ordering the following from B&H or Adorama or somewhere this afternoon:

3 - 8x10 developing trays
1 - Thermometer
3 - Print tongs
3 - Datatainer jugs
1 - Print Squeegee
1 - Package of Dektol
1 - Box of Ilford 5x7 paper


As soon as I can find the thread with the link that was given to me, I'm going to order two or three replacement bulbs for the enlarger in case something happens, since it hasn't been used in a while.

Other than what I've mentioned, is there something that I am overlooking that I'll need to make a basic 'commando' go of it?

I'm going to start with 5x7's until I read and research some more, and learn more of what I am doing in detail. Its been a while, so I don't want to waste money on large paper that I'll mess up.
 

pbromaghin

Subscriber
Joined
Sep 30, 2010
Messages
3,826
Location
Castle Rock, CO
Format
Multi Format
I don't see stop bath on your list. Did you decide to go without?

It sounds exciting. Have fun and tell us how it turns out. I have everything I need for a bathroom setup but am waiting until I take lessons this fall.
 
OP
OP
ChristopherCoy

ChristopherCoy

Subscriber
Joined
Aug 9, 2011
Messages
3,599
Location
On a boat.
Format
Multi Format
No, but I'll put it down.

I figured out a way to set up my dry area in our utility room, and the wet area directly over the bathtub in the bathroom connected to our utility room. Hopefully what I'm envisioning will work.

I'm kinda working off of memory and jumping in head first before a refresher course.
 

Rick A

Subscriber
Joined
Mar 31, 2009
Messages
9,964
Location
Laurel Highlands
Format
8x10 Format
You're better off using a stop bath, your fixer will live longer for it. Also, unless you have running water, you will also need a tank or extra tray to hold finished prints until you are ready to wash them.
 
OP
OP
ChristopherCoy

ChristopherCoy

Subscriber
Joined
Aug 9, 2011
Messages
3,599
Location
On a boat.
Format
Multi Format
Can't I use the bathtub for that?
 

MattKing

Moderator
Moderator
Joined
Apr 24, 2005
Messages
53,505
Location
Delta, BC Canada
Format
Medium Format
Can't I use the bathtub for that?

Yes, but it will be a lot easier to use a tray in the bathtub.

Large cat litter trays work well as washing trays :smile:
 
OP
OP
ChristopherCoy

ChristopherCoy

Subscriber
Joined
Aug 9, 2011
Messages
3,599
Location
On a boat.
Format
Multi Format
Its all here, and it was delivered two days earlier than I was expecting. I bought Arista RC VC 5x7 paper because it was $25 for 100 sheets. I figured I'd ruin the cheap stuff while I relearned the ropes, and buy the good stuff later.

I have a feeling I'm going to be up really late playing tonight....
 
OP
OP
ChristopherCoy

ChristopherCoy

Subscriber
Joined
Aug 9, 2011
Messages
3,599
Location
On a boat.
Format
Multi Format
Well here it is. In all of its simple gloriousness! It's ugly, but it works!

For those of you wondering how I wash my prints, I fill up the bathroom sink just to the left of my trays (not pictured.) I plug the drain, and let the water run enough so that it fills and drains through the emergency drain hole at the top. It's working for now. I'm going to look for a proper print washer next.
 

Attachments

  • Darkroom.jpg
    Darkroom.jpg
    216.4 KB · Views: 91

MattKing

Moderator
Moderator
Joined
Apr 24, 2005
Messages
53,505
Location
Delta, BC Canada
Format
Medium Format
OP
OP
ChristopherCoy

ChristopherCoy

Subscriber
Joined
Aug 9, 2011
Messages
3,599
Location
On a boat.
Format
Multi Format
Photrio.com contains affiliate links to products. We may receive a commission for purchases made through these links.
To read our full affiliate disclosure statement please click Here.

PHOTRIO PARTNERS EQUALLY FUNDING OUR COMMUNITY:


Ilford ADOX Freestyle Photographic Stearman Press Weldon Color Lab Blue Moon Camera & Machine
Top Bottom