Basic service info needed for older, dial-set Zeiss Ikon Compur

WWPPD2025-01-scaled.jpg

A
WWPPD2025-01-scaled.jpg

  • 2
  • 1
  • 43
Shannon Falls.jpg

D
Shannon Falls.jpg

  • 3
  • 0
  • 84
Trail

Trail

  • 1
  • 0
  • 96
IMG_6621.jpeg

A
IMG_6621.jpeg

  • 1
  • 2
  • 176
Carved bench

A
Carved bench

  • 1
  • 3
  • 200

Recent Classifieds

Forum statistics

Threads
198,079
Messages
2,769,349
Members
99,559
Latest member
Evraissio
Recent bookmarks
0

PFGS

Member
Joined
Jul 22, 2020
Messages
282
Location
NC USA
Format
Digital
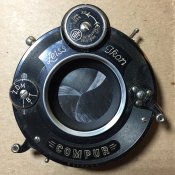
I've had reasonable success with a couple of Copals but have not been able to find much disassembly or repair info on this Compur. Right now, the bulb and time modes are perfect. The shutter fires with good snappy action on all the timed speeds, and the faster speeds are discernibly different. I can hear some buzzing in an escapement when I turn the dial to the slower speeds, but they are not slow at all, sound similar to the 1/25 or 1/50. The aperture blades appear to be non-metallic, so I don't want to dunk it in solvent and cross my fingers. Any pointers on getting this back in shape are appreciated!
 

Attachments

  • IMG-5051.JPG
    IMG-5051.JPG
    992.7 KB · Views: 109

Donald Qualls

Subscriber
Joined
Jan 19, 2005
Messages
12,210
Location
North Carolina
Format
Multi Format
I've been into one of those, once, fifteen or so years ago. I'll check if I have any photos stored when I get home...

BTW, in mine, the blades are blued steel.
 

Donald Qualls

Subscriber
Joined
Jan 19, 2005
Messages
12,210
Location
North Carolina
Format
Multi Format
Pretty sure both are steel. I'll check that, too, when I get home. Two of mine are on bayonet mounts on Ideal plate cameras, and the glass unscrews easily once it's unlatched from the standard, so I can literally check in a couple minutes.
 

shutterfinger

Member
Joined
Feb 25, 2013
Messages
5,020
Location
San Jose, Ca.
Format
4x5 Format
IMG-5051.JPG
1. set the selector to T then remove the center screw, then lift the dial off the shutter.
2. remove the 3 screws on the cocking lever then remove the lever.
3. remove the screw then Carefully lift the speed dial off the shutter paying closely to the order the underlaying parts are in. They may be stuck together.
4. turn the shutter over and remove the 4 screws around the perimeter of the case. Note that they are not equal distance from each other.
5. lift the case with aperture off the shutter mechanism.
6. take pictures, disassemble, clean, lube as needed, reassemble.
The aperture operating lever may have a thin layer of grease on it, clean and relube. Do not get any grease or fluids on the aperture blades. I rubbed extra fine powdered graphite into mine with a cotton swab. It works smoothly.
 

grat

Member
Joined
May 8, 2020
Messages
2,045
Location
Gainesville, FL
Format
Multi Format
If you search, there's a wiki page with a list of compur serial numbers by year (number is usually on the side of the shutter).

My particular dial-set (1914) is metal for both sets of blades.
 
OP
OP

PFGS

Member
Joined
Jul 22, 2020
Messages
282
Location
NC USA
Format
Digital
View attachment 255662
1. set the selector to T then remove the center screw, then lift the dial off the shutter.
2. remove the 3 screws on the cocking lever then remove the lever.
3. remove the screw then Carefully lift the speed dial off the shutter paying closely to the order the underlaying parts are in. They may be stuck together.
4. turn the shutter over and remove the 4 screws around the perimeter of the case. Note that they are not equal distance from each other.
5. lift the case with aperture off the shutter mechanism.
6. take pictures, disassemble, clean, lube as needed, reassemble.
The aperture operating lever may have a thin layer of grease on it, clean and relube. Do not get any grease or fluids on the aperture blades. I rubbed extra fine powdered graphite into mine with a cotton swab. It works smoothly.

Thanks so much - this is exactly the kind of breakdown I was hoping for. I particularly like that you used my own photo for the ilustration.

Is there any particular speed I should leave the speed dial on? And, anything I should look out for for why the slow speeds are not engaging, or just clean & lube and go from there?
 
OP
OP

PFGS

Member
Joined
Jul 22, 2020
Messages
282
Location
NC USA
Format
Digital
If you search, there's a wiki page with a list of compur serial numbers by year (number is usually on the side of the shutter).

My particular dial-set (1914) is metal for both sets of blades.


Mine is between the numbers for 1912 and 1914 on that chart, #221636, and looking again, the aperture is unquestionably paper.

If I can get a 100+ year old shutter running smoothly, I'll be pretty impressed with myself.
 

shutterfinger

Member
Joined
Feb 25, 2013
Messages
5,020
Location
San Jose, Ca.
Format
4x5 Format
Is there any particular speed I should leave the speed dial on? And, anything I should look out for for why the slow speeds are not engaging, or just clean & lube and go from there?
You will find a pin or two on the bottom of the dial parts that engage levers through slots and the pieces only mount one way so the speed is not important. I usually use 1 second.
There is a delay gear mechanism that is fairly simple. You will need to remove the shutter blade retaining plate and the blades may fall off, pay attention to their position as they are different.
The IBT selector is a long lever attached with a special head screw. The rest is levers and springs. Take good picturers before removing any internal parts.
 

Donald Qualls

Subscriber
Joined
Jan 19, 2005
Messages
12,210
Location
North Carolina
Format
Multi Format
I have one on a 1936 Speed Graphic, the aperture blades are lacquered paper.

The one I just checked (one of four I own, all from 1926/1927 time frame cameras) does in fact appear to have paper aperture blades. This one has a 15 cm f/4.5 Tessar mounted, with a bayonet for an Ica 225 Ideal (9x12 cm plate camera). Different bayonet from my other Ideal (Zeiss 225/75, IIRC) with 13.5 cm f/4.5 Tessar, sad to say; I'd have liked to be able to use both of these lenses and the third bayonet shutter with pinhole on the same body...
 
Photrio.com contains affiliate links to products. We may receive a commission for purchases made through these links.
To read our full affiliate disclosure statement please click Here.

PHOTRIO PARTNERS EQUALLY FUNDING OUR COMMUNITY:


Ilford ADOX Freestyle Photographic Stearman Press Weldon Color Lab Blue Moon Camera & Machine
Top Bottom