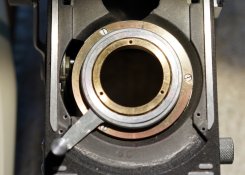
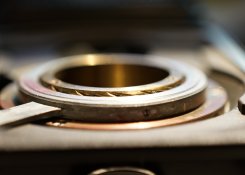
Anyone know if after cleaning and lubing the focus helical if when reinstalled the inner and outer gears are flush or is the inner gear slightly higher or lower than the outer gear? I read it's supposed to be flush but I can only get it higher or lower, there doesn't seem to be a thread to start in between those points. My starting points are just to left or right of 12:00 and not at 12:00 where I think it probably should be to get it flush so the two markings are aligned.
-
Welcome to Photrio!Registration is fast and free. Join today to unlock search, see fewer ads, and access all forum features.Click here to sign up
- Home
- Forums
- Analog Workflow Forums (100% Analog/Traditional)
- Analog Equipment
- Medium Format Cameras and Accessories
You are using an out of date browser. It may not display this or other websites correctly.
You should upgrade or use an alternative browser.
You should upgrade or use an alternative browser.
Autocord helical gear
-
A
- Thread starter campy51
- Start date
Recent Classifieds
-
For Sale Rodenstock Apo Ronar 300mm MC on prontor pro
- Started by Guivd
-
For Sale Voigtlander Nokton 50mm F/1.5 Aspherical (Leica Thread Mount)
- Started by MotoMark
-
For Sale Gossen Luna Pro SBC and Spot Attachment
- Started by MotoMark
-
For Sale Expired Instant Film
- Started by dankapsner
-
For Sale LF sheet film holders (used)
- Started by madsox
Forum statistics
Dan Daniel
Subscriber
Slightly above. There's only one start point that will get you the proper 12/4/8 o'clock orientation of the holes and a slight amount above the outer ring. 'Slight' is small, enough to pic up with a fingernail, enough to see, but not much more. When you put the lens panel on, there will be a thin band of silver showing at the base.
This is with the outer/focusing ring at infinity.
This is with the outer/focusing ring at infinity.
Thanks I will do that and check focus again. My first attempt was right where you said it should be, but I didn't realize that the pointer may have been in the wrong position when I attached the focus ring so I am re-doing it tonight.Slightly above. There's only one start point that will get you the proper 12/4/8 o'clock orientation of the holes and a slight amount above the outer ring. 'Slight' is small, enough to pic up with a fingernail, enough to see, but not much more. When you put the lens panel on, there will be a thin band of silver showing at the base.
This is with the outer/focusing ring at infinity.
Dan Daniel
Subscriber
The focus ring set screws leave marks in the outer helical. And there is always one set screw point that appears to have been slightly deepened. I'll use this as the first point and see if the ring self-locates. I've found that using these marks and being sure to keep track and reinstall any shims under the shutter and cocking mechanisms usually leads to good focus. Factory setup, basially. Karl Bryan has mentioned finding many Autocords that need the focus reset, but I've been lucky with most.
Dan, can you look at these pictures and tell me if this looks correct. When I opened this up originally the inner and outer helical had marks lined up at the 6 o'clock position, but when I put it back together and use a ground glass at the film plane at say 4 ft. the image is not focused. Does this mean my focus lever and helical marks are in the wrong position? I also checked my other Autocord and the focus and the scale the tape measure distance don't match but the couple of rolls I shot with it were very sharp. I did not check infinity focus on that camera. I think I am missing something that is obvious.


Dan Daniel
Subscriber
The inner helical looks high.
The way I have always done it is to reinstall the focusing lever using the set screw marks. This is the factory setting. The set screw are in the same spot on all of the levers. And they are staggered as they are so that there is only one position where the four points match. Find the set screw marks and put a line up above it on the outer helical top edge. All four. As I mentioned above, find the one set screw mark that is a little bigger and tighten this one down first. But only lightly! See if the lever has caught in the divot by trying to rotate it. When it stays still, do the other screws. Lightly- you can snap the lever by over-tightening. Watch for the lever ring getting pushed away from the helical.
After the lever is in and set to infinity, you should find that only one start point of the inner helical gives you a 12 o'clock position with a very small it above the outer helical. Your photo is too much. And below is simply wrong- the lens board will stop the helical before the lever gets to infinity.
If you want to, reassemble the lens board, then install the shutter without any shims. Do a ground glass focus test, and you should find that it focuses past infinity. Measure the lens extension with focus lever zeroed at infinity and then with the lens focused at infinity. the difference tells you how thick your shims needs to be.
I wouldn't trust he scales on camera like this, especially close. What matters, what is critical, is that the taking lens (film plane) focus and viewing lens focus agree. If you want to be a masochist, test this at a few different distances. You might find that the taking lens and viewing lens are slightly different focal lengths so you can't get agreement at every distance. I use 10 feet as my balance point unless someone tells me that they, for example, always shoot infinity landscapes wide open or head shots from 3 feet.
Ok thanks I will try again tomorrow. I do want to mention that it only had 3 screws on the helical.
Dan Daniel
Subscriber
Ok thanks I will try again tomorrow. I do want to mention that it only had 3 screws on the helical.
You mean three set screws on the focus lever ring? Is there a hole for a fourth screw?
Yes
I've never disassembled a TLR, but on the two pics above, I believe I see two indicator marks, the first about 12:00 plus, and the second at about where the end, length of travel will allow the focus lever to rest.
I wonder if the above solutions have solved the issue and what these two marks are for?
Eli
I wonder if the above solutions have solved the issue and what these two marks are for?
Eli
I believe those marks are the infinity marks for the helical.
| Photrio.com contains affiliate links to products. We may receive a commission for purchases made through these links. To read our full affiliate disclosure statement please click Here. |
PHOTRIO PARTNERS EQUALLY FUNDING OUR COMMUNITY:  |

