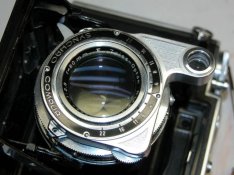
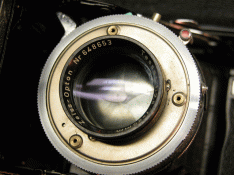
I've got a super ikonta BX with f/2.8 coated tessar, in the older compur-rapid shutter. I need to remove the front element to clean an internal surface of the lens of fog. THe front seems to be held with two micro screws, but I'm afraid if I remove them and pull off the front that I'll uncouple the rangefinder or throw it out of calibration somehow, as the rotation and movement of the front element is what focuses. Any tips? It looks like there's a tab on the side that slots into the rotating front lens barrel, and might be the rangefinder coupling mechanism. Ideas? Anyone done this?
-
Welcome to Photrio!Registration is fast and free. Join today to unlock search, see fewer ads, and access all forum features.Click here to sign up
- Home
- Forums
- Analog Workflow Forums (100% Analog/Traditional)
- Analog Equipment
- Medium Format Cameras and Accessories
You are using an out of date browser. It may not display this or other websites correctly.
You should upgrade or use an alternative browser.
You should upgrade or use an alternative browser.
Anyone know how to remove front element of Super Ikonta Tessar?
-
A
- Thread starter walter23
- Start date


Recent Classifieds
-
For Sale Rodenstock Apo Ronar 300mm MC on prontor pro
- Started by Guivd
-
For Sale Voigtlander Nokton 50mm F/1.5 Aspherical (Leica Thread Mount)
- Started by MotoMark
-
For Sale Gossen Luna Pro SBC and Spot Attachment
- Started by MotoMark
-
For Sale Expired Instant Film
- Started by dankapsner
-
For Sale LF sheet film holders (used)
- Started by madsox
Forum statistics
There should be three tiny set screws. You generally don't need to remove them fully, but it doesn't hurt. On some lenses, you'll find three tiny drill marks that correspond to the holes.
Sometimes there will be a small scratch mark on the out and inner elements that correspond with infinity. If the marks don't line up on reassembly, you'll need to rotate the lens out and find a new starting point for the helicals. Take your time and don't damage the helicals. They're brass and can be damaged somewhat easily.
Clean off all of the old lubricant and relubricate.
Setting the rangefinder to infinity and recollimating the lens are two separate procedures. The tab on the side of the lens is the infinity stop for the lens ring (the part that you want to remove).
If you've worked on cameras before, this won't be too difficult. I probably wouldn't pick a Super Ikonta for my first foray into camera repair. It's not impossible, just slightly more complex than other cameras.
The small arm that is part of the lens/shutter assembly holds two rotating wedge prisms.
It's a very accurate system that rarely falls out of calibration once set. It's far superior to the usual system of mirrors.
It was used in a number of Zeiss Ikon cameras, including most of the Super Ikontas and several 35mm cameras.
One thing to be aware of is the inner elements of the coated Ikontas are extremely fragile. Please use caution when cleaning these elements, in fact if you don't have to clean..Dont!.
Best of luck.
Best of luck.
I'm pretty sure I have to clean. The fog is reasonably substantial. I'm shooting a test roll right now though, and if I don't need to go in there I'll leave it alone. I'm sure it's enough to reduce contrast and cause flare, but I'm not sure how bad it would be.
Any suggestions for avoiding damaging the coatings, if I do have to clean?
Any suggestions for avoiding damaging the coatings, if I do have to clean?
In general, I've found the lens coatings on Zeiss lenses to be durable. Not so with early Leica lenses.
The early lenses are single coated, by the way.
Here's what to do:
Most drug store chains carry optical cleaner, and that works very nicely. Many people use Windex or some other glass cleaner. I like the optical cleaner. It should only cost about $3 or $4 for about eight ounces, and it lasts for a long time.
Camera repair expert and author Thomas Tomassey has a simple method for cleaning lenses. It works, and I've used it to clean several hundred lenses. Get plain white facial tissue: No scents, no lotions, nothing.
If there is debris on the lens, either blow it off or use a camel hair brush to remove it.
Spray some optical cleaner on the tissue and wipe the lens. Turn to a dry side and wipe the optical cleaner off the lens. As I said: It's simple and effective.
I have wrenches I purchased from Micro Tools in the US. These are really handy to remove this element.
I have a Super Ikonta B with the focusing mechanism removed, exposing the lens assembly. If you like I can post some pictures. The rear lens also
can be removed to clean.
I have 4 Super Ikonta Bs and 3 Super Ikonta Cs. (really! it is a form of madness I think caused by altitude) If you find it is necessary to remove this
lens assy. let me know and I'll post pictures of what I have. If you find it difficult to remove the inner element (and you likely will) I have the proper wrench
I could lend you if you were in the Canmore area.
Whatever... use caution with cleaning the inner surfaces. Rub too hard and the coating can come off or be compromised.
In general, I've found the lens coatings on Zeiss lenses to be durable. Not so with early Leica lenses.
I've never had a early Leica lens apart, but I've heard this. Something to remember to be sure.
I have cleaned my Super Ikonta C with coated Opton with great trepidation but I was rewarded with a nice clean inner element. I used a lens pure alcohol as a cleaner by very carefully applying it with a soft artists water colour brush. I then wrapped a Kodak lens cleaning tissue around a "Q" tip, tying it off with thread.
I found it a little tricky not to foul my cleaning stuff by touching the helical threads (yes I really, really cleaned these threads before) which would still have some residue from the old grease.
It works, and I've used it to clean several hundred lenses. Get plain white facial tissue: No scents, no lotions, nothing.
Really? I've used plain white nose tissue for eyeglasses and found it scratches them. I've been using kodak lens cleaner tissues for camera lenses and a clean cotton T-shirt for eyeglasses ever since.
If you could show a picture or two that would be really helpful. I don't think I need to remove anything other than the front element, but I'll keep your offer in mind if it turns out I need that tool. Thanks for the help.
I have wrenches I purchased from Micro Tools in the US. These are really handy to remove this element.
I have a Super Ikonta B with the focusing mechanism removed, exposing the lens assembly. If you like I can post some pictures. The rear lens also
can be removed to clean.
I have 4 Super Ikonta Bs and 3 Super Ikonta Cs. (really! it is a form of madness I think caused by altitude) If you find it is necessary to remove this
lens assy. let me know and I'll post pictures of what I have. If you find it difficult to remove the inner element (and you likely will) I have the proper wrench
I could lend you if you were in the Canmore area.
Whatever... use caution with cleaning the inner surfaces. Rub too hard and the coating can come off or be compromised.
As I mentioned, I've cleaned several hundred lenses (both coated and uncoated) and have never scratched one of them.
I never dry clean a lens using a tissue or cloth only. I always use optical cleaning fluid.
Do your glasses have plastic or glass lenses? And have you dry cleaned them?
I never dry clean a lens using a tissue or cloth only. I always use optical cleaning fluid.
Do your glasses have plastic or glass lenses? And have you dry cleaned them?
- Joined
- Jan 14, 2007
- Messages
- 688
- Format
- Medium Format
I discovered this product by accident. Tried it first on filters and fund it work like magic. It's soft and will not scratch and leaves no lint or dust behind. I then tried on lenses and again it works perfectly. I now use it to wipe my glass film carrier for my MF film scanner. Again it cleans so well and it really leaves no nothing on the glass. My scanned image will see any scratch or dust left behind but I can not see any. I have thrown away all my Kodak lens cleaning tissue paper. In fact I have stopped using anything other that this product. It is really nothing new. It's a piece of micro fiber cloth made specifically for cleaning glass and plastic and my lenses. The onlything I will not use it to clean will be the mirror of my SLRs. But other than that I have great success alway in cleaning lenses. You can see this product here at:
http://www.tapplastics.com/shop/product.php?pid=119&
Last time I visited a Tap Plastics store they have this micro fiber cloth for $1.79 a piece. I purchased some plastic products over $100. The store manager threw one in for me free of charge. I now have half a dozen of it. I have so many of it so I use some for cleaning my cameras. It really gets all the dusts off and leaves no scratch and no dust behind.
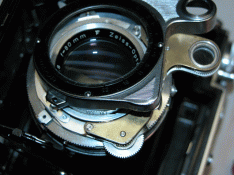
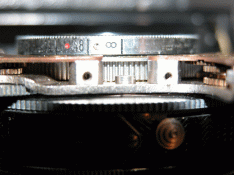
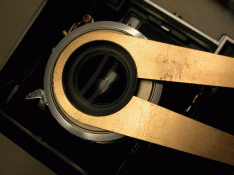
1) Make sure the infinity symbol is at infinity. Mark infinity somehow on the lens barrel.
Remove the focus mechanism.
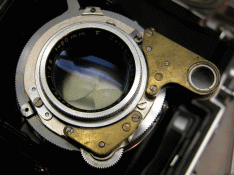
2) Lots of things to remember here. Don't screw up the infinity setting and remember the point in the helical where the lens releases from the threads. ( I hate this)
3)The lens lifts out. This is where it can be cleaned. These surfaces are quite fragile.
4) In the last image I am removing the inner lens to clean the other side. This tool is a real good idea.
Remove the focus mechanism.
2) Lots of things to remember here. Don't screw up the infinity setting and remember the point in the helical where the lens releases from the threads. ( I hate this)
3)The lens lifts out. This is where it can be cleaned. These surfaces are quite fragile.
4) In the last image I am removing the inner lens to clean the other side. This tool is a real good idea.
Attachments
Looks a bit painful but doable. I need to lubricate (or clean) the focussing gears as well. Thanks for the pictures - this gives me an idea of what to expect. In terms of removing the front element, once you've got the cover off it just lifts out, or is it threaded? Do you have to unscrew the little micro screws around the barrel of the front element or are those just to hold the glass inside the housing?
I think I'm going to have to shelve this until I move next week as I've realized that all my small screwdrivers are in storage.
I think I'm going to have to shelve this until I move next week as I've realized that all my small screwdrivers are in storage.
It would be hard for me to explain but when you remove something, like a lens or gears, make sure you have marked things so they go back exactly the way you took it apart. Do not assume anything.
The micro screws around the barrel, three of them, holds the focus ring. It just comes off when these are loosened. The focus ring has a slot which receives a little tooth from a ring gear, part of the focus mechanism. This area can really mess up the focus if you don't somehow ensure things go back the same way as they came apart. (how do I know this??)
The lens then unscrews from the helical threads. As you carefully unscrew the lens gently pull the lens away from the body, when the threads disengage carefully note where this happened so you can put things back the way they were.
Good luck.
By the way, if you've worked on a Rolleiflex successfully this thing should be relatively easy. Much different, but easy.
Okay, thanks for the help, Paul. I'll get on it in a couple of weeks.
I have the proper wrench
I could lend you if you were in the Canmore area.
You're right, I did find removing this element impossible. Does it unscrew, or does this wrench do something else? I can't figure it out. I think I saw the tool you mean on microtools - it's just a round wrench, right? They call it a flexitool or something like that.
Also I mucked up the rangefinder. I just mean the optical assembly; I didn't realize that it was the "lower" gear which contacts the focusing gear / helical, and turned the lens focusing helical while this gear was disengaged. Oops. I know how the lens goes back together so I just have to go out and find something at infinity and reset the rangefinder (I think). Hopefully it's that easy. Better to have to measure / calibrate just the rangefinder than measure / calibrate the focus of the lens, I think.
Last edited by a moderator:
The wrench really grips the lens element but does not damage the helical.
If you didn't mark the lens when you removed it, and did not mark where the gear when you removed it, you made things just a little more difficult to put back together. Nothing is damaged or irreversible or too complicated just more difficult now.
I PM'd you.
If you didn't mark the lens when you removed it, and did not mark where the gear when you removed it, you made things just a little more difficult to put back together. Nothing is damaged or irreversible or too complicated just more difficult now.
I PM'd you.
I got the lens marked so it goes back in just fine, I just screwed up the rangefinder by rotating the helical-coupling gear, when it wasn't contacting the rangefinder gear. I think it will be easy to fix; I already got it pretty close by mucking around in my front yard calibrating the rangefinder on a tree, but I think I may need to find a slightly more distant "infinity" object to calibrate on as the one I used was only about 50 meters away. I'll head to the shore where I can see the distant olympic mountains and make sure it's okay.
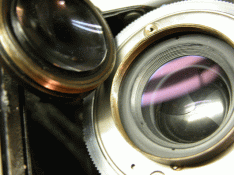
My only problem is getting the second element out (the one adjacent to the aperture & shutter). It turns out that's where the fog is, not where I originally thought on the back of the front (focusing) element. And I guess that requires the wrench, as I couldn't budge it by trying to turn it (assuming it just unscrews).
Guess I'm repeating things by responding here and in PM. Respond where you want
Reviving this ancient thread - I have a 532/16 and I want to clean the lens. I am going to follow the instructions above, but I am not very familiar with how the rangefinder linkage works or how to adjust it. If I am able to replace the lens just as I removed it, will the rangefinder still be accurate?
I am 100% amateur at this stuff, but I usually don't let that stop me from messing up my camera... I got a very nice looking Super Ikonta for about $40, but I can't live with the images the lens is providing...
I am 100% amateur at this stuff, but I usually don't let that stop me from messing up my camera... I got a very nice looking Super Ikonta for about $40, but I can't live with the images the lens is providing...
Before proceeding, I'd suggest contacting Don Goldberg. (DAG Camera Repair) He disassembled and cleaned a German lens for me that other techs wouldn't touch, partly because of the soft coating. His price was very reasonable and best of all, it was clean and in good shape when I got it back. If you are an experienced tinkerer, OK. Otherwise, a Super Ikonta isn't the easiest camera to work on. If you screw it up, good luck finding anyone to fix it.
Reviving this ancient thread - I have a 532/16 and I want to clean the lens. I am going to follow the instructions above, but I am not very familiar with how the rangefinder linkage works or how to adjust it. If I am able to replace the lens just as I removed it, will the rangefinder still be accurate?
If you get the front element back on the same thread start, engaged on the same tooth on the prism gear, and and turned to the same depth, it should match up with the RF. I've seen a good tutorial somewhere on calibrating the RF on a Moskva 5 (it's been a long time -- like more than fifteen years -- so the page likely isn't there any more, but it might be worth searching), which works the same except for the folding arm (Moskva 5 was an upgraded clone of the pre-War Super Ikonta C). The same procedure should work.
The RF on Super Ikonta cameras from the 1930s through early 1950s (and their Soviet clones) works by counterrotating a pair of prisms in the window on the front stanard; aside from vertical image merge adjustment, all the RF parts under the top cover are fixed. At infinity, the two prisms have the thick side opposite; as you focus closer, they rotate (gear driven by the front element) opposite directions, so that the up-down refraction cancels, but the right-left displacement builds up until they're as far around as the camera's focus limit (typically around 1.2 meters, or about four feet) will take them. This is not a terribly complex way to run an RF -- and a lot simpler to build than anything else that would allow a fixed, reasonably rigid front standard on a folding camera like an Ikonta (almost all other RF folders use a moving front standard, which is prone to be less rigid than that on a front-element focusing camera).
That said, calibrating it requires some tools, and knowing how to get into the gear train without damaging anything, and some care and attention to detail. I'd strongly recommend looking up (or checking the Wayback Machine for) the page on adjusting the RF in a Moskva 5, as I'm sure it'll tell you almost everything you need to know about the Super Ikonta series RF setup.
Thanks everyone. This may be over my head. I took the front cover off and it looked straightforward to remove the three screws and mark the lens to replace it at the same thread point; but if I have to match rangefinder gears, too, that may be a step too far for me.
I want to post my experience here, in case it helps others who search this thread:
After developing my first roll, I realized my "new" Super Ikonta had an issue making muddy, horrible photos of gray mush. I checked the lens again (I had already checked it), and there was indeed a light layer of haze, probably from fungus.
It really looked like it was directly behind the front element. I was rightly warned away form going after it myself. However, I decided to grab my lens spanner tool and removed the REAR element. I cleaned the rear element, and locked open the shutter at the widest aperture so I could clean the back of the next element forward. This turned out to be where the haze was!
The way light bounces around in these lenses, it really looked to me like the haze was at the front. I am so happy now, and I have run another roll through that gave me punchy photos.
Thanks to everyone for their recommendations, and for keeping me from surely screwing up my camera by trying to go into the front.
I took some snapshots down at the lake to confirm. Here's one, dust and all:
| Photrio.com contains affiliate links to products. We may receive a commission for purchases made through these links. To read our full affiliate disclosure statement please click Here. |
PHOTRIO PARTNERS EQUALLY FUNDING OUR COMMUNITY:  |