analogue halftoning/lithography process information/guides?

Cafe Art

A
Cafe Art

  • 4
  • 2
  • 34
Sciuridae

A
Sciuridae

  • 4
  • 2
  • 91
Takatoriyama

D
Takatoriyama

  • 6
  • 3
  • 115
Tree and reflection

H
Tree and reflection

  • 2
  • 0
  • 96

Recent Classifieds

Forum statistics

Threads
197,632
Messages
2,762,199
Members
99,425
Latest member
dcy
Recent bookmarks
1
Joined
Oct 27, 2015
Messages
69
Format
4x5 Format
I'm looking for someone to point me in the right direction for resources on creating halftoned copies of negatives. Before I move on purchasing a contact screen, I'd like to understand exactly what I'm doing a little better than I do right now. Got some books out from the university library, and it seems to me that there are different proprietary equipment sets that each have their own methods of use. On top of that, the only material I found is either highly technical and focused on a specific brand, or little brochure-type books for showing off equipment without going to detail on its operation. In the case of the former, they often assume you know what they are talking about, which makes for difficult reading. Perhaps someone familiar with the process could help me out, here. I'd be quite grateful.
 

CMB

Member
Joined
Mar 17, 2011
Messages
117
Location
Santa Cruz,
Format
Multi Format
HalfTone Photography for Offset Lithography, Erwin Jaffe, Graphic Arts Technical Foundation (GATF),1967
 
OP
OP
senderoaburrido
Joined
Oct 27, 2015
Messages
69
Format
4x5 Format
You wouldn't happen to have a copy you'd be willing to sell me, would you? I can't find it online.
 

Bill Burk

Subscriber
Joined
Feb 9, 2010
Messages
9,153
Format
4x5 Format
senderoaburrido,

If you can tell some stories about what you want to do, and what you want to do it with, maybe I can direct you to some resources or give you direct answers.

Traditional halftone work was done using a process camera and involved calculations based on the print highlight and shadow reflection densities. You would determine a main exposure and a bump exposure and maybe a flash exposure. The three exposures together would be figured such a way that you got a tiny speck of a black dot in the shadows (maybe a 2% tint value) and a tiny speck of a clear dot in the highlights (maybe a 95%). The idea was to avoid a salt and pepper kind of problem that would occur if you got solid black or solid white on press.

So the camera would hold a copy flat under glass, in the bright side of the camera department, with four pulsed xenon lights aimed carefully to give even lighting and avoid reflections. Inside the darkroom you would have a vacuum easel and above it would be the "flash" lamp. You can put the film down and give the flash exposure... then lay a Kodak Magenta Contact Screen on top of the film, and allow the vacuum to draw it down into contact with the film... then close the camera and make a main exposure and if needed, a bump exposure.

Then you'd process the film and make a contact proof of it to see if the negative was useful, or if it had to be remade.

Today, it would be difficult to come up with all the material and equipment... But you could still use the Kodak Magenta Contact Screen.

You could work with a sandwich made of a large format continuous tone positive copy of a negative. (Imagine you could print on a sheet of film under the enlarger and create a transparent positive that way). Then the Kodak Magenta Contact Screen, then the ortho litho contact film. The sandwich would have to be held together with the vacuum.

But I don't know the equipment you have, want to get, or might be able to have access to... People who have process cameras would be happy to give them away to a good cause. I personally would worry about the electric bill and spare bulbs because pulsed xenon draws some impressive current and those bulbs were never cheap...
 
OP
OP
senderoaburrido
Joined
Oct 27, 2015
Messages
69
Format
4x5 Format
$10 on Amazon (1964 edition but should be fine for your purposes): http://www.amazon.com/Halftone-Photography-Offset-Lithography-Erwin/dp/B001DXF2VK
Shipping to Canada + duties might make that 10$ book a 25$ book.
senderoaburrido,

If you can tell some stories about what you want to do, and what you want to do it with, maybe I can direct you to some resources or give you direct answers.

Traditional halftone work was done using a process camera and involved calculations based on the print highlight and shadow reflection densities. You would determine a main exposure and a bump exposure and maybe a flash exposure. The three exposures together would be figured such a way that you got a tiny speck of a black dot in the shadows (maybe a 2% tint value) and a tiny speck of a clear dot in the highlights (maybe a 95%). The idea was to avoid a salt and pepper kind of problem that would occur if you got solid black or solid white on press.

So the camera would hold a copy flat under glass, in the bright side of the camera department, with four pulsed xenon lights aimed carefully to give even lighting and avoid reflections. Inside the darkroom you would have a vacuum easel and above it would be the "flash" lamp. You can put the film down and give the flash exposure... then lay a Kodak Magenta Contact Screen on top of the film, and allow the vacuum to draw it down into contact with the film... then close the camera and make a main exposure and if needed, a bump exposure.

Then you'd process the film and make a contact proof of it to see if the negative was useful, or if it had to be remade.

Today, it would be difficult to come up with all the material and equipment... But you could still use the Kodak Magenta Contact Screen.

You could work with a sandwich made of a large format continuous tone positive copy of a negative. (Imagine you could print on a sheet of film under the enlarger and create a transparent positive that way). Then the Kodak Magenta Contact Screen, then the ortho litho contact film. The sandwich would have to be held together with the vacuum.

But I don't know the equipment you have, want to get, or might be able to have access to... People who have process cameras would be happy to give them away to a good cause. I personally would worry about the electric bill and spare bulbs because pulsed xenon draws some impressive current and those bulbs were never cheap...

I'd love to go into detail and I will do so tomorrow. I have to head out to the farm, but I may have an opportunity tomorrow night.
 
OP
OP
senderoaburrido
Joined
Oct 27, 2015
Messages
69
Format
4x5 Format
The proc
senderoaburrido,

If you can tell some stories about what you want to do, and what you want to do it with, maybe I can direct you to some resources or give you direct answers.

Traditional halftone work was done using a process camera and involved calculations based on the print highlight and shadow reflection densities. You would determine a main exposure and a bump exposure and maybe a flash exposure. The three exposures together would be figured such a way that you got a tiny speck of a black dot in the shadows (maybe a 2% tint value) and a tiny speck of a clear dot in the highlights (maybe a 95%). The idea was to avoid a salt and pepper kind of problem that would occur if you got solid black or solid white on press.

So the camera would hold a copy flat under glass, in the bright side of the camera department, with four pulsed xenon lights aimed carefully to give even lighting and avoid reflections. Inside the darkroom you would have a vacuum easel and above it would be the "flash" lamp. You can put the film down and give the flash exposure... then lay a Kodak Magenta Contact Screen on top of the film, and allow the vacuum to draw it down into contact with the film... then close the camera and make a main exposure and if needed, a bump exposure.

Then you'd process the film and make a contact proof of it to see if the negative was useful, or if it had to be remade.

Today, it would be difficult to come up with all the material and equipment... But you could still use the Kodak Magenta Contact Screen.

You could work with a sandwich made of a large format continuous tone positive copy of a negative. (Imagine you could print on a sheet of film under the enlarger and create a transparent positive that way). Then the Kodak Magenta Contact Screen, then the ortho litho contact film. The sandwich would have to be held together with the vacuum.

But I don't know the equipment you have, want to get, or might be able to have access to... People who have process cameras would be happy to give them away to a good cause. I personally would worry about the electric bill and spare bulbs because pulsed xenon draws some impressive current and those bulbs were never cheap...

The process you describe is exactly what I am after. I have found a few places where I may be able to purchase a contact screen. The plan was to use a positive with the screen to make a copy onto ortho litho film, exactly as you explained.

The end goal is to make t-shirt printing screens with my photography sans digital processes. I figured it would be an interesting and challenging diversion. I was even thinking of trying the old process of editing photos together via overlapping negatives and painting over unwanted areas.
 

Bill Burk

Subscriber
Joined
Feb 9, 2010
Messages
9,153
Format
4x5 Format
OK this is where you have a bit of freedom...

T-Shirt printing... is more about the graphic design and originality than about the print quality.

The screen resolution that you need is so "large" that you may not be able to buy a Kodak Magenta Contact Screen in a lines per inch range that is suited to the "serigraphy" process.

But now you should know what a contact screen is... it is basically a continuous tone "out of focus" continuous tone picture of a glass line ruled halftone screen.

You could, since you are experimenting, try to make a glass screen and/or a contact screen for your own use. You could get interesting images with detail as rough as 25 lines per inch.

For example on glass you might experiment by slicing electrical tape as thin as you can and criss-crossing it over a piece of glass like if you were putting a crust on a pie. Work out the concept at a larger lines per inch such as 10 lines per inch, and a smaller area, such as 4x5 inches. Then you can experiment with your negative in contact with ortho litho film with the glass screen over it.

Always use a grayscale in everything you do... Graphic arts doesn't use ASA speeds. Instead you use a grayscale which reveals what you got. You count steps up and down from what you got... to a step that looks like where you wanted to be... so none of the test shots are ever wasted.
 

Ian Grant

Subscriber
Joined
Aug 2, 2004
Messages
23,234
Location
West Midland
Format
Multi Format
Kodak used to sell an Autoscreen litho film this could be enlarged or contact printed onto (no screen needed). I don't know when it was discontinued I experimented with some in the mis 1970's.

Ian
 

Bill Burk

Subscriber
Joined
Feb 9, 2010
Messages
9,153
Format
4x5 Format
A fun thought occurred to me.

I know a screen print process which requires you to start with a positive. Sort of a photosensitive goop that you wipe-on the screen and allow to dry then expose with bright light through a positive.

So if you are able to make a "screen", you might arrive at a positive halftone film in one generation by making the enlargement through the "screen" onto a sheet of ortho litho film... which you develop to positive... ready to put on the silkscreen.

You'll probably enjoy a straightforward process like that.

Back in the old day, starting from a print in the copyboard, the process required that you make yet another contact positive from the camera halftone negative.
 

Bill Burk

Subscriber
Joined
Feb 9, 2010
Messages
9,153
Format
4x5 Format
Here's another idea: For t-shirt printing ... Sandwich an ordinary Kodak Magenta Halftone Screen with your negative in an enlarger and enlarge together.

35mm to 8x10 inch for example...

The combination of pictorial negative and halftone pattern negative enlarged together, will expose a sheet of ortho litho film... and you will get a dot pattern.

So suppose you find a 100 or 120 line halftone screen, you will end up with a 12 to 15 lines per inch halftone pattern, which would be "just fine" for t-shirt printing.

If your original is 4x5 inch and you are making 11x14 inch screen prints, the same screen would give you 25 to 33 lines per inch. That would be something you could hold.
 
OP
OP
senderoaburrido
Joined
Oct 27, 2015
Messages
69
Format
4x5 Format
This is all very helpful. I think I might do exactly what you're talking about. Removing a step would help familiarize me with the process. From there I could consider photo manipulation and other things
 

Don_ih

Member
Joined
Jan 24, 2021
Messages
7,403
Location
Ontario
Format
35mm RF
@Bill Burk -- I'm resurrecting a thread, here. I've been interested in screenprinting and halftone reproduction for years. I just got an idea reading your suggestion to sandwich a screen and a negative in an enlarger. I have no halftone screens but what if I took a photo of window screen against a white background and used that piece of film as a screen (either developed to positive or printed to lith film)? Would that work? Or does the screen need to have more opaque lines than you get from max density on film?
 

Bill Burk

Subscriber
Joined
Feb 9, 2010
Messages
9,153
Format
4x5 Format
Hi @Don Heisz,

Fun reading this old thread! The old archive org book shows what you need it’s more like 50% black/clear in each direction, leaving about 25% clear.

Right now there are more contact screens on eBay than I have ever seen before. Usually there are only two or three. (Careful one seller wants $70 shipping.)

Search “Bychrome” or Kodak contact screen. The full set of Bychrome screens is good for comic book art the old school way.
 

Don_ih

Member
Joined
Jan 24, 2021
Messages
7,403
Location
Ontario
Format
35mm RF
The full set of Bychrome screens is good for comic book art the old school way.

Thanks, Bill. I was actually looking at that, earlier. There are probably some ebay results that don't show up for me, since lots of people won't ship to Canada.

I missed out on something a few years ago. I could have bought an Agfa stat camera and a pile of unspecified "supplies" for $50 - if I could just haul it away. Unfortunately, that was the part I could not do - and also don't have a place for a camera the size of a Volkswagen...
 

glbeas

Member
Joined
Sep 25, 2002
Messages
3,913
Location
Marietta, Ga. USA
Format
Multi Format
You have to be aware of the basic types of screens. The actual halftone screen is a continuous tone product intended to be used with high contrast litho films. Its a virtual image of the dot shadows made by the grid that was historically used for halftone way back when. The other type is fixed tone screens used to make spot colors in line art. They are high contrast dot images defined by the precentage of coverage. As in a 20% screen when contact printed will make a hard edged dot pattern that covers 20% of the image area to produce precisely defined grey tones in the artwork. You cant use a tone screen to make a real halftone image.
Of the actual halftone screens there is what is called square dot, round dot and elliptical dot, all designed for specific purposes. In the shops I worked in the elliptical dot was mostly used as it provided a smoother transition of tones from dark to light. You might notice too some that have an angle included in the specs. This is for color separations and duotones and tritones so multiple screens can be overlaid without moire patterns to produce the characteristic rosette seen in process color dot patterns.
 

Bill Burk

Subscriber
Joined
Feb 9, 2010
Messages
9,153
Format
4x5 Format
Actually, @Don Heisz..

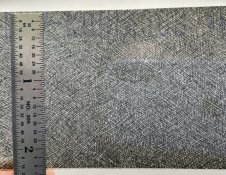
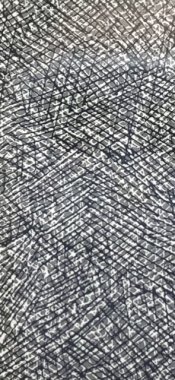
At a trade sho years ago I grabbed a “sample” screen. It’s “etching” texture and not truly “halftone” but more like three tones.
 

Attachments

  • 3B08A1AF-3414-4EA3-8FC2-4020D591951D.jpeg
    3B08A1AF-3414-4EA3-8FC2-4020D591951D.jpeg
    200.6 KB · Views: 153
  • 464F703F-F378-4183-9216-35E2FBB8F9C5.jpg
    464F703F-F378-4183-9216-35E2FBB8F9C5.jpg
    129.3 KB · Views: 123

Don_ih

Member
Joined
Jan 24, 2021
Messages
7,403
Location
Ontario
Format
35mm RF
@glbeas and @Bill Burk - this is information that is reaching the esoteric state. Once the techniques involved were dropped, it seems information about it vanished.

I have a stock of lith film that I would like to use for some of this (it doesn't do much else, really). Not sure what the final result would be, though... I've used some of it to make screenprinting screens - all very much "soot and chalk". Some kind of not-done-by-hand shading might be nice.
 

Lachlan Young

Member
Joined
Dec 2, 2005
Messages
4,842
Location
Glasgow
Format
Multi Format
You can also generate random pattern halftone screens from all manner of stuff - etched glass, certain diffusion materials, even something like Tri-X (Fomapan is probably better for this today).
 

Pieter12

Member
Joined
Aug 20, 2017
Messages
7,533
Location
Magrathean's computer
Format
Super8
creating halftoned copies of negatives.

Usually, one creates a halftone negative of a positive image. Also, Pocket Pal, by Frank Romano and Mike Riordan, published by International Paper (available through Amazon and probably other sellers), might help with some of the terminology and halftone processes.
 

glbeas

Member
Joined
Sep 25, 2002
Messages
3,913
Location
Marietta, Ga. USA
Format
Multi Format
Usually, one creates a halftone negative of a positive image. Also, Pocket Pal, by Frank Romano and Mike Riordan, published by International Paper (available through Amazon and probably other sellers), might help with some of the terminology and halftone processes.
Thats true for offset printing. If going to silkscreen or similar processes a positive is needed.
During the later years I worked at my hometown paper we also made halftones under the enlarger that could be put down directly on the pasteup page and shot onto the lithographic page film. The quality wasnt as good as stripped in halftone negs but was faster getting the page to plate and on the press.
 

Pieter12

Member
Joined
Aug 20, 2017
Messages
7,533
Location
Magrathean's computer
Format
Super8
halftones under the enlarger that could be put down directly on the pasteup page and shot onto the lithographic page film

Called a Velox, usually made as a contact print from a halftone negative or a direct positive (PMT) in a stat camera. You wouldn't want to use an enlarger as it would change the screen resolution.
 

glbeas

Member
Joined
Sep 25, 2002
Messages
3,913
Location
Marietta, Ga. USA
Format
Multi Format
Called a Velox, usually made as a contact print from a halftone negative or a direct positive (PMT) in a stat camera. You wouldn't want to use an enlarger as it would change the screen resolution.

Nope, we used a high contrast print paper and a halftone screen on top with glass. Used a dim lamp for the highlight bump exposure. Same handling as making the halftone negs just going direct from the continuous tone negative. I think the screen was a special profile for under the enlarger prints.
No point in doing so many steps to get the image. We did plenty of pmt shots as well for outside sourced prints for publication.
 
Photrio.com contains affiliate links to products. We may receive a commission for purchases made through these links.
To read our full affiliate disclosure statement please click Here.

PHOTRIO PARTNERS EQUALLY FUNDING OUR COMMUNITY:


Ilford ADOX Freestyle Photographic Stearman Press Weldon Color Lab Blue Moon Camera & Machine
Top Bottom