Aligning Omega enlargers

Hydrangeas from the garden

A
Hydrangeas from the garden

  • 2
  • 2
  • 63
Field #6

D
Field #6

  • 7
  • 1
  • 78
Hosta

A
Hosta

  • 16
  • 10
  • 157
Water Orchids

A
Water Orchids

  • 5
  • 1
  • 89

Recent Classifieds

Forum statistics

Threads
197,922
Messages
2,766,894
Members
99,505
Latest member
Alexander6x6
Recent bookmarks
0

ZoneIII

Member
Joined
Jan 7, 2007
Messages
264
Location
Illinois
Format
Large Format
In another thread, someone mentioned that they had a difficult time aligning the lens stage of their Omega D2 enlarger. I posted a suggestion and emailed the person who was having that problem. He replied saying that he used shims to align his lens stage and then glued it in place permanently. The problem with that method is that it makes, in effect, a lens stage that can't be re-aligned. As anyone knows, alignment goes off on enlargers. Even just raising the head can cause minor mis-alignment.

I have an old Omega D2 and a Beseler 45V-XL. I prefer the D2 and do at least 95% of my printing on it for two reasons: 1) It is much easier to align and... 2) It is easier to make an above-the-negative filter drawer for it. (I don't like using contrast filters in the optical path.)

There are easy things that you can do to an Omega enlarger to make it super-fast and easy to align. Maybe someone else will find these simple modifations useful. I would not recommend that you do anything make it so your enlarger can't be aligned. Instead, if possible, do things that make it easier to align because it's going to need re-alignment at some point.

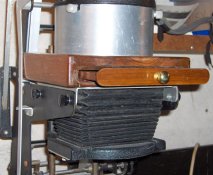
The first thing is to simply place a donut of rubber (I used mouse-pad material) between the lens plate and the cone. You then drill two more holes for attaching the plate to the cone, tap the cone holes, and use thumb screws for adjustment. (You could use a 3-hole setup but you would have to drill and tap two holes anyway because the factory holes are 180% apart and a 3-hole setup should have the holes 120% apart. Also, I have found 4-holes to be better because you can align the two planes separately more easily.) The modification took no more than 20 minutes to do.

The other modification is to simply replace the film plane screws with thumb screws.

I use a Versalab laser alignment tool and it's one of those things that, once I got it, I wondered how I did without it for so many years. It takes five minutes at the most to align my D2 and the laser is much more sensitive and accurate than bubble levels. In fact, I check and adjust the alignment before I make all final prints. I generally make very large prints for display in hospitals, offices, etc. My printing sessions are long - about 10-12 hours - and I generally make two or three finished prints in that time (not including proofs, tests, and multiple prints, of course.) I probably spend between 5 and 10 minutes total checking and tweaking alignment of my wall-mounted D2 and it's time well spent.

One attached picture shows the lens/cone modification. Another shows the negative stage thumbscrews. Also note the filter drawer.

I hope this info may be useful for others.
 

Attachments

  • Picture 009.jpg
    Picture 009.jpg
    48.5 KB · Views: 404
  • Picture 007-S.jpg
    Picture 007-S.jpg
    274.3 KB · Views: 456
Last edited by a moderator:

David A. Goldfarb

Moderator
Moderator
Joined
Sep 7, 2002
Messages
19,974
Location
Honolulu, HI
Format
Large Format
I haven't gotten the instructions, but Harry Taylor sells instructions and an alignment kit from classic-enlargers.com. I'm not quite sure how it's done, but I'm fairly sure there's a way of aligning the lens stage apart from the film stage without modifying the enlarger, and I think it involves adjusting the whole carriage on the column.
 

RJS

Member
Joined
Jan 4, 2005
Messages
246
Location
Southern Cal
Format
Multi Format
I used to worry about using below-the-lens filters with my Beseler and used 6 inch ones in the drawer with the condenser head. But when I changed to a cold light there was no drawer except for the very expensive Aristo. However, using filters below the lens I have as yet been unable to see a difference. Writers like Ctein also seem to have been concerned and run tests making all sorts of outrageously large print sizes, microscopes and etc. and no one I am aware of has found any degradation of the image due to the filters close below the lens. I think that perhaps the only difference might be a very slight reduction in contrast, but even that seems problematical. Or at least measuring/demonstrating any loss seems impossible. I too routinely test/re-align the lenswhenever I vhange it and for every enlarging session. The Versalab is as you say invaluable!
 

David A. Goldfarb

Moderator
Moderator
Joined
Sep 7, 2002
Messages
19,974
Location
Honolulu, HI
Format
Large Format
With my cold light head, I just insert a 6" filter between the head and the negative carrier when I use VC paper. It doesn't seem to cause any problems.
 

pelerin

Member
Joined
Sep 11, 2004
Messages
343
Format
Multi Format
I haven't gotten the instructions, but Harry Taylor sells instructions and an alignment kit from classic-enlargers.com. I'm not quite sure how it's done, but I'm fairly sure there's a way of aligning the lens stage apart from the film stage without modifying the enlarger, and I think it involves adjusting the whole carriage on the column.

Hi,
The axle between the two railroad wheels at the upper rear of the carriage is drilled eccentrically. Loosen (but do not remove) the two bolts that fasten it to the carriage, place a rod through the small hole and rotate the axle. You will see the carriage (and lens stage) move in relation to the column.
Celac
 

David A. Goldfarb

Moderator
Moderator
Joined
Sep 7, 2002
Messages
19,974
Location
Honolulu, HI
Format
Large Format
Thanks. I knew it had something to do with turning those axles on the back from the hole in the center, but I wasn't quite sure what the procedure was.
 

Lee L

Member
Joined
Nov 17, 2004
Messages
3,281
Format
Multi Format
The hole in the eccentric axle on my D5 is just to the right of the spring housing bracket as you view the enlarger from the rear.

Viewed from the front of the enlarger, the left rear negative stage screw (nearest the column) is "fixed". The other three are slotted to allow for adjustment.

Lee
 
OP
OP
ZoneIII

ZoneIII

Member
Joined
Jan 7, 2007
Messages
264
Location
Illinois
Format
Large Format
David, There most definitely is a way to align negative the stage and it couldn't be simpler. Look at my picture of the enlarger. See those four black thumbscrews that I mentioned in my original post? All you do is loosen them and then you can lift or lower four corners of the negative stage. Someone mentioned that only three of the screw holes were elongated (which is fine) but all of mine are elongated. The process of aligning an Omega enlarger is super-simple which is why I find it surprising that the subject comes up among darkroom workers so often.

As I mentioned, I use a VersaLab laser alignment tool but you could use a bubble level tool or even just a small carpenters level and a piece of glass that sticks out far enough from the negative stage to place it on.

My D2 is wall-mounted and the enlarging table itself was leveled first. I never have to mess with that but the alignment procedure would take care of any problems there anyway.

Here is the procedure that I use which may be of interest to anyone who hasn't used a laser alignment tool. It takes no more than five minutes maximum:

I place a piece of glass (comes the VersaLab) into the negative carrier. Then I place the laser tool on the easel and turn it on. I place it so it is directly below the negative stage and that the laser bounces off the glass and back onto the face of the laser tool. I then slightly loose the four screws (black thumbscrews) in the picture and simply move the negative stage until the laser bounces directly back into the tiny hole that it is emitted from on the laser tool. It is super sensitive and accurate. I lock down the thumb screws and now the negative stage plane is exactly parallel to the easel.

Then I basically repeat the procedure for the lens stage. A glass slide is held to the rim of the enlarging lens with elastic bands. Then I simply adjust the four thumbscrews on my modified cone until the bounced laser again goes precisely back into the hole it is emitted from and then I tighten the thumbscrews. Now all three planes are in perfect parallel. It almost takes less time to actually do than it took me to write this... and I'm a fast typist. It's actually fun to do and it's extremely precise.


RJS - I agree with you that it is difficult to see any loss of sharpness when you use below-the-lens (BTL) contrast filters - assuming they are clean. But I did some tests with brand new BTL filters and there was a minor but noticeable difference. I wouldn't lose any sleep about using BTL filters if I had to but I don't have to. It is very easy to build a filter drawer for Omega enlargers. It's a one-time project and then you never have to even think about it anymore. My drawer is a little fancier than necessary but I am a reproduction furniture maker in my spare time and I am handy. But here is a little more detail on how I made mine: The main square portion (the top) was chucked in a lathe to turn the lipped hole that slides over the Aristo cold light. It is a perfect slip fit and it needs nothing to hold it in place. The drawer bottom is UV blocking glass. I decided to use that based on Ctein's claim that some modern extended range VC papers are sensitive to UV and a secondary image can form when printing because UV focuses in a different distance than visible light. If anyone remembers Ctein's articles on the subject, you may remember that his solution was an incredibly complicated procedure of doing tons of tests and raising or lowering the enlarging paperby minute amounts by placing or removing sheets of paper below it. His method didn't eliminate his claimed double image at all. It merely focused between them. Some people wrote into the magazine (Camera and Darkroom) saying that their own tests confirmed that there was indeed a double image in the print. Even enlarger lens manufacturers admitted that there was a potential problem. Some blamed enlarging lens manufacturers but if there was any real blame to be placed it would be with the VC paper manufacturers.

Anyway, Ctein claimed that some enlarger light sources emitted UV while others didn't. As I said, his solution was - well - goofy - and it didn't solve the problem. I thought about it for a minute and it dawned on me that the solution was very simple. Just block the UV light so it can't reach the paper in the first place. So I made my filter drawer bottom out of UV blocking Plexiglas. I don't know if there really was a problem with my enlarger but it cost virtually nothing to eliminate any possibility of a problem so why not? I had some extra UV blocking glass so I cut a disk of it and put it above the diffuser in my other Aristo head that I use on my Beseler 45V-XL.

Anyway.... I got side-tracked. :smile: Back to the drawer. The bottom is a diffuser and it rests just above the negative. That reduced the chance of specks on the filters or the drawer bottom showing up in the print. Of course, the diffuser should be kept clean but they should be clean anyway. But if there was no diffuser, my filters would have to be perfectly clean and the drawer bottom would also have to be clean. With the diffuser, even damaged filters could be used. Only the two sides of the diffuser have to be perfectly clean.

The drawer works beautifully but a MUCH simpler one could be made. Heck! You could make one of of cardboard and tape! The point is that there really is no need to use BTL filters when it's so easy to eliminate any possible loss of sharpness that you can experience with them. Most people who are interested in photography enough that they are members of APUG do everything they asonably can to improve our images. We use good lenses and filters so why take a chance in the last step of the process? Eliminating any possible loss of sharpess from having filters in the image path is one of the easiest things you can do. Also, as you know, BTL contrast filters have to be clean but they are easily damaged. As someone else posted here, you can simply place 6x6" contrast filters above the negative carrier. But if you do that, it is a good idea to have a diffuser under them. In fact, that is exactly what I do when I print on VC papers with my 45V-XL because it is difficult to make a filter drawer for that design. I have a piece of diffusion glass with an edge around it to hold the 6x6" filters. I simply place it over the film on the negative carrier. Nothing to it! Remember, the 6x6" contrast filters are not optical grade. They are not meant to be used in the image path. That's what the diffuser is for.
 
Last edited by a moderator:
Photrio.com contains affiliate links to products. We may receive a commission for purchases made through these links.
To read our full affiliate disclosure statement please click Here.

PHOTRIO PARTNERS EQUALLY FUNDING OUR COMMUNITY:


Ilford ADOX Freestyle Photographic Stearman Press Weldon Color Lab Blue Moon Camera & Machine
Top Bottom