I have 2 Agfa Universal 8x10 cameras that lack bellows. I'm going to attempt to make some replacement bellows for the cameras, but I don't have a complete set of frames or old bellows to pattern from. I'm hoping someone on the forum could take a look at their camera and answer a couple questions for me or perhaps post some quick digisnaps to clarify some things.
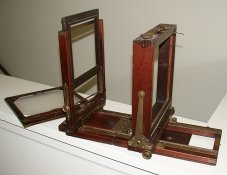
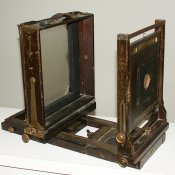
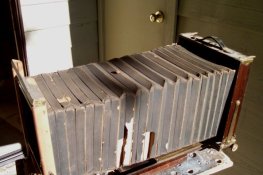
First, I'd like to know where the bellows are attached to the rear frames. I assume the rear of the bellows attaches to the inside of the frame rather than the surface facing the lens. Is that correct?
Second, it appears from some other info I've received that the bellows wraps around the front frame and attaches to the surface facing the lens, thus being sandwiched between the bellows frame and the lensboard frame. Can someone confirm this?
Does anyone see a reason or know why the front frame appears square while the rear is rectangular? The backs are reversible on these cameras and so, square. Assuming a symmetrically tapering bellows would be easier to construct than one with two different tapers (i.e., the sides differ from top/bottom), why wouldn't the rear bellows frame also be a square (especially if the bellows attaches to the inside of the frame)? Anyone know?
I think I have the design figured out now, but would still like to confirm how the bellows attaches to the rear. Making these bellows is pretty time-intensive and being off my a few fractions of an inch can really affect the results. So, I'd like to get as much info as possible before starting to construct the bellows.
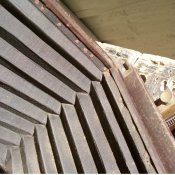
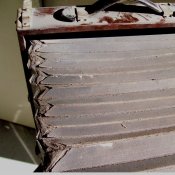
So, can someone please post a quick digital snapshot of a rear corner of the area where the bellows & frame attaches to the rear box? A picture is worth a thousand words you know.
Thanks,
Joe
First, I'd like to know where the bellows are attached to the rear frames. I assume the rear of the bellows attaches to the inside of the frame rather than the surface facing the lens. Is that correct?
Second, it appears from some other info I've received that the bellows wraps around the front frame and attaches to the surface facing the lens, thus being sandwiched between the bellows frame and the lensboard frame. Can someone confirm this?
Does anyone see a reason or know why the front frame appears square while the rear is rectangular? The backs are reversible on these cameras and so, square. Assuming a symmetrically tapering bellows would be easier to construct than one with two different tapers (i.e., the sides differ from top/bottom), why wouldn't the rear bellows frame also be a square (especially if the bellows attaches to the inside of the frame)? Anyone know?
I think I have the design figured out now, but would still like to confirm how the bellows attaches to the rear. Making these bellows is pretty time-intensive and being off my a few fractions of an inch can really affect the results. So, I'd like to get as much info as possible before starting to construct the bellows.
So, can someone please post a quick digital snapshot of a rear corner of the area where the bellows & frame attaches to the rear box? A picture is worth a thousand words you know.
Thanks,
Joe