advice spotting prints

Death's Shadow

A
Death's Shadow

  • 0
  • 1
  • 28
Friends in the Vondelpark

A
Friends in the Vondelpark

  • 1
  • 0
  • 58
S/S 2025

A
S/S 2025

  • 0
  • 0
  • 64
Street art

A
Street art

  • 1
  • 0
  • 58
20250427_154237.jpg

D
20250427_154237.jpg

  • 2
  • 0
  • 84

Recent Classifieds

Forum statistics

Threads
197,516
Messages
2,760,328
Members
99,524
Latest member
llorcaa
Recent bookmarks
1

darinwc

Subscriber
Joined
Dec 14, 2003
Messages
3,121
Location
Sacramento,
Format
Multi Format
OK, Ive made my first 11x14 prints from 35mm negatives.

White spots from dust on the negative really stand out on this size enlargement.

So I went to the photo store and they reccomended to get a set of spotting pens instead of ink. (ouch the pens were $35 vs $5 for the ink!)

So I'm trying out the pens on some extra prints and it seems to be much harder than it should be. here are my issues:

-the pens leave a 'drop' of ink at the end of the stroke. The 'drop' of ink seems darker than what the pen is labeled with. So I could 'dab' the pens on the spots, but places where there is a white line from a fiber, I guess i will have to use a cotton swab to soak up the drop at the end.

-the ink is translucent. This is a real pain, cause if I miss the white spot at all, it adds density to the surrounding area. I end up with a dark dot right next to the white dot. This happens even if use a lighter shade than the surrounding area. Again it adds density.

OK I was getting really frustrated. Any advice will be appreciated.
 

vpwphoto

Member
Joined
Feb 21, 2011
Messages
1,202
Location
Indiana
Format
Multi Format
Spot-tone to match your paper. #3 is best for most.
A pice of old paper
Spit... yes spit
Shake bottle (slightly) take off lid.... put open bottle in another room (if not you will spill it on your nice print)
Use fine bush to to get spot-tone from lid, and mix with spit and build up the tones to match. Don't do it all at once.

You can buy two sable brushes and a bottle of spot-tone for less than those markers and if you don't spill the spot-tone it will last forever.
 

MattKing

Moderator
Moderator
Joined
Apr 24, 2005
Messages
51,965
Location
Delta, BC Canada
Format
Medium Format
Tiny, tiny dots!

Don't try to spot out the white areas with a single large application.

Instead, fill in the white areas with lots and lots of almost imperceptible little dots of dye.

Keep the pens moving as you lightly touch the area over and over - a figure 8 pattern of small movements works well.

It is generally better to spot too little.

The pens work well once you get used to them - and if you apply the tone this way the pens will last a very long time.
 

RalphLambrecht

Subscriber
Joined
Sep 19, 2003
Messages
14,563
Location
K,Germany
Format
Medium Format
Darin

I could never get used to the pens. In my opinion, spotting dyes are the way to go! Spotone is unfortunately no longer with us, Marshall's works just as well. I have made my own from China Ink sticks and wouldn't hesitate to use good fountain pen ink as well.

I can offer this read on the subject:

http://www.waybeyondmonochrome.com/WBM2/TOC_files/PrintSpottingEd2.pdf

and some interesting facts about fountain pen inks:

http://www.pendemonium.com/ink_facts.htm#top

I suggest the following action list, sorted by my preference:

1. Get used Spotone #3 and #2 if you sulfide tone your images.
2. Get the Marshall's equivalent (still available).
3. make your own using an ink stick.
4. Use black fountain pen ink.

But whatever you do, don't use products with egg-white (such as Schmincke). They are also expensive and do not soak into the emulsion but end up sitting on top of the print where they are shiny and easily detectable.
 

Barrie B.

Member
Joined
Jul 10, 2008
Messages
72
Location
Melbourne Au
Format
4x5 Format
Print spotting

Print spotting is an 'ART ', it takes a while to get the hang of it .
( it is much better to spend your time ' removing the dust from the negative before printing ' ) . However now that you have these ' white spots ' they are best removed with almost dry spotting using a very fine camel-hair brush - size 0 , or 00 , and ' spotone '. Make up a palette of the color about the size of your small finger nail on a piece of white china / glass or a white section of a glossy print scrap , then make a second small pool of color from this one with a drop of water to dilute the color, and a third pool from the 2nd. one also diluted, etc. It is from these sample pools that you dip your brush, then wipe it almost dry on a test strip and compare the color to your real print.You will be amaized how a small dob that is both smaller and lighter than your 'white spot ' makes the spot disappear. Using a 3X magbifier also helps.
I have a piece of glossy fibre base processed printing paper peppered with dobs of black and gray spotone that has dried hard and each piece comes alive with a small drop of water from my brush each time I have to spot.
A little bit of spotting material goes a long way .
I hope this helps........... Cheers Barrie B.
 

tkamiya

Member
Joined
Oct 3, 2009
Messages
4,287
Location
Central Flor
Format
Multi Format
I use Marshalls' dyes. A day before I am going to spot, I take a drop of the dye and put it in a place of my palette. Put one or two drops of water let dry overnight. It will dry up and form a very thin layer of dye. Bottom is the thinnest and goes darker as it goes up the wall of the palette.

Next day, I take my very small spotting brush and barely wet it with water. I pick up the right shade of the thin die from dried up dye I made yesterday. Brush lightly on spare piece of paper and make sure the density is right. More importantly, I make sure the brush is not too wet. For me, having the brush just barely moist but mostly dry works the best. Also, if too dry, bristles separate so it needs to be a bit wetter than that.

Spot, spot, spot. Look. Repeat if necessary. I typically wait for 5 minutes after all done and review my work.

Letting the dye dry first in this fashion allows me to pickup very minute amount of the material easily, accurately, and repeatably. I can exercise far more control than diluting it on the spot.

If I really mess it up, I wash the print again and dry, then repeat.
 

Worker 11811

Member
Joined
Jan 18, 2010
Messages
1,719
Location
Pennsylvania
Format
Multi Format
Tiny, tiny dots!

Don't try to spot out the white areas with a single large application.

Pointillism. As in Georges Seurat.
http://www.artfortune.com/pointillism/

Except you're making much smaller dots and you only have one color to work with.

Basically, you're trying to mimic the random pattern of the film grains that make up the image.

Put a drop of spotting dye in the middle of a white saucer then put the rest of the bottle away. Dip the brush in clear water and make a small puddle of water mixed with dye part way out to the rim. Make another puddle of water and dye using the mixture from the previous puddle. Successive dilution...get it?

Blot the brush dry on a piece of paper towel then dip just the tip of the brush in the (successively diluted) puddle of dye that most closely matches the area that you want to spot over. Make some test dots on a scrap piece of photographic paper that is the same as the kind as your print is made on. This is a good thing to use some of your test strips for. Continue to make diluted or concentrated mixtures of dye/water, testing them on your scrap paper until you are satisfied with your color match.

The ability to dilute your dye to get an exact match is where liquid dye and brush win out over spotting pens. You can also choose your brush so you can make the exact size of dots you want.

When you've diluted your dye to match your print and have had a practice session, it's time to channel Georges Seurat and have at your print.

Strangely, it's not as hard as it sounds but it takes time to get the hang of it.

Make a couple of duplicate prints in case you aren't satisfied with the result of the first. I suppose you could wash the dye out, dry the print again and start over but what the hell... You should make yourself a reference print anyway. Right?
 

MattKing

Moderator
Moderator
Joined
Apr 24, 2005
Messages
51,965
Location
Delta, BC Canada
Format
Medium Format
Folks, the OP already has the pens. He may as well learn to use them.

Personally, I like them, because they work well for me.
 

Jim Jones

Subscriber
Joined
Jan 16, 2006
Messages
3,745
Location
Chillicothe MO
Format
Multi Format
I've also used Dr. Ph. Martin's ink, usually available at arts & crafts stores. It can be used as others above have described using Spotone.
 

Mike Wilde

Member
Joined
Aug 10, 2006
Messages
2,904
Location
Misissauaga
Format
Multi Format
The cost of the dye is only half the equation. The brush is where the retouching capital costs are involved. I have two spotting only brushes.

Windsor & Newton sable hair. One is 00 size and the other 000 size. Very Fine. Neither of mine cost less than $20 over 20 years ago.

The different dried spotting colours are dried in a 4 troughs of a 5 trough glazed bone china watercolur palette. The spare 5th trough is used for mixing dry dyes for matching toned print colours.

Yes, a tiny wipe of the brush on your tongue is all the moisture it takes to pick up a bit of dried dye.

I keep spoiled/test prints processed the same as finished prints to use for the first dab of the dye laden brush, and may dab a few more times to lighten the tone before applying spotting to the final print.
 

TheFlyingCamera

Membership Council
Advertiser
Joined
May 24, 2005
Messages
11,548
Location
Washington DC
Format
Multi Format
I really like the pens. The trick with the pens is to start with a lighter shade than you think, and try it out. If it's too light, it'll look like you didn't spot it at all. If you put too much on, or too dark a shade, then a quick dab with something wet (a q-tip in distilled water is probably best, but I've been known to wet my finger with a dab of spit as well) will take it up immediately to no ill effect. Best technique is to hold the pen vertically, and dab downward (as previously mentioned, think pointilism). Don't try to use it like a pen to draw lines.
 

vpwphoto

Member
Joined
Feb 21, 2011
Messages
1,202
Location
Indiana
Format
Multi Format
Just saying to the OP... that many of us old timers used spot-tone tried the pens, and went back to spot-tone. I just hoarded the last two bottles at the local store.
 
OP
OP
darinwc

darinwc

Subscriber
Joined
Dec 14, 2003
Messages
3,121
Location
Sacramento,
Format
Multi Format
Well i was lucky and while I was rummaging through some old boxes I found about 6 bottles of spottone in various shades.

However i also noticed at my local photo store that they had another product they did not tell me about the first time. I dont remember what the name of it was, but it included an opaque white to mix with the black dyes. if I hadnt already bought the pens, I would have tried this out.
 

Ian Grant

Subscriber
Joined
Aug 2, 2004
Messages
23,249
Location
West Midland
Format
Multi Format
I really like the pens. The trick with the pens is to start with a lighter shade than you think, and try it out. If it's too light, it'll look like you didn't spot it at all. If you put too much on, or too dark a shade, then a quick dab with something wet (a q-tip in distilled water is probably best, but I've been known to wet my finger with a dab of spit as well) will take it up immediately to no ill effect. Best technique is to hold the pen vertically, and dab downward (as previously mentioned, think pointilism). Don't try to use it like a pen to draw lines.

That excellent advice goes for pens or brushes.

It's not about spotting perfectly from the outset , rather hiding the defect so it's never seen again :D

The huge mistake most make is immediately match what's missing. I remember teaching someone to spot colour prints about 25 years ago, it was so simple, ironically he's never realised that was the first colour print I'd worked on. However I had been hand colouring B&W ptints for a few years :smile:

Ian
 

Ian Grant

Subscriber
Joined
Aug 2, 2004
Messages
23,249
Location
West Midland
Format
Multi Format
Ian is right. The goal of spotting is not to eliminate spots, the goal is to disguise them.

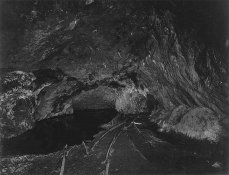
This was a multiple flash shot, 3 photographers and a spare husband popping off 4 large hand held flash-guns painting the cavern (a manganese mine), however some weren't as careful as I'd asked a straight print shows me in the image rather ghost like.

manganese.jpg

I got the shot after about 12-16 flashes from each unit, everyone else closed their shutters way earlier (maybe 4 flashes), then was horrified to see I'd be caught on the right of the image, the flash gun I held was very obvious.

Probably 2 hours work and I'd completely retouched myself out. It's a softly softly approach but works.

Ian
 

M. Lointain

Member
Joined
Jun 1, 2011
Messages
143
Format
Multi Format
I can't really help the op with anything that hasn't already been said. I will say though that I prefer to use a really big brush by retouching standards. I find everything goes a lot faster with one. It also helps to skip around the print building the density up as you go. If you try to fix a spot all in one shot it doesn't work very well. By fixing it a little at a time it is very hard to overdo it.

I have found Raphaël brushes to be superb. I prefer them over Winsor & Newton anyway.
 

Gerald C Koch

Member
Joined
Jul 12, 2010
Messages
8,139
Location
Southern USA
Format
Multi Format
Sometimes its easier to apply the dye using a sharpened wooden toothpick. Make a solution of a drop of Photo-Flo to a couple of ounces of water. Dilute the dye with a few drops of this solution so that it is lighter than needed. The dye should be lighter than the surrounding area of the print so that several applications must be made. Allow the pick to soak in the diluted dye for a few minutes. When you remove the pick from the dye make sure there is no visual drop clinging to it. Hold the pick veritcal to the print and apply to the spot. Dip the pick in the dye for a moment and repeat. Keep doing this until the spot is no longer visible.
 
Last edited by a moderator:
Joined
Mar 14, 2005
Messages
524
Location
Germany
Format
Medium Format
Besides Spotone and an excellent 10/0 brush, I find my clip on spectacle magnifiers (the English name, the German manufacturer gave this device) indispensable. A simple magnifying glass does not work as you need to see stereoscopic to exactly hit your spot.

Ulrich

EDIT: Just seen, Roger already gave you the advice
 

MattKing

Moderator
Moderator
Joined
Apr 24, 2005
Messages
51,965
Location
Delta, BC Canada
Format
Medium Format
They certainly aren't as effective as the specialized magnifiers, but the "reading" glasses you can buy at many stores for very little money work well for spotting and camera repairs.

Just be sure to get ones that are more powerful than your existing prescription (if any).
 

tkamiya

Member
Joined
Oct 3, 2009
Messages
4,287
Location
Central Flor
Format
Multi Format
That is a great idea (about the reading glasses)!
 

Toffle

Member
Joined
Mar 27, 2007
Messages
1,930
Location
Point Pelee,
Format
Multi Format
I think print spotters need something like a 12-steps program. I will be fine for a few weeks or months and then I will fall off the wagon. It starts with "just one or two spots". Then I find myself going through my recent prints looking for miniscule blemishes and next thing you know, I'm fixing the kitchen wallpaper. :blink:
 

ROL

Member
Joined
Oct 27, 2005
Messages
796
Location
California
Format
Multi Format
The art of spotting is to know when to leave well enough alone. I use 99¢ 3.5 diopter glasses to spot under strong light, then change to normal reading glass strength (1.5 for me) to evaluate the print. If the spot is no longer noticeable at this point, it will be all but invisible at normal viewing distances, and I am done.

I've tried "spotting pens" on recalcitrant spots many times. In every case I've had to return to brush and spot tone inks.
 

RalphLambrecht

Subscriber
Joined
Sep 19, 2003
Messages
14,563
Location
K,Germany
Format
Medium Format
OK, Ive made my first 11x14 prints from 35mm negatives.

White spots from dust on the negative really stand out on this size enlargement.

So I went to the photo store and they reccomended to get a set of spotting pens instead of ink. (ouch the pens were $35 vs $5 for the ink!)

So I'm trying out the pens on some extra prints and it seems to be much harder than it should be. here are my issues:

-the pens leave a 'drop' of ink at the end of the stroke. The 'drop' of ink seems darker than what the pen is labeled with. So I could 'dab' the pens on the spots, but places where there is a white line from a fiber, I guess i will have to use a cotton swab to soak up the drop at the end.

-the ink is translucent. This is a real pain, cause if I miss the white spot at all, it adds density to the surrounding area. I end up with a dark dot right next to the white dot. This happens even if use a lighter shade than the surrounding area. Again it adds density.

OK I was getting really frustrated. Any advice will be appreciated.
here is what i do:
 
Photrio.com contains affiliate links to products. We may receive a commission for purchases made through these links.
To read our full affiliate disclosure statement please click Here.

PHOTRIO PARTNERS EQUALLY FUNDING OUR COMMUNITY:


Ilford ADOX Freestyle Photographic Stearman Press Weldon Color Lab Blue Moon Camera & Machine
Top Bottom