Advice sought on dodge and burn in this print.

Shadow 2

A
Shadow 2

  • 0
  • 0
  • 16
Shadow 1

A
Shadow 1

  • 2
  • 0
  • 17
Darkroom c1972

A
Darkroom c1972

  • 1
  • 2
  • 31
Tōrō

H
Tōrō

  • 4
  • 0
  • 39

Recent Classifieds

Forum statistics

Threads
198,826
Messages
2,781,478
Members
99,718
Latest member
nesunoio
Recent bookmarks
0

Andy K

Member
Joined
Jul 3, 2004
Messages
9,420
Location
Sunny Southe
Format
Multi Format
I have been tryimg to make a photograph where there are some big contrasts between a bright sunny day and a shaded underside of a roof.

Here is a negative scan. As you can see there is detail in the front of the two trains.

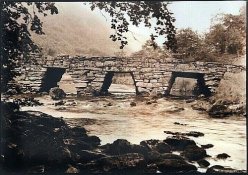
Here is a scan of one of the prints I have made so far. I have arrived at an exposure time for the roof and floor areas of 12 seconds at f/11.
The problem is in burning in the two triangles of bright light to the left and right in order to show the detail in the trains. How do I do this without over exposing the cast iron roof support columns?

Thanks in advance for any suggestions.
 

Lee L

Member
Joined
Nov 17, 2004
Messages
3,281
Format
Multi Format
Have you tried flashing or split filter printing, or (more likely to work) a combination of the two? Maybe if you mentioned details what you've done on the work print that would help elicit more helpful suggestions.

Are you using VC paper, or graded?

Lee
 
OP
OP
Andy K

Andy K

Member
Joined
Jul 3, 2004
Messages
9,420
Location
Sunny Southe
Format
Multi Format
Hi Lee. I'm using Ilford MGIV RC pearl paper. I have made several prints and so far it is looking like I will have to burn at least an extra 20 seconds to bring out the detail in the trains. I did try preflash but it made no difference.

I am using a Meopta Opemus 6 Color enlarger, with the dials set to zero which is equivalent to a multigrade filter of 2. Any less contrast and the underside of the roof starts to look 'fogged' and loses it's blacks.
 

Ole

Moderator
Moderator
Joined
Sep 9, 2002
Messages
9,244
Location
Bergen, Norway
Format
Large Format
Use lower contrast paper. The print scan shows a lot higher contrast than the neg scan; the negative looks to be very contrasty. You could try a fixed-grade paper; the curves are different enough that a completely different paper can give completely different results. If you really prefer VC, try Varycon (AKA ADOX) which has the slackest shoulders of any paper I've tried so far.

For something like this I might even consider lith printing, the only way I have managed to produce a decent print of one of my "worst" negatives: Even with a compensating developer this negative from a 17 stop (!) scene is impossible to print normally.
 

Attachments

  • bro.jpg
    bro.jpg
    83.8 KB · Views: 212

Nige

Member
Joined
Sep 8, 2002
Messages
2,317
Format
Multi Format
If the preflash made no difference, you need to retest your preflash time.

Also, what you're experiencing is why I rarely scan a neg to 'preview' it before printing. Two completely different beasts!
 

Donald Miller

Member
Joined
Dec 21, 2002
Messages
6,230
Format
Large Format
Andy,

I would print the image at a grade one as a start. Determine the proper exposure to hold details in the trains and to arrive at the highlight tone that you want. You might even drop down to a grade one half for the first exposure. I would then burn in the roof only at a grade five to arrive at the black that you want for that area.

The problem in this negative and consequently in the print is that you have three contrast areas to deal with. The first contrast is the one that everyone else has addressed that is the overall contrast between the blackest black and the whitest white in the entire print.

The second and third contrasts are localized contrast in the sunlit area outside the porch (second localized contrast) and the area under the porch roof (third localized contrast). There is a vast difference in the localized contrast within and between these two areas.

In order to arrive at a meaningful print you need to resolve the second and third contrasts while maintaining the first contrast in the print. The procedure that I outlined at the beginning will do that for you.

I see no need to dodge this print at all. The only remedial step is the high contrast burn that I mentioned.

Good luck.
 

Donald Miller

Member
Joined
Dec 21, 2002
Messages
6,230
Format
Large Format
Nige said:
If the preflash made no difference, you need to retest your preflash time.

Also, what you're experiencing is why I rarely scan a neg to 'preview' it before printing. Two completely different beasts!


I don't think that I would use a preflash in printing this negative. Preflashing the paper compresses highlight tonality. That is a sure way to lose the sense of light in this image.
 

Donald Miller

Member
Joined
Dec 21, 2002
Messages
6,230
Format
Large Format
Ole said:
Use lower contrast paper. The print scan shows a lot higher contrast than the neg scan; the negative looks to be very contrasty. You could try a fixed-grade paper; the curves are different enough that a completely different paper can give completely different results. If you really prefer VC, try Varycon (AKA ADOX) which has the slackest shoulders of any paper I've tried so far.

For something like this I might even consider lith printing, the only way I have managed to produce a decent print of one of my "worst" negatives: Even with a compensating developer this negative from a 17 stop (!) scene is impossible to print normally.


Using a lower grade paper or printing at a lower grade will lead to compression of shadow detail. The print will lose it's impact when you do this.
 

df cardwell

Subscriber
Joined
Jul 16, 2005
Messages
3,357
Location
Dearborn,Mic
Format
Multi Format
Fiber would make it easier: you'd get another step in the whites.

On fiber, I'd expect a two bath, or water bath, develoment to do the trick.

With RC, Donald is right on.

good luck !
 

Ole

Moderator
Moderator
Joined
Sep 9, 2002
Messages
9,244
Location
Bergen, Norway
Format
Large Format
Donald Miller said:
Using a lower grade paper or printing at a lower grade will lead to compression of shadow detail. The print will lose it's impact when you do this.

That depends on the paper and the developer; it doesn't necessarily follow.
 

Charles Webb

Member
Joined
Nov 7, 2004
Messages
1,723
Location
Colorfull, C
Format
Multi Format
Andy,
This is where Pan Masking film really was the pot of gold at the end of the rainbow. Kodak hasn't made this stuff for years, and I am not sure if any other manufacturer makes such a film. You contact printed your negative
on to the Pan masking film by using different thickness of glass with a sheet of diffusing material sandwiched in between. Develop the Pan Mask a positive as I remember and place it in register with your original negative. then print. The mask held back the thin areas of the negative and allowed the highlight to burn in. I haven't done this in over fifty years, but it did work back then. You mught have to make several tries to get the mask perfect, but once achieved you could make one print or a thousand all just alike. I am sure this can still be done today, but I admit I am foggy on the technique but I know I used 1/4 inch polished plate glass and 1/8 inch polished plate and Crystalene diffusion material. I placed the diffusion material on a sheet of 1/4 in glass, then the negative emulsion down over the diffusing material. then covered the negative with an 1/8 inch piece of glass.
Next placed the 1/8th and 1/4 sandwitch over the Pan Masking film.

(A sheet of 4x5 black paper is used over the easel or enlarger base to kill any reflection.) I used a seperate 1/4 inch glass sheet on the easel to help keep things flat. Then exposed the mask under my enlarger . Jeeze this sounds complicated.

_________________________ 1/8 glass

_________________________ Neg
_________________________ Crystalene Diff.

_________________________ 1/4 in. glass
_________________________ Mask film. Emulsion up.
_________________________ Black paper

_________________________ 1/4 in. glass
on enlarger base.

The black paper keeps the light from bouncing back up through the masking film. I also used a litho reversal film with some success as a masking film. Any way, the post is food for thought! All, a long time ago in a place far far away...........

Charlie.............................
 

Donald Miller

Member
Joined
Dec 21, 2002
Messages
6,230
Format
Large Format
df cardwell said:
Fiber would make it easier: you'd get another step in the whites.

On fiber, I'd expect a two bath, or water bath, develoment to do the trick.

With RC, Donald is right on.

good luck !


I haven't printed with RC in over twenty years. Hated the stuff then...see no need to print on anything other then fiber. BTW I would print it the way I said with VC fiber.

I'd use your suggestions if I was printing on graded fiber.
 

Donald Miller

Member
Joined
Dec 21, 2002
Messages
6,230
Format
Large Format
Charles Webb said:
Andy,
This is where Pan Masking film really was the pot of gold at the end of the rainbow. Kodak hasn't made this stuff for years, and I am not sure if any other manufacturer makes such a film. You contact printed your negative
on to the Pan masking film by using different thickness of glass with a sheet of diffusing material sandwiched in between. Develop the Pan Mask a positive as I remember and place it in register with your original negative. then print. The mask held back the thin areas of the negative and allowed the highlight to burn in. I haven't done this in over fifty years, but it did work back then. You mught have to make several tries to get the mask perfect, but once achieved you could make one print or a thousand all just alike. I am sure this can still be done today, but I admit I am foggy on the technique but I know I used 1/4 inch polished plate glass and 1/8 inch polished plate and Crystalene diffusion material. I placed the negative on a sheet of 1/4 in glass, then covered the negative with an 1/8 inch piece.
Then placed the 1/8th and 1/4 sandwitch on the diffusion material, then the Pan Masking film under the diffusion material then a sheet of 4x5 black paper
and and another sheet of glass to keep things flat. Then placed under my enlarger to expose the mask. Jeeze this sounds complicated.

_________________________ 1/8 glass

_________________________ Neg
_________________________ Crystalene Diff.

_________________________ 1/4 in. glass
_________________________ Mask film. Emulsion up.
_________________________ Black paper

_________________________ 1/4 in. glass
on enlarger base.

The black paper keeps the light from bouncing back up through the masking film. I also used a litho reversal film with some success as a masking film. Any way, the post is food for thought! All, a long time ago in a place far far away...........

Charlie.............................

Charlie,

This is a method that works well even yet today. I use APHS ortho lith film developed in Dektol 1-30 for a contrast reduction mask. I use this method a lot when I print on graded paper. However with VC a whole new means of printing is opened up. That is that multiple contrast grades can be used on the same print. Something not afforded to us when we only had a single grade paper to print with.

In the masking process I use, I use Duratrans and a clear sheet of acetate to separate the mask film and the camera negative. The emulsions of the two films are away from each other in order to arrive at a low contrast and relatively low density unsharp mask.
 

Charles Webb

Member
Joined
Nov 7, 2004
Messages
1,723
Location
Colorfull, C
Format
Multi Format
Wow I messed up in typing had to go back and do some editing, Darn where are the proof readers when you need them?

Charlie.........................

Duratrans is wonderful stuff! Much finer than crystalene!
As I said, I havn't messed with it in a long time!
 

Nige

Member
Joined
Sep 8, 2002
Messages
2,317
Format
Multi Format
Donald Miller said:
I don't think that I would use a preflash in printing this negative. Preflashing the paper compresses highlight tonality. That is a sure way to lose the sense of light in this image.

but would you agree with what I wrote?
 

Donald Miller

Member
Joined
Dec 21, 2002
Messages
6,230
Format
Large Format
Nige said:
but would you agree with what I wrote?

Nige,

I would like to say that I agree with what you stated but I can't say that, in my experience, that the effect of preflash is always noticeably beneficial. A great deal depends on the density range of the camera negative. Sometimes the effect is noticeable and sometimes the density range is too extreme for preflash to be of any benefit.

I am not a big proponant of preflashing paper for the reason that I indicated earlier. I personally find that compressing the shadow end of the tonal scale to be less noticeable and equally as effective. The practice of compressing the shadow end of the scale requires more work and technical ability but the results are better in my opinion.

Ultimately the best results are obtained when one has a good grasp of their materials and technique to markedly decrease the need for these corrective measures at the printing stage.
 
OP
OP
Andy K

Andy K

Member
Joined
Jul 3, 2004
Messages
9,420
Location
Sunny Southe
Format
Multi Format
Wow! I love it when you post a query on APUG, go to bed, come back in the morning and find so much has developed! :smile:

Thankyou everyone for your responses and advice! I plan to give this print another try tonight. Watch this space!
 

ricksplace

Member
Joined
Jan 22, 2006
Messages
1,561
Location
Thunder Bay,
Format
Multi Format
You might want to try pulling the print from the developer early, and then swabbing the areas you want to develop a little more with a cotton ball soaked in developer. It's a low-tech answer. I tried it once a long time ago. Your print has quite a bit larger area so it might not be so effective, and might give you a muddieness in the areas of the print that were not in the developer for the whole time. In conjunction with split-grade printing, it might give you the results you seek.
 

TheFlyingCamera

Membership Council
Advertiser
Joined
May 24, 2005
Messages
11,546
Location
Washington DC
Format
Multi Format
I'd also try using SOME filtration dialed in on your color head for your grade 2 - while this adds some neutral density, it helps a lot with the contrast control. Depending on whose method you choose, grade 2 is either 10m or 41y 32m. Frankly, I would try split-grade printing first, and using a more dilute paper developer with extended development time to see if that helps.
 
Photrio.com contains affiliate links to products. We may receive a commission for purchases made through these links.
To read our full affiliate disclosure statement please click Here.

PHOTRIO PARTNERS EQUALLY FUNDING OUR COMMUNITY:


Ilford ADOX Freestyle Photographic Stearman Press Weldon Color Lab Blue Moon Camera & Machine
Top Bottom