Access to the Front Elements of the Nikkor D 40mm f4 for Bronica SLRs

Brentwood Kebab!

A
Brentwood Kebab!

  • 1
  • 1
  • 82
Summer Lady

A
Summer Lady

  • 2
  • 1
  • 111
DINO Acting Up !

A
DINO Acting Up !

  • 2
  • 0
  • 62
What Have They Seen?

A
What Have They Seen?

  • 0
  • 0
  • 76
Lady With Attitude !

A
Lady With Attitude !

  • 0
  • 0
  • 63

Recent Classifieds

Forum statistics

Threads
198,780
Messages
2,780,748
Members
99,703
Latest member
heartlesstwyla
Recent bookmarks
0

Dinis

Member
Joined
Sep 14, 2017
Messages
13
Location
Frederick, MD
Format
35mm
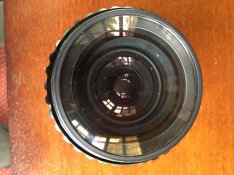
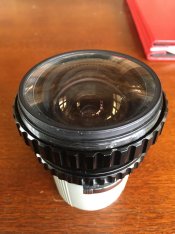
I was wondering if anyone had any idea how to open up the front of the Nikkor D 40mm f4 for Bronica SLRs. I need to clean some fungus. The rear elements screwed out in a straight forward way. I have the name plate screwed off the front, but I can't work out how to get deeper. There are no retaining rings that I can. Here is a photo. I'd be grateful for any ideas anyone has. Thanks!
 

Attachments

  • thumbnail (1).jpg
    thumbnail (1).jpg
    107.5 KB · Views: 125
  • thumbnail.jpg
    thumbnail.jpg
    98.7 KB · Views: 138

Dan Daniel

Subscriber
Joined
Jul 4, 2009
Messages
2,883
Location
upstate New York
Format
Medium Format
Any chance that it is simply dropped in place? Lots of lenses do this- make a shelf and retaining ring, and the glass element is loose. Well, not loose. Usually a very precise fit that needs a little pressure.

Put a few layers of a soft clothe on a table, point lens down, and give a few whacks to the back side to see if it drops out.
 

moto-uno

Member
Joined
Sep 28, 2009
Messages
585
Location
Burnaby, B.C
Format
Medium Format
As Dan has mentioned or , if you have a Garmin GPS or something similar that mounts to your windshield with a suction cup ,
(these are actually quite strong and may well fit to the larger front lens) and allow you to pull it out . Peter
 
OP
OP

Dinis

Member
Joined
Sep 14, 2017
Messages
13
Location
Frederick, MD
Format
35mm
Dan and Peter, thanks for the suggestions. I did try the suction cups, but it would not budge at all. I think there is a small black ridge attached to side of the lens that is keeping the first element in place. It seems like there are two threaded surfaces that need to be unscrewed from each other. I just can't work out how to do it.
 

David A. Goldfarb

Moderator
Moderator
Joined
Sep 7, 2002
Messages
19,974
Location
Honolulu, HI
Format
Large Format
Send it to Frank Marshman. He's the Bronica guy. It's a great lens. I wouldn't want to mess it up.
 

moto-uno

Member
Joined
Sep 28, 2009
Messages
585
Location
Burnaby, B.C
Format
Medium Format
Looking at your second picture , is there a very small slot head screw coming in from the side ? It appears to be in the
threaded area closest to the grooved ring . Possibly a more detailed picture would clarify it. Peter
 

John Koehrer

Subscriber
Joined
Apr 3, 2004
Messages
8,276
Location
Aurora, Il
Format
Multi Format
Back to the strap wrench. The ring going around the edge of the element may simply unscrew.
 

Dan Daniel

Subscriber
Joined
Jul 4, 2009
Messages
2,883
Location
upstate New York
Format
Medium Format
Looking at your second picture , is there a very small slot head screw coming in from the side ? It appears to be in the
threaded area closest to the grooved ring . Possibly a more detailed picture would clarify it. Peter

Could be- if you go up from the lower silver part to the largest knurled ring, then right two knurls and a bit more, that could be a set screw in the threaded area just above. If so, check for two more at 120 degrees around.
 
OP
OP

Dinis

Member
Joined
Sep 14, 2017
Messages
13
Location
Frederick, MD
Format
35mm
Thanks to everyone for their suggestions. I did think there might be a set screw on the threaded area. There is a small hole just above the knurled aperture ring. I can see a silver surface behind it, but it is flat with no slot for a screwdriver. It might have been stripped at some point in the past. I'll have to think about drilling it out or just using the lens as is. Thanks to all!
 

reddesert

Member
Joined
Jul 22, 2019
Messages
2,403
Location
SAZ
Format
Hybrid
If there is just a hole, maybe there was once a setscrew and now it is gone. I would be cautious about drilling anything. How bad is this fungus really? The lens doesn't look terrible. If it were mine, I might just set it out in the sun to kill the fungus by UV light and then use it as is. Sometimes, even if you can get lens assemblies apart, you can't get the groups within the assembly out.
 
OP
OP

Dinis

Member
Joined
Sep 14, 2017
Messages
13
Location
Frederick, MD
Format
35mm
Just an update that I was finally able to get the front element opened and cleaned on this lens in case anyone needs to know how to work on the same lens. The set screw on my lens was in fact stripped. I was able to drill it out with a tiny drill bit and then order a small strap wrench to open it. All of the threads in the front element assembly were locked with loctite or some other thread locker. So those needed some acetone and heat to get them to loosen. The top ring in the lens holds the entire front lens assembly in place. It lifts out and then you can access each of the lens elements by unscrewing them. It's pretty obvious how to proceed element by element after they are all out. Acetone is needed to loosen the threads for each element as well as they were all locked. Thanks again to everyone who had suggestions as that helped me figure it out.
 
Photrio.com contains affiliate links to products. We may receive a commission for purchases made through these links.
To read our full affiliate disclosure statement please click Here.

PHOTRIO PARTNERS EQUALLY FUNDING OUR COMMUNITY:


Ilford ADOX Freestyle Photographic Stearman Press Weldon Color Lab Blue Moon Camera & Machine
Top Bottom