A12 Magazine - Crank Mounting problem

Exhibition Card

A
Exhibition Card

  • 0
  • 0
  • 12
Flying Lady

A
Flying Lady

  • 5
  • 1
  • 45
Wren

D
Wren

  • 0
  • 0
  • 28

Recent Classifieds

Forum statistics

Threads
199,037
Messages
2,785,087
Members
99,786
Latest member
Pattre
Recent bookmarks
0

logan.egbert

Member
Joined
Aug 24, 2010
Messages
187
Format
Multi Format
I just took apart a cranky A12 back to lube and grease it and everything is running super smoothly. The only issue is that the crank mount won't 'catch' on the gear inside the back to allow me to wind the back.

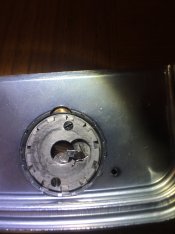
I think the issue is with the little spring pictured here. There is no tension in the little arm because the spring seems to be in the wrong position. But I don't have any empty magazines to double check against.

Has anyone ever had this issue? Any solutions?

Thanks!
 
OP
OP

logan.egbert

Member
Joined
Aug 24, 2010
Messages
187
Format
Multi Format
IMG_1313.JPG
Here's that arm and spring for reference
 
OP
OP

logan.egbert

Member
Joined
Aug 24, 2010
Messages
187
Format
Multi Format
Open it back up and get it right. You likely have a good first effort, but there's obviously a sponge left in the patient.
It's still open. I can't figure out how this spring is meant to be positioned. It's maddening to be so close but unable to get it wrapped up.
 
Joined
Jan 9, 2011
Messages
154
Location
Kehl/Strasbo
Format
Multi Format
I guess the spring should press the little arm against to other straight spring.
The following video shows the “Crank mounting“ at around 3:50:
 

Sirius Glass

Subscriber
Joined
Jan 18, 2007
Messages
50,391
Location
Southern California
Format
Multi Format
Wow, that repairman is really fast!
 

Leigh B

Member
Joined
Jan 17, 2011
Messages
2,059
Location
Maryland, USA
Format
Multi Format
That is perhaps the worst "instructional" video I've ever watched.

- Leigh
 
OP
OP

logan.egbert

Member
Joined
Aug 24, 2010
Messages
187
Format
Multi Format
I guess the spring should press the little arm against to other straight spring.
The following video shows the “Crank mounting“ at around 3:50:


This is the video, combined with Hasselblad's repair documentation that I used to piece together how to service my magazine.

The problem with my back is that the spring has come undone and I don't know where to set the second part to get it to line up like you say at 3:50 in the video.
 
OP
OP

logan.egbert

Member
Joined
Aug 24, 2010
Messages
187
Format
Multi Format
I liked the video. Pretty easy to follow how to get things loosened up and working again - have two magazines in need of that. Don't know if I'd want to go any further than that, aside from changing light trap seals anyway.

Once you have a back open and can poke and prod it, you start to see just how things go together. That combined with Hasselblad's documentation can get you as far as disassembling it to a point where all the major spots can be lubed and the gears can be greased. Once you do that, the thing is smoother than a baby's behind!
 
Joined
Oct 9, 2016
Messages
247
Location
Albuquerque
Format
Multi Format
I just took two of them apart to clean and lubricate them.

The base of the crank, inside the cover, has a pawl that engages the spline drive of the clockwork. If that pawl gets pushed around backwards and underneath the circular plate inside the bottom of the crank, it won't engage the spline. Be sure that the pawl is in the correct position, and turn the crank backwards (counter-clockwise) as you push the cover back on. Turning the crank backwards keeps the pawl in the correct position as the cover is pushed on.

It works like a ratchet - clicks with not much resistance when turned backward, and engages when turned clockwise to turn the mechanism.
 
Last edited:
OP
OP

logan.egbert

Member
Joined
Aug 24, 2010
Messages
187
Format
Multi Format
I just took two of them apart to clean and lubricate them.

The base of the crank, inside the cover, has a pawl that engages the spline drive of the clockwork. If that pawl gets pushed around backwards and underneath the circular plate inside the bottom of the crank, it won't engage the spline. Be sure that the pawl is in the correct position, and turn the crank backwards (counter-clockwise) as you push the cover back on. Turning the crank backwards keeps the pawl in the correct position as the cover is pushed on.

It works like a ratchet - clicks with not much resistance when turned backward, and engages when turned clockwise to turn the mechanism.

Do you happen to have a picture of how the spring that control's the pawl's movement should be arranged relative to the pawl? As you can see above, mine is not how it's supposed to be.
 
Joined
Oct 9, 2016
Messages
247
Location
Albuquerque
Format
Multi Format
Do you happen to have a picture of how the spring that control's the pawl's movement should be arranged relative to the pawl? As you can see above, mine is not how it's supposed to be.
I did not, but looking at your photo, you may want to try hooking that loose end of the spring over the top of the pawl. I don't know if that will work, but it's worth a try. There should be just a just a little bit of spring pressure on the pawl to keep it engaged with the spline.
 
OP
OP

logan.egbert

Member
Joined
Aug 24, 2010
Messages
187
Format
Multi Format
For everyone's reference, I fixed my back.

The top spring has to be fitted in a groove on the back (flat) side of the pawl. You have to carefully slip it in there and then get the pawl to catch on the main gear and then it's good to go.
 
Photrio.com contains affiliate links to products. We may receive a commission for purchases made through these links.
To read our full affiliate disclosure statement please click Here.

PHOTRIO PARTNERS EQUALLY FUNDING OUR COMMUNITY:


Ilford ADOX Freestyle Photographic Stearman Press Weldon Color Lab Blue Moon Camera & Machine
Top Bottom