A few basic printing questions

sdeeR

D
sdeeR

  • 0
  • 0
  • 27
Rouse St

A
Rouse St

  • 1
  • 0
  • 39
Untitled

A
Untitled

  • 2
  • 1
  • 54
Today's Specials.

A
Today's Specials.

  • 3
  • 0
  • 54
Street portrait

A
Street portrait

  • 1
  • 0
  • 45

Recent Classifieds

Forum statistics

Threads
199,179
Messages
2,787,493
Members
99,832
Latest member
lepolau
Recent bookmarks
0

cantore

Member
Joined
Jan 30, 2012
Messages
59
Format
Multi Format
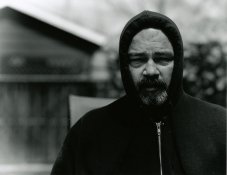
Today i printed a 6x7 negative and have a few basic printing questions. The exposure was at f11 for 10 seconds and also i had to burn the left side for an additional 10 seconds because the lens was inadequate for a 6x7 negative. At first i thought the negative was popping up or down because of the blurry light on the left hand side but i realized it must be the lens. Im using a 75mm Nikon EL-Nikkor and need to get a 90mm or 100mm to cover a 6x7. Are all Nikon lenses of the same sharpness if its a 75mm, 90mm, or 100mm? Is the contrast to much in this print? I like contrast! The film is Adox developed in Rodinal, printed on Ilford rc paper with no contrast filter used while enlarging.

Thanks..
 

Attachments

  • sub.jpg
    sub.jpg
    130.8 KB · Views: 230

Bob Carnie

Subscriber
Joined
Apr 18, 2004
Messages
7,735
Location
toronto
Format
Med. Format RF
On top of a bit longer lens, you must make sure the easel is centered to the lens, negative, condensors and bulbs or you will see fall off as you print indicates.
 
OP
OP

cantore

Member
Joined
Jan 30, 2012
Messages
59
Format
Multi Format
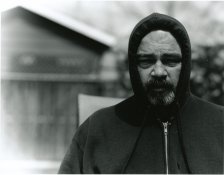
Here is a print before the burning was done. Left side issue must be due to the lens on covering a 6x7 negative, am i correct?
 

Attachments

  • sub2.jpg
    sub2.jpg
    146 KB · Views: 171
OP
OP

cantore

Member
Joined
Jan 30, 2012
Messages
59
Format
Multi Format
I never had this issue with 35mm, 6x6 or 645.. This only happened with 6x7 and its on both sides of the negative. The print dose not show the right side because i cropped the right side off.
 

Rick A

Subscriber
Joined
Mar 31, 2009
Messages
9,952
Location
Laurel Highlands
Format
8x10 Format
I think you have some alignment issues happening. Using a 75mm lens would show slight fall off in the corners equally, not offset as your print shows. You need to check that the condensors are aligned as well as the negative carrier and lens.

Are you cropping the image using the easel?
 
OP
OP

cantore

Member
Joined
Jan 30, 2012
Messages
59
Format
Multi Format
I cropped it on the easel. How would i go by adjusting the condensers? Im using a beseler mcrx. When i first received the enlarger i removed the condensers from the metal tube to clean them because they were filthy and i put them back in the order they were removed. I believe they are held down by a snap ring.
 

removed account4

Subscriber
Joined
Jun 21, 2003
Messages
29,832
Format
Hybrid
hi cantore

sometimes enlargers have a secondary condenser, or a different configuration for different format films.
i have a little durst m601 and you are supposed to change the square condensers when doing 6x6,
and with the omega d3v ( sort of ) there is a condenser i am supposed to slide under the lamp house
and above the big condenser lenses ... maybe someone with the same one or knowledge of yours
can comment about the max. format it is capable of taking, without fall off ( like you are getting ).
( i know nothing about besslers )

nice print btw !
john
 

Bob Carnie

Subscriber
Joined
Apr 18, 2004
Messages
7,735
Location
toronto
Format
Med. Format RF
Did you crop by moving the easel????? if so my post above is very relavent.

I never had this issue with 35mm, 6x6 or 645.. This only happened with 6x7 and its on both sides of the negative. The print dose not show the right side because i cropped the right side off.
 
OP
OP

cantore

Member
Joined
Jan 30, 2012
Messages
59
Format
Multi Format
Bob, Jnan & Rick... Thanks you guys for the advice! I fell like an idiot right now! I made such a rookie mistake and if yous want to hold me down and kick me a few times i deserve it. Yes i moved the easel because i liked the composition of the image the way its in the print. I also did that another time also with a 6x7 neg which made me think it was the format/lens combo. The print is of the lower left side of the negative.. You guys are great and i really appreciate all your help.. I think i will go and put my head under the pillow for a while :sad:
 

Konical

Subscriber
Joined
Jun 1, 2003
Messages
1,824
Good Evening, Cantore,

I also have a 75mm El Nikkor and use a Beseler MCR-X enlarger. That lens will NOT cover a 6 x 7 negative adequately, although it will come close if everything is well centered. You do need to have the condensers set properly to be sure light covers the entire negative; I've added a mark about 1/2 inch above the 2 1/4 x 3 1/4 mark on the scale for use in printing 6 x 7 negatives. Setting the condensers at the 2 1/4 x 3 1/4 mark would cause no problem, just very slightly less-concentrated light--a matter of no practical consequence.

Konical
 
Joined
Sep 10, 2002
Messages
3,596
Location
Eugene, Oregon
Format
4x5 Format
Bite the bullet and get yourself a longer enlarging lens. Should be cheap enough on eBay these days. Go ahead and go for 100mm if you ever plan on doing 6x9.

BTW, moving the easel should not really cause this kind of vignetting. Sure, you could overrun the image and get the edges of the negative carrier blocking a side of the print, but that would be a straight edge; corners being clipped looks a lot more like inadequate lens coverage to me.

Best,

Doremus
 
OP
OP

cantore

Member
Joined
Jan 30, 2012
Messages
59
Format
Multi Format
The 100mm sounds like a good choice for me since a have a bunch of old 6x9 negatives that i never printed.
 

Bob Carnie

Subscriber
Joined
Apr 18, 2004
Messages
7,735
Location
toronto
Format
Med. Format RF
Actually moving the easel would cause this. plus a bit of inadequate lens coverage. Have to disagree but it really is a basic error a lot of technicans make. the OP is probably enlarging the image and then moving the easel off the center axis.. just my 2 cents though.

Bite the bullet and get yourself a longer enlarging lens. Should be cheap enough on eBay these days. Go ahead and go for 100mm if you ever plan on doing 6x9.

BTW, moving the easel should not really cause this kind of vignetting. Sure, you could overrun the image and get the edges of the negative carrier blocking a side of the print, but that would be a straight edge; corners being clipped looks a lot more like inadequate lens coverage to me.

Best,

Doremus
 

Bill Burk

Subscriber
Joined
Feb 9, 2010
Messages
9,326
Format
4x5 Format
Hi cantore,

Since you disassembled, and reassembled, this thread may interest you (just in case you got it back together wrong)...

(there was a url link here which no longer exists)

Don't beat yourself up. Same exact thing happened to me a couple days ago.
 
OP
OP

cantore

Member
Joined
Jan 30, 2012
Messages
59
Format
Multi Format
Thanks for the link Bill.. I appreciate it.
 
Joined
Sep 10, 2002
Messages
3,596
Location
Eugene, Oregon
Format
4x5 Format
Bob,

My thinking is simply this:

If the negative is in a carrier, and the light source is adjusted so that the entire negative is evenly illuminated, and the lens has adequate coverage for that size negative, then moving the easel will not result in vignetting, rather the straight edge of the negative carrier will be "shown" on the paper, including the corners of the negative, since they are all within the cone of view for the lens. Only if the lens coverage or the circle of illumination are inadequate will the corners be vignetted. The OP is using a 4x5 enlarger, so illumination coverage is not his problem. Therefore, if he has vignetting, his enlarging lens is not seeing the corners of his negative as far as I can tell.

I can certainly move my easel off to one side and still print the corners of my negatives, even if they end up in the middle of the paper! For that matter, one should be able to use a smaller amount of enlargement and print all four edges of the negative carrier on the printing paper without vignetting at the corners. Sometimes I intentionally do this so I can trim the print exactly to the outside of the image area easily. I'm enlarging 4x5 with 150mm lenses and never have clipped corners.

Best,

Doremus
 

Bob Carnie

Subscriber
Joined
Apr 18, 2004
Messages
7,735
Location
toronto
Format
Med. Format RF
Doremus

You are assuming he/she is printing full frame, I am assuming he/she have magnified the negative and is printing a section of the negative by moving the easal off axis to accommodate the crop... give it a try , you sill see falloff .. notice most of the falloff is on one side of the image, if it was a lens falloff it would be even minus density on all four edges.
I would be interested in hearing from the OP whether this is full frame or a crop?


Bob


Bob,

My thinking is simply this:

If the negative is in a carrier, and the light source is adjusted so that the entire negative is evenly illuminated, and the lens has adequate coverage for that size negative, then moving the easel will not result in vignetting, rather the straight edge of the negative carrier will be "shown" on the paper, including the corners of the negative, since they are all within the cone of view for the lens. Only if the lens coverage or the circle of illumination are inadequate will the corners be vignetted. The OP is using a 4x5 enlarger, so illumination coverage is not his problem. Therefore, if he has vignetting, his enlarging lens is not seeing the corners of his negative as far as I can tell.

I can certainly move my easel off to one side and still print the corners of my negatives, even if they end up in the middle of the paper! For that matter, one should be able to use a smaller amount of enlargement and print all four edges of the negative carrier on the printing paper without vignetting at the corners. Sometimes I intentionally do this so I can trim the print exactly to the outside of the image area easily. I'm enlarging 4x5 with 150mm lenses and never have clipped corners.

Best,

Doremus
 

tkamiya

Member
Joined
Oct 3, 2009
Messages
4,284
Location
Central Flor
Format
Multi Format
Bob?

In your own practice, if you have to crop, do you move the film so that your easel is always located at the dead center of the optical axis of the lens?? I move the easel myself....
 

Bob Carnie

Subscriber
Joined
Apr 18, 2004
Messages
7,735
Location
toronto
Format
Med. Format RF
I use glass carriers I over 10 of them, and I have dedicated full frame indicators on the back side of each one for each format. This allows me to always know where the dead center location is. And yes I always move the negative into position rather than move the easal.... this is what I am trying to point out to the OP and of course Doremus.
On one of my threads I have alluded to this practice, learned after years of making mistakes....
Moving the easel for crop is a very bad practice... a hair ok but the sweet spot is the sweet spot , no sense arguing this from my point of view... others may like burning in edges and having soft areas, I prefer even light and sharp corners.


Bob?

In your own practice, if you have to crop, do you move the film so that your easel is always located at the dead center of the optical axis of the lens?? I move the easel myself....
 
OP
OP

cantore

Member
Joined
Jan 30, 2012
Messages
59
Format
Multi Format
Bob.. magnified the negative and is printing a section of the negative by moving the easel off axis to accommodate the crop.. This is exactly what i did. Im going to center the easel and print the full negative and post it here.
 

Bill Burk

Subscriber
Joined
Feb 9, 2010
Messages
9,326
Format
4x5 Format
In my case, Omega DII with stock 4x5 condensers on 6x6 neg. Wrong condenser set for the neg. Way bigger, covers the neg with light but...

In the DII there are different lens cones that put the 135mm lens far away from the neg. The condenser set that works for a lens that has to be far away from the neg is not aimed right for an 80mm lens (on a flat board) that has to be really close to the neg.

When I lifted the head to remove the negative (another DII 'feature'), I could see the falloff go away. The light improved. I could have held the head up and gotten even lighting. That's how I immediately knew the falloff was due to the condensers. Fortunately I had the correct set of condensers so I just swapped them out and continued.

I could swear I use the 80mm for 6x9 all the time with no coverage issues. Have to check my notes. This time I needed the extra contrast, otherwise I usually use a fluorescent head where none of this stuff about condensers applies. (With a DII anyway, it is painful because they are not adjustable).
 
Joined
Sep 10, 2002
Messages
3,596
Location
Eugene, Oregon
Format
4x5 Format
Bob,

I'm trying to picture your scenario and just can't seem to get it to "work." If a lens' view covers the total negative, then the corners won't be vignetted as badly as the OP's as far as I can see, no matter what the magnification. That is, unless there is an illumination issue, or something is blocking the light path.

Yes, I agree with you, that there is a certain amount of falloff with most enlargers (the need for edge burning as SOP confirms this in most cases), and I agree that, if possible, the area of the negative that one wants to print (the cropped portion) should be as nearly centered in the lens' field of view as possible. But, even with falloff, the corners should not be totally white in the print (i.e., almost no light at all getting to the paper) unless there is a lens coverage issue.

IIRC, the OP stated that he/she cropped out the right hand corners, which also were vignetted. If that is the case, then indeed all four corners are vignetted, and that 75mm lens just won't cover 6x7. Or, he/she has one an illumination problem like I mentioned above.

I print with both Omega DIIs and Beseler 45ms, but with diffusion sources. With a lens that is adequate for the negative size I am printing, I just can't seem to imagine any way the corners of the negative would get vignetted as long as the light source covered the negative adequately... I can move the easel so that half the print is "in the dark" and the negative image still shows a the clean edge of the negative carrier. Corners are fine, even at high magnification. I can place all four corners in the middle of the print and they are clean and relatively well lit. Maybe it is a condenser issue/lens placement issue as Bill suggests, but once that is fixed, then there really should be no problems getting the corners to print as far as I can see as long as the lens coverage is adequate.

If I'm missing something here, maybe you could give me a more detailed explanation? TIA

Best,

Doremus
 
OP
OP

cantore

Member
Joined
Jan 30, 2012
Messages
59
Format
Multi Format
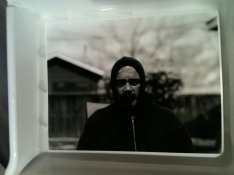
Here is a quick 8x10 print of the full negative with the easel centered under the lens. I dont see any falloff at all with the 75mm Nikon.. Bob must be correct about the issue being from cropping the image by moving the easel. Last night i removed the condenser tube to look and see if something look out of wack and put it back in place this morning.. Could the condensers have been out of line and when i put them back they fell back into place? This is a bad image of the print sitting in the fixer taken with my cell phone. No burning or dodging was done, just a quick exposure.
 

Attachments

  • 004.JPG
    004.JPG
    1.1 MB · Views: 130

Bob Carnie

Subscriber
Joined
Apr 18, 2004
Messages
7,735
Location
toronto
Format
Med. Format RF
Doremus


Here is a tip.

I wish I could draw this but I can't so I will try to explain.


Every printing session we do this.

Example: 12x18 prints from 35mm negs= correct aspect ratio.

therefore we set the enlarger height to this size.
we set the easel blades to 12x18 full frame for this ratio of film
we place correct lens in holder ,
we set the condensers to the correct position.
we make sure the bulb is working.

We place a 35 negative carrier into place which is centered to the lens, condensor and bulb. we focus without a neg in place to see the outside edges of the neg carrier.( I tape with electrical tape the position on the 4x5 glass, I am not using a standard carrier and this may be where you are not seeing my workflow}
We then take the carrier out of the enlarger and project the light, we drop the bellows slightlyand therefore can see the condensor circles....
We then move the easel into position with the 4 corners of the blades touching the condesor circles.. this tells us we are exactly centered top to bottom.

We use Duct Tape,( because we love Red Green and are Canadians) and tape the easel into place.

We do not move the easel again for this printing session,,, If we need to crop we move the negative into place, remember I am using 4x5 glass carrier and can move the neg, it is not in a strip the negative is individually cut so we can do this.

I hope this makes sense. Moving the easel will cause some problems in some darkrooms, I have seen enough darkrooms to know this to be true.


Bob
 

tkamiya

Member
Joined
Oct 3, 2009
Messages
4,284
Location
Central Flor
Format
Multi Format
Bob,

When you do that, what do you do to take care of the possible flare caused by white light coming through outside of the 35mm neg frame? Do you mask it or just let it be? Is this a non-issue?
 
Photrio.com contains affiliate links to products. We may receive a commission for purchases made through these links.
To read our full affiliate disclosure statement please click Here.

PHOTRIO PARTNERS EQUALLY FUNDING OUR COMMUNITY:


Ilford ADOX Freestyle Photographic Stearman Press Weldon Color Lab Blue Moon Camera & Machine
Top Bottom