5x7 3D printed pinhole

The Urn does not approve...

D
The Urn does not approve...

  • 2
  • 2
  • 42
35mm in 616 test

A
35mm in 616 test

  • 0
  • 1
  • 64
Smiley

H
Smiley

  • 0
  • 1
  • 46

Recent Classifieds

Forum statistics

Threads
197,482
Messages
2,759,894
Members
99,385
Latest member
z1000
Recent bookmarks
0

BHuij

Member
Joined
Oct 12, 2016
Messages
797
Location
Utah
Format
Multi Format
Despite being kind of a sharpness whore with my normal gear, I have always had a fascination with pinhole photography.

I also find that 90% of my nature photography ends up being fairly simple and everyday subjects photographed in overcast or open shade conditions, so I develop a lot of negatives at N+1.

For the last couple of years, I've had a lot of fun designing and 3D printing custom camera and camera-related items.

Finally, I recently got into alt process printing, specifically kallitypes and salted paper.

Add these 4 things together, and you get an oddly compelling idea one day to design a 5x7 pinhole camera. 5x7 is big enough that even pinhole photos can look somewhat detailed. It's big enough to make contact prints worth displaying. It's just small enough to barely fit in my 3D printer's limited space. And paper negatives will give me a lot of contrast, without being likely to exceed the dynamic range of scenes I typically photograph. Those contrasty negatives will probably make for a pretty good salt print. It all kinda works out, at least on paper.

The "film holder" I designed is simple - a plate with a baffle that will keep light out when it's attached to the camera, a frame with embedded magnets to keep the 5x7 paper in place and give it 1/4" borders. No need to carry around multiples of them that can keep light out when not attached to the camera; my exposures will range from minutes to days. It's working as intended on the first prototype. The camera body lacks the finesse of a better 3D designer, and it's a behemoth (600g of filament). But it printed out nice and it does its job. Focal length is 150mm for a nice medium wide angle. I have a 0.4 and 0.5 laser drilled pinhole on the way from a guy in France.

Pretty excited to see what I can do with this glorified box.
 

Donald Qualls

Subscriber
Joined
Jan 19, 2005
Messages
12,079
Location
North Carolina
Format
Multi Format
My experience with pinhole at "normal" focal lengths is that it tends to be disappointing (I've got a pinhole mounted in an interchangeable shutter for my Zeiss Ideal plate camera, and a pinhole conversion on an electron microscope body originally intended for use with a Polaroid pack film back). I find that in general, a much shorter focal length (equivalent of a couple inches for 4x5) with a pinhole optimized for that dimension gives much sharper images -- and because it's faster, shortens exposures a bit.

I don't think "days" will be expected, though; Joe van Cleave routinely shoots paper negatives in large format pinhole and gets exposures in single-digit minutes (though deep shade might extend that to an hour or more).

If you haven't already, you might also find it helpful to carry along a set of multi-contrast filters, because I'm pretty certain you'll find unfiltered exposures to give too much contrast (though perhaps that won't be a problem for salt prints and kallitype).

Still, I'm interested to see results, when you have something.
 
OP
OP
BHuij

BHuij

Member
Joined
Oct 12, 2016
Messages
797
Location
Utah
Format
Multi Format
First off, I am thrilled with the appearance of the camera itself. Surely a greater triumph of human aesthetic cannot be achieved; it definitely doesn’t look like an enormous box.

I gave it first light yesterday. A bunch of calculations tell me that at 150mm, for an average wavelength of light between blue and green, a 0.4mm pinhole is a good compromise between optimum contrast and optimum resolution. This represents f/375.

I have some cheap RC paper that I’m fairly sure is rebranded Ilford. I tried the first one with no filtration at EI 6, so I picked a very low contrast subject (green leaves on a shrub), and photographed it in flat overcast light. Shutter speed metered at 1h30m. I gave it just 1h30m without worrying too much about reciprocity failure, just to see where I landed. Developed normally in Ilford MG developer at 1:9.

Good news:
- Contrast is very high as expected, but I think printable, at least using an alt process like salted paper that needs a lot of contrast. In the future I will try shooting it through a grade 00 filter and adding an extra stop of light.
- Resolution/sharpness seems good. 5x7 negs are nothing to sneeze at. Hard to say whether sharpness would be better on a totally stationary subject; I’ll have to test that. It was windy out and these leaves were not perfectly still for an hour and a half.
- Vignetting appears minimal, which is probably an advantage of shooting less of a wide angle.
- The light traps between the camera and film holder appear to be functioning perfectly, I see no evidence whatsoever of light leaks.

With a little luck I’ll have a salt print tonight. Curious to see how long it takes in the UV box. Transparent film takes 12 minutes to get to dmax on salt prints. This will probably end up being more than an hour.
 

Attachments

  • 5DA9C50D-5C04-47BD-A08D-93FE6959EC04.jpeg
    5DA9C50D-5C04-47BD-A08D-93FE6959EC04.jpeg
    367.5 KB · Views: 165

Roger Thoms

Subscriber
Joined
Nov 18, 2007
Messages
1,767
Location
Flagstaff, AZ
Format
8x10 Format
First off, I am thrilled with the appearance of the camera itself. Surely a greater triumph of human aesthetic cannot be achieved; it definitely doesn’t look like an enormous box.

Wow, sounds like an awesome camera, any chance of see a photo of it.

Roger
 

Donald Qualls

Subscriber
Joined
Jan 19, 2005
Messages
12,079
Location
North Carolina
Format
Multi Format
That's firmly in the "function over form" class, but it seems as though it works well.

I wouldn't expect a big vignetting issue until you get wide enough that the light path to the corners is twice the distance as at the center of the negative. You use the average light path length to calculate your aperture ratio, hence exposure, and overexpose the center by one stop while underexposing the corners by the same amount. On film, compensating development will give a barely vignetted image (don't know how you'd do that on paper). Your exposure looks quite good, so apparently reciprocity isn't a big problem at that exposure level with that paper.

So far, the biggest film I've exposed with a pinhole is 4x5 in my converted electron microscope camera; in addition to that and a pinhole shutter that fits one of my Zeiss Ideal plate cameras I've also got a 360 degree camera that takes two sheets of 9x12 cm (end to end around the inside of a cylindrical body, pinhole on the end) to produce a 9x24 cm image. Even with the extreme angle for the film closest to the pinhole end of the cylinder, there's not a huge amount of vignetting.

01.JPG
 
OP
OP
BHuij

BHuij

Member
Joined
Oct 12, 2016
Messages
797
Location
Utah
Format
Multi Format
Salt print has been going for 30 minutes under my UV lights. It is definitely forming an image, but it's going nice and slow. This was expected though. At this rate I'm guessing final time for a salt print is going to be upwards of 2 hours :smile:
 
OP
OP
BHuij

BHuij

Member
Joined
Oct 12, 2016
Messages
797
Location
Utah
Format
Multi Format
So I'm a little surprised at my salt printing results. I'm not getting as much contrast as I expected. It's possible that the process simply demands more contrast in the negative than I can provide with RC paper negatives. But I have a few things to try before I accept that idea as truth.

First, print times are incredibly long. This was expected. I've done one print at 4 hours under the UV lights, which got a reasonably good dmax but started to crush the highlights down from paper base white. I've also done one at 3 hours which got a noticeably lighter dmax but preserved paper base white in the highlights. So the right answer is likely somewhere in between those two times. That said, the section of sensitized paper that is not under the paper negative gets WAY blacker than even the white borders of the negative. I expect if I wanted to actually extract the maximum possible dmax that the emulsion is capable of, I'd need something like an 8 or 16 hour print time. If it comes to that, I'll just try exposing outdoors and printing by inspection. I may also just accept that I won't get as dark of a dmax with paper negatives as I could with film. I think it's unlikely I'll start messing with dichromates for extra contrast. Non-fatal-if-ingested chemicals are definitely more my speed with a 4 year old running around the house.

The other thing I want to chase down is my in-camera exposure times. So far I've just rated the paper at EI 6 and given it exactly what was metered, then developed normally in Ilford MG 1:9 for 2 minutes. The image looked reasonably contrasty on both negatives, but I suspect I actually need to be giving more exposure in camera to compensate for reciprocity failure and give me a bit more density so I can print longer without losing my highlights. Next one I do, I'll just give 4x the metered exposure. I'd rather err on the side of overexposing than slowly creep up on correct over several iterations.

Technical shortcomings aside, I'm actually really happy with the images I'm getting. They're large enough to look at properly without a magnifying glass. They seem to be riding the line between having a surprising amount of detail and sharpness, but still preserving the somewhat dreamier and more surreal "pinhole look." And the salt printing process renders the prints in a way that I think works well for the type of photos the camera produces. I'm also happy with the focal length. I have a hard time composing with really wide angles. It's a character flaw of mine :wink: 
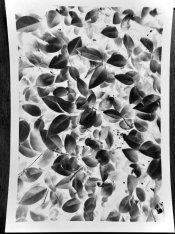
A roughly 35mm equivalent focal length is working out dandy.
 
Photrio.com contains affiliate links to products. We may receive a commission for purchases made through these links.
To read our full affiliate disclosure statement please click Here.

PHOTRIO PARTNERS EQUALLY FUNDING OUR COMMUNITY:


Ilford ADOX Freestyle Photographic Stearman Press Weldon Color Lab Blue Moon Camera & Machine
Top Bottom