4th later gum bichromate became... gum?

Nothing

A
Nothing

  • 1
  • 0
  • 62
Where Did They Go?

A
Where Did They Go?

  • 6
  • 4
  • 185
Red

D
Red

  • 5
  • 3
  • 176
The Big Babinski

A
The Big Babinski

  • 2
  • 6
  • 207

Recent Classifieds

Forum statistics

Threads
198,034
Messages
2,768,587
Members
99,536
Latest member
famipefilm
Recent bookmarks
0

Aimee Danger

Member
Joined
Apr 17, 2019
Messages
23
Location
Seattle
Format
Large Format
I’m so depressed. I have spent since this July learning the gum bichromate process. I finally have the paper, the exposure, the solution, the negative density, and the technique down. I attempted a 4-color gum this weekend. Every ting went well until I came to the K layer. I used W&N lamp black with my typical ratios. The 4th layer turned into total... all I can say is gum... on my print. It fell off the paper in places and stained the paper horribly in others. It was kind of pixelated where it adhered. It ruined one of my prints completely. The one where I had done a dark cyanotype as my base layer survived but only because the blue was so rich and vibrant.
Anybody have an idea what went wrong? Is it just the wrong watercolor for this process? Is it too old (it’s been premixed with the gum Arabic since August but stored in a dark, ambient temp space)?
I purchased a totally different black to try again but I’m afraid it might not be the paint. Ive been using Hahnemuhle plat rag and it’s been the best paper so far but I’ve also been rinsing it for an hour in between layers like I used to do with Arches. Could I have washed it too long?
So. Frustrating.
 
OP
OP
Aimee Danger

Aimee Danger

Member
Joined
Apr 17, 2019
Messages
23
Location
Seattle
Format
Large Format
Nope! I have the dichromate solution stored separately. I only have the gum and watercolor together.
Something else I thought of... I bought food-grade gum arabic and made a solution of it myself (WAY cheaper by the pound). I never added any preservative to it, but I had a lot of people tell me there was no need. If there is a possibility that it spoiled (?), what would that look like?
 

Como

Member
Joined
Aug 16, 2019
Messages
24
Location
Purmerend (Netherlands)
Format
35mm
I have never made a CMYK gum bichromate print, but many times a CMY print.
What I notice that after a couple of layers it could be that there is a adhesian problem. Layers wash off at certain places.
Sometimes it helps to add a couple of drops of ammonia to the gum bichromate.
With CMY prints I always take the most transparant colors. Black is however not transparant, so be careful with that layer.
 

Como

Member
Joined
Aug 16, 2019
Messages
24
Location
Purmerend (Netherlands)
Format
35mm
I always use aquarel paint as color. Some colors are transparant, so you can see the color of the layer under it mixing with the top layer.
All the manufactorers of aquarel paint have tables in which you can see wether a color is transparant, semi transparant or opaque.
To get a green color you need a mix of yellow and blue. The colors have to be transparant to achieve this.
 

Como

Member
Joined
Aug 16, 2019
Messages
24
Location
Purmerend (Netherlands)
Format
35mm
Two parts from the Horodam catalogue where you can see which color is tranparant.
Schmincke 1.jpg
Schmincke 2.jpg
 

Como

Member
Joined
Aug 16, 2019
Messages
24
Location
Purmerend (Netherlands)
Format
35mm
Example of a gum bichromate print, and the layers used.
roos.jpg


Rose


Paper: Canson Montval


Cyanotypie 1A + 1B 2’40” CYANOTYPIE

Sizing: PVA 1+1


gum+dichr+pigment / ml – ml – gr

color pigm.nr. gum+dichr+pigment/ml-ml-gr exp.time negative

Madder red dark PV19 8,0 +8,0 +0,8 1’ 10” MAGENTA

Translucent Yellow PY150 8,0 +8,0 +1,1 * 1’ 10” YELLOW

Helio Cerulian PB15:3 6,0 +8,0 +0,3 * 2’ 00” CYAAN

Madder red dark PV19 6,0 +8,0 +0,4 * 2’ 00” MAGENTA

Translucent Yellow PY150 6,0 +8,0 +0,4 * 2’ 00” YELLOW

* 2dr. ammoniak < 5%

Natrium metabisulfiet 50gr/l 3’ 00” (clearing bath)


OP
OP
Aimee Danger

Aimee Danger

Member
Joined
Apr 17, 2019
Messages
23
Location
Seattle
Format
Large Format
When you make a CMY print, do you separate into CMYK and don't print the K layer, or do you separate into RGB layers and do the conversion (I don't remember it off the top of my head, but green=magenta or something like that)?
Also, that print is beautiful. Is aquarel paint watercolor paint or something else? I am not a painter, so all of this information about pigment is new to me.
 

Como

Member
Joined
Aug 16, 2019
Messages
24
Location
Purmerend (Netherlands)
Format
35mm
Quite right, after you have inverted the photo into negative you split into RGB. Then the R layer is saved as CYANneg (gum dichromate with blue pigment)
The G layer is saved as MAGENTAneg (red pigment) and the B layer as YELLOWneg (yellow pigmet)

Try to get your hands on the book of Christina Z Anderson: Gum printing and other amazing contact printing processes. ISBN: 978-0-9846816-1-7
It is very practical and contents lots of information.

For the print I used Schmincke water color, Madder red dark, pigment nr. PV 19, Helio Cerulian, pigment nr. PB15.3 and Translucent Yellow, pigment nr. PY150.
You can also use other brands. Maybe the names differ, but the pigment numbers should be the same.

Other colors or combinations are also possible. You have to find out what suit you the best.
 
OP
OP
Aimee Danger

Aimee Danger

Member
Joined
Apr 17, 2019
Messages
23
Location
Seattle
Format
Large Format
This was the only CMYK negative set I still had. I am now pretty convinced I prefer RGB negative sets.
After trial and error, I realized that there were a few things I did wrong. 1. there was too much pigment in my black so it was very mottled. 2. I think I will need to size Hahnemuhle plat rag, even though I read that other people didn't size it. 3. I'm applying my layers too thick.
 
OP
OP
Aimee Danger

Aimee Danger

Member
Joined
Apr 17, 2019
Messages
23
Location
Seattle
Format
Large Format
Try to get your hands on the book of Christina Z Anderson: Gum printing and other amazing contact printing processes. ISBN: 978-0-9846816-1-7
It is very practical and contents lots of information.
it was actually my birthday this past week, and my MIL bought me this book. I read it front to back in 2 days.
 

rknewcomb

Subscriber
Joined
Sep 12, 2006
Messages
483
Location
Athens, Ga. USA
Format
Medium Format
That is a very lovely print !!!
May I ask, what was the original shooting format ie: film size or digital etc and what size is the print?
Well done.
Robert
 

Como

Member
Joined
Aug 16, 2019
Messages
24
Location
Purmerend (Netherlands)
Format
35mm
it was actually my birthday this past week, and my MIL bought me this book. I read it front to back in 2 days.
Great and congratulations.
I have learnt to apply thin layers with two brushes. One wet to bring up the gum and then one dry brush to spread it equally.
I always size with PVA after shrinking in hot water.
 

Como

Member
Joined
Aug 16, 2019
Messages
24
Location
Purmerend (Netherlands)
Format
35mm
That is a very lovely print !!!
May I ask, what was the original shooting format ie: film size or digital etc and what size is the print?
Well done.
Robert
Thank you for the compiment.
The original was made with a digital Canon camera. I don't know exactly wich one.
I was folowing a course still live photography in the Rijksmuseum Amsterdam and they lent me this camera during the course.
The print is 18 x 27 cm.
 

Bob Carnie

Subscriber
Joined
Apr 18, 2004
Messages
7,731
Location
toronto
Format
Med. Format RF
I have been making Gum Prints pretty regularly for the last 7 years now .. I have some observations

First off the old saying if it Quacks like a Duck, if it waddles like a Duck , if it looks like a Duck - then its probably a Duck.


So first thing I think all Gum Printers should know is two things...

1. the negative must look like the right negative - visually look

2. the gum process is a wash off hardening process and not a photon changing process like silver or pd. If no light is hardening the gum the pigment will wash off and not create your image.
This was a very simple lightbulb moment for me.


I do a lot of gum over palladiums as my process of choice and below is the basic structure of the final print.


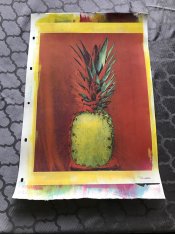
Original Image.jpg This is the final print , Yes the image does look like this as it is a solarization colour negative. Lots of Red , Yellow, mixture of green and a bit of blue on a grey background for copy work.

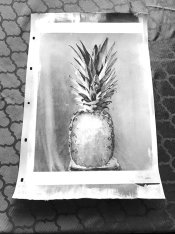
BW conversion.jpg This is the image on screen after I have done the BW conversion, Note that I have used the sliders in BW conversion to lighten any areas , specifically the red background to allow pigment to show through over my initial Palladium Detail print.

BW Negative.jpg It looks like a negative to me folks.... as one would expect.. I use this negative (IN MY WORK) to create a palladium detail base, I find by putting down a palladium first I get a smoother less gritty print and I like the old school effect of colour over the warmth of the palladium.

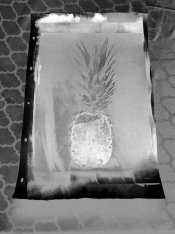
Yellow Layer.jpg Yellow negative... It looks correct to me whereas it is allowing a lot of light through to the paper that is coated (pigment , Gum Arabic, Ammonium Dichromate) the clear areas allow the light to harden the areas where yellow needs to be and stops light where yellow does not need to be.. In this image I have noted it has a lot of yellow and red... Equal amounts of Y and M = Red so this negative is going to do a lot of work and is my first laydown over palladium.

Magenta.jpg Magenta Negative, it is allowing a lot of light through onto the background which is Red.. Equal amounts of Y and M make Red so this looks right, notice on the flesh of the fruit the density is stopping light getting through because its Green.... equal amounts of Yellow and Cyan make Green ... so yes this negative makes sense.

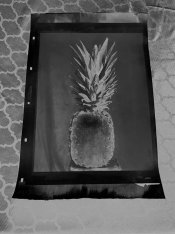
Cyan.jpg Cyan Negative.. as you can see the Cyan negative is creating a lot of detail, not letting much on the background but letting some through on the flesh of the fruit and some on the leaves.


So IMHO this set of negatives work.....They look correct as if I was shooting 25 years before I can see all the areas sorting themselves out.

I must point out that unless one looks and visualizes and understands how the process works , one will be fighting this wonderful process for ever with a lot of frustration. The real problem with unsuccessful printing , and this has been the rule for the last 40 plus years that I have been making a living from it is .. Operator Error... when things go wrong , look in the mirror , you will see the culprit.


Like any process Gum has its NEEDS to be successful, the enlightened printer tries to understand these needs and address them.

hope is helpful.
Bob
 

Como

Member
Joined
Aug 16, 2019
Messages
24
Location
Purmerend (Netherlands)
Format
35mm
Thanks Bob, a beautiful print.
Experience is equal to the pile of failed prints.
Everybodey has to find out what works best for himself. There are many roads leading to Rome. But so far I can see you have found a short one.

Co
 

Bob Carnie

Subscriber
Joined
Apr 18, 2004
Messages
7,731
Location
toronto
Format
Med. Format RF
This road I took was actually a long one, but rather than fill up bins of prints I took an approach of understanding film ( helpful with a lot of film shot over years) Separating film ( thanks to previous jobs) and researching exactly how the gum process works in practical terms , backed up with reading everything I could get my hands on.
 
Photrio.com contains affiliate links to products. We may receive a commission for purchases made through these links.
To read our full affiliate disclosure statement please click Here.

PHOTRIO PARTNERS EQUALLY FUNDING OUR COMMUNITY:


Ilford ADOX Freestyle Photographic Stearman Press Weldon Color Lab Blue Moon Camera & Machine
Top Bottom