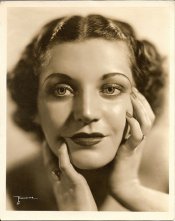
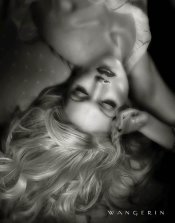
1930's Hollywood/glamour lighting

Texting...

D
Texting...

  • 0
  • 0
  • 29
The Urn does not approve...

D
The Urn does not approve...

  • 4
  • 2
  • 62
35mm in 616 test

A
35mm in 616 test

  • 0
  • 2
  • 87
Smiley

H
Smiley

  • 0
  • 1
  • 60

Recent Classifieds

Forum statistics

Threads
197,486
Messages
2,759,979
Members
99,386
Latest member
Pityke
Recent bookmarks
2

dianna

Member
Joined
Sep 22, 2005
Messages
123
Location
Denton, Texa
Format
Multi Format
I love everything about this look from the shallow DOF to the lighting. With such a shallow depth of field, I'm guessing that the photographer used modeling lights or some other constant light source and a wide aperture or large format camera. I would be grateful for any tips on how to achieve this look (BTW I don't own a set of studio strobes and don't have an interest in using them).
 

Attachments

  • glamour.jpg
    glamour.jpg
    105.1 KB · Views: 1,096

JBrunner

Moderator
Moderator
Joined
Dec 14, 2005
Messages
7,429
Location
PNdub
Format
Medium Format
Large tungsten or carbon arc fixtures (at the studio, you know)
High right key, lower(eye level) left fill (you can see them in her eyes, and the key angle from the nose shadow), a hair light, and lots of makeup. Portrait lens.

The triangle of light under her eye (left frame) was the thing in the day.
 

Amund

Member
Joined
Nov 18, 2004
Messages
902
Location
Oslo,Norway
Format
Multi Format
And lots of work with the 30`s version of Photoshop: the lead pencil :smile:
 

df cardwell

Subscriber
Joined
Jul 16, 2005
Messages
3,357
Location
Dearborn,Mic
Format
Multi Format
Massive retouching is the key. The photographic image - made under HOT lights - was often completely painted over. This particular image was also vignetted ( probably in the printing ). You COULD do this all day long in Photoshop.

Pick the most appealing quality of the image, and you can probably do it easily enough without tricks. But combining the whole catalog of FX ? Paint, pencil, etching knife, airbrush...
 

Kino

Subscriber
Joined
Jan 20, 2006
Messages
7,612
Location
Orange, Virginia
Format
Multi Format
Don't forget our buddy, Max Factor here. He began by providing pancake to the silents for shooting with Ortho stocks which made the caucasian face turn very dark. Next time you watch a low budget silent, look around the nape of the neck and cuff area of the arms and see where the makeup ends.

It made it really easy for white guys to play Native Americans; they simply didn't apply makeup...

I assume the lass has as very thick layer of (base) makeup on her face.

BTW FWIW, the kicks in her eye suggest to me a spun glass Mole Richardson "rifle" light (5K tungsten) for her camera-right key, up at 2 O'clock and a Niner-broad Mole on camera left with silks at 9 O'clock for fill with a tweenie or other small illuminary providing the kicks on the hair from behind at 10 and 2 O'Clock.

Pretty classic stuff...
 

David A. Goldfarb

Moderator
Moderator
Joined
Sep 7, 2002
Messages
19,974
Location
Honolulu, HI
Format
Large Format
Looks like makeup and pencil in that example.

Hurrell used to like to photograph subjects with makeup only to define the eyes and lips and no base makeup to get the natural glow from the skin, and then all blemishes would be retouched out and lines would be softened with pencil on the neg.

I have an Adams Machine, and I'm learning.
 

df cardwell

Subscriber
Joined
Jul 16, 2005
Messages
3,357
Location
Dearborn,Mic
Format
Multi Format
Hey Kino

Why do they call it pancake ? ( you owe me a milkshake for the softball.. )

.
 

Kino

Subscriber
Joined
Jan 20, 2006
Messages
7,612
Location
Orange, Virginia
Format
Multi Format
Oh yeah, sorry, suggestions....

Lowell DP kit, Key at 1:30, medium flood with hard reflector at 8 feet away. Fill, another DP light full flood behind a sheet of toughspun diffusion at 12 feet and directly at eye level to fill sockets. 2 Teenies, no more than 150 watt each, just out of frame behind subject at 10 and 2, hard spots raked across hair tips from behind. White cyclorama (or sheet) behind subject about 4 feet (no shadows on it) and a nice even, diffused light source on it; put it on a dimmer or variac and adjust by eye. Stack NDs on camera to get minimum DOF and focus on eye kicks. Heavy makeup, vaseline on teeth and you are ready.

My 2 cents.

Frank
 

Kino

Subscriber
Joined
Jan 20, 2006
Messages
7,612
Location
Orange, Virginia
Format
Multi Format
df cardwell said:
Hey Kino

Why do they call it pancake ? ( you owe me a milkshake for the softball.. )

.

I used to know this... Sorry... Drat.
 

removed account4

Subscriber
Joined
Jun 21, 2003
Messages
29,833
Format
Hybrid
mark wangerin is in the midst of writing a book for
making portraits just like this .... last i spoke with him ( a few months ago ) it was still being edited ...

the adams machines were great. i had one and used it for years. one of the tricks is to have a very sharp-pointy lead, and a light touch (and not to put hardener in the fix - you'll loose the film's tooth ).

don - pancake makeup was called that because it came in a semimoist cake form ... or so they say ... unlike grease-paint, from days of yore :smile:

-john
 
Last edited by a moderator:
Joined
Oct 1, 2004
Messages
456
Location
Paris, France
Format
Multi Format
dianna said:
I love everything about this look from the shallow DOF to the lighting. With such a shallow depth of field, I'm guessing that the photographer used modeling lights or some other constant light source and a wide aperture or large format camera. I would be grateful for any tips on how to achieve this look (BTW I don't own a set of studio strobes and don't have an interest in using them).

Hi Dianna,

First, here are my observations about this portrait:
Classic Rembrandt lighting
Main : medium-high, right, undiffused –probably a wide-diameter tungsten fresnel
Backlights : right and left kickers evidenced by reflection in hair and side of forehead and extreme edge of jowl
Fill : low left, probably at head level as evidenced by catchlight and shadow on chin from finger .. Probably not very near lens as evidenced by canyon-shadows between hands, under chin
Background : flood – maybe Mole Softlites
Make-up : finished with a little coldcream as evidence by focused highlights on nose annd cheeks
Lens : probably longer than normal, close-up, f wide
Film : probably ortho as evidenced by dark lips
There is as always for these type of portraits, quite heavy pencil retouching, and this portrait is a master example. I do not think a vignetter was used
and I do not notice any flagging on the lighting (though there may be, especially on such a well done portrait).

To do the same today, just use the same materials and technique (you have several good answers, above particularly regarding retouching. Yes, you can "get away with" smaller format and other substitutions, but if you really want the same look, the solution is simple: do the same thing!

One difference: Today I use all Dedo lights, as the optical efficiency of the spotlights let me work in smaller spaces and at more comfortable levels of light.

Good luck and have fun.
 
Joined
Oct 1, 2004
Messages
456
Location
Paris, France
Format
Multi Format
dianna said:
I love everything about this look from the shallow DOF to the lighting. With such a shallow depth of field, I'm guessing that the photographer used modeling lights or some other constant light source and a wide aperture or large format camera. I would be grateful for any tips on how to achieve this look (BTW I don't own a set of studio strobes and don't have an interest in using them).

Hi Dianna,

First, here are my observations about this portrait:

-Classic Rembrandt lighting

-Main : medium-high, right, undiffused –probably a wide-diameter tungsten fresnel

-Backlights : right and left kickers evidenced by reflection in hair and side of forehead and extreme edge of jowl

-Fill : low left, probably at head level as evidenced by catchlight and shadow on chin from finger .. Probably not very near lens as evidenced by canyon-shadows between hands, under chin

-Background light : flood – maybe Mole Softlites

-Make-up : finished with a little coldcream as evidence by focused highlights on nose annd cheeks

-Lens : probably longer than normal, close-up, wide f/stop

-Film : probably ortho as evidenced by dark lips

As always for these type of portraits, there is quite heavy pencil retouching, and this portrait is a masterly example. I do not think a vignetter was used
and I do not notice any flagging or scrimming on the lighting, although with a portrait this well done, it's not always easy to tell.


To do the same today, just use the same materials and techniques (you have several good answers and suggestions above particularly regarding retouching, which is ABSOLUTELY necessary to achieve this look). Yes, you can "get away with" smaller format and other substitutions, but if you really want the same look, the solution is simple: do the same thing!

One difference: Today I use all Dedo lights, as the optical efficiency of the spotlights let me work in smaller spaces and at more comfortable levels of light. Plus, their barndoors (essential for this kind of work) are the best I've ever seen.

Good luck and have fun!
 
OP
OP
dianna

dianna

Member
Joined
Sep 22, 2005
Messages
123
Location
Denton, Texa
Format
Multi Format
Thanks for the tips. The Lowell kits are in the $2K range. Ouch! I think I'll just admire the glamour portraits and stick with available light until I can educate myself.

I would love to see a revival of that style. It's a niche that nobody seems to have exploited lately.
 

JBrunner

Moderator
Moderator
Joined
Dec 14, 2005
Messages
7,429
Location
PNdub
Format
Medium Format
If you want to mess around with tungsten lighting you can get some shop lights and and some foam core. Smith victor lights can also be found cheap.

You can use the foam core to bounce light, and also cut holes in it to control light.

Note that different B&W films have varying response to tungsten light.
 

jimgalli

Subscriber
Joined
Sep 7, 2002
Messages
4,232
Location
Tonopah Neva
Format
ULarge Format
Contact me offline if you're interested in a Century Studio camera complete with Wollensak Series II Velostigmat & packard shutter. It's a 5X7 so film won't eat you up quite so bad. You could put an 8X10 back on but I don't have one for it. Clamps and floods from the hardware store are useable while you collect the correct vintage stuff on Ebay.
 

df cardwell

Subscriber
Joined
Jul 16, 2005
Messages
3,357
Location
Dearborn,Mic
Format
Multi Format
Kino said:
I used to know this... Sorry... Drat.


Max Factor's PANCHROMATIC CAKE MAKEUP = Pancake

Christopher: Dedos.... gosh, yes !
 
Joined
Oct 1, 2004
Messages
456
Location
Paris, France
Format
Multi Format
dianna said:
Thanks for the tips. The Lowell kits are in the $2K range. Ouch! I think I'll just admire the glamour portraits and stick with available light until I can educate myself.

I would love to see a revival of that style. It's a niche that nobody seems to have exploited lately.

Hey! Don't despair! Start out with a Smith-Victor photoflood outfit (used to be 3 lights and 3 stands for about $150. or so). Or check out the slightly more expensive Lowel L-Light system (http://www.lowel.com/llight/)

I swear you can get great results with either of these (don't forget to buy BARNDOORS!).. perhaps not the "Hollywood glamour look", but certainly the "Kodak glamour look"! Not as dramatic, but just as impressive. Look up Wallace Seawell's work to understand the difference.

By the way, about your comment that, "It's a niche that nobody seems to have exploited lately" ... well, there's me .. and ..

http://www.studio-harcourt.com/
http://www.thestarlightstudio.com/
http://www.wangerinphoto.com/
 
Last edited by a moderator:
OP
OP
dianna

dianna

Member
Joined
Sep 22, 2005
Messages
123
Location
Denton, Texa
Format
Multi Format
Thanks Christoper, for both the gear recommendation and the links. That, I can justify buying to use for learning and practice. It's awesome that there are a few of you out there doing that kind of work. It looks like it's fun and challenging.
 

Changeling1

Member
Joined
Mar 19, 2005
Messages
655
Location
Southern Cal
Format
4x5 Format
In addition to all the great advice you've received from the others, I have an interesting bit of trivia which you might either find amusing or useful.
Famous Hollywood Glamour photographer George Hurrell, IIRC, used what he called his "magic potion" that he would anoint his subjects with so they would get dazzling results from the shoot. The "secret potion" was actually baby oil which he carefully applied in small amounts in certain areas of the face to produce a sort of specular highlight(s) in just the right spot. It worked great and gave his work a unique look.

With the hard lighting and big negs of those times- expert retouchers were in great demand!
 
OP
OP
dianna

dianna

Member
Joined
Sep 22, 2005
Messages
123
Location
Denton, Texa
Format
Multi Format
This is a little bit off topic, but those of you who shoot in this style: how did you practice when you were learning? who was your model? My hubby said there are good workshops out there - maybe that's the best way to get started?
 

Mark Wangerin

Member
Joined
Jul 3, 2004
Messages
26
Location
Southern cal
Dianna,
I see Christopher has already chimed in with some excellent observations on this discussion. I think we all go about this in such different ways to achieve the Vintage Hollywood look, that it's difficult to say that there is one right way to go about this. It's also important to keep in mind that with several light sources you have an opportunity for disastrously conflicting shadows. This in itself is a big obstacle to negotiate for the student.

I think someone mentioned earlier that George would rub oil on his subjects but in reality that was rarely necessary as the subject was already sweating from the heat generated from the lights. He liked to keep the sweat on the subject then blend that on the negative with dyes for the Hurrell Glow that we all have come to love. He would also use crushed lead to create the burnished effect that is also an earmark of the Hurrell look.

I create my images more and more with digital (duck and cover) but I still use my Linhof Super Technika and vintage lenses, including a Verito and an Imagon for a beautiful glow right at the pull of the trigger.

You can practice good lighting technique very cheaply with nothing more than cheap Home Depot parabolic work lights, some cardboard and pony clamps for light control. This is how I started then rewarded myself with some more expensive Moles, B&M Keg Lights and even the modern Desisty fresnels once I got a handle on controlling my light and their ratios.
 

Attachments

  • Angelique for APUG.jpg
    Angelique for APUG.jpg
    36.8 KB · Views: 474
Last edited by a moderator:

df cardwell

Subscriber
Joined
Jul 16, 2005
Messages
3,357
Location
Dearborn,Mic
Format
Multi Format
A good film to use is Tri X Pro ( TXP ) as it gives the classic 'portrait curve' with no violence needed from your part.

Start with a single 100 w light bulb in a simple photo reflector ( shop lights cast rings on the subject ). Work with a wig dummy. Most of what you want to accomplish can be done with a single light. Ignore 'how to guides'... they are invariably wrong, and will lead you astray. There is no substitute for SEEING what the light does. And practise.

Hurrell lighting has been in vogue among folks wanting to do 'something different' for many years. But few get it, and few do it well. Lots of people trying, but like anything else, few willing to put in the effort.

William Mortensen published an introduction to lighting back in the '30s that will open your eyes. You might also hunt down '30s cinema lighting manuals.

Oh, yes. In addition to adding gloss with oil, subtract it with a tiny bit of powder. Basic stagecraft.

.
 
Photrio.com contains affiliate links to products. We may receive a commission for purchases made through these links.
To read our full affiliate disclosure statement please click Here.

PHOTRIO PARTNERS EQUALLY FUNDING OUR COMMUNITY:


Ilford ADOX Freestyle Photographic Stearman Press Weldon Color Lab Blue Moon Camera & Machine
Top Bottom