


David Lyga
Member
processing C-41 color print film as a monochrome negative
First, this thread is NOT about making B&W prints from extant color negatives. Instead, it is about processing C-41 color print film in B&W chemicals in order to create monochrome negatives (which then can be printed onto B&W paper). Twice before, during the past several years, I had written on Photrio about this. But, to tell the truth, every once in a while when I read either Photrio or another photography forum I see that when the question comes up, invariably, the response is that only bad negatives will manifest (i.e., very foggy and of low contrast). Why am I not able to get across? That inability becomes interesting to me.
I think the problem is not endemic to photography. *****
{Moderator's note - we have redacted a small portion of this paragraph because of the inclusion of arguably reasonable points that are in essence, political and controversial outside the area of photography, thus not consistent with the Photrio rules.}
So we have it. For some, truth will forever be subordinate to ... mental inertia? I cannot cure this; I am able only to note this and try to lead the way forward.
Thus, I am asking for moderator approval for yet another iteration of this topic. I guess all that I can hope to be able to do is to instruct the NEWER members, the ones whose minds are not as rigid and are still open to alternative methods. That way they might learn this useful material in order to reap a greater artistic flexibility.
There are two bonuses in store for these newbie trailblazers. First benefit, C-41 color negative film is completely panchromatic, unlike regular B&W film which is only partially so because of its blue bias. Thus, if there are clouds in the sky, no filter is needed in order to capture those clouds. Second benefit, no matter how much age-fog the old color negative film has, ALL that nasty fog will be completely eliminated with this process. Yes, with both new film and old film, you will end up with clean negatives.
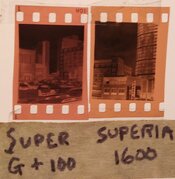
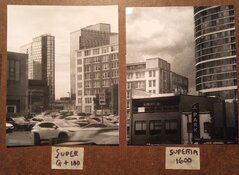
I present two extreme examples of films: The Fujicolor negative films I am using for this demonstration are Super G+ ISO 100 and Superia ISO 1600. The '100' is about 20 years old but was always kept frozen and still records at full box speed; thus,I call this film fresh. Since I rate ALL negative films at slightly below box speed, I rate this ‘100’ at EI 64. The 'Superia 1600' is even older, had always been kept at room temperature and, since it also was a far faster film, it is extremely age-fogged. i doubt that it could now even be used to make a color negative, so badly is it fogged. This '1600' film I rate at a lowly EI 32.
For ALL B&W work (negs and paper) I use 80 F (26.7 C).( I have included, below, a temperature factor chart for your convenience, since you probably work at a different temperature.) Simply multiply MY time by the factor for YOUR temperature.
I developed the '100' film in Dektol (1+9) for 8 minutes. For the '1600' film I developed in Dektol (1+4) also for 8 minutes. (Note that the film that is more age-fogged requires a stronger, less diluted developer.) After development, stop bath, and fixer (fix like you would fix TMAX 400) you are greeted by the ugliest negatives you have ever seen: almost totally black, including the base.
Next, you will use Farmer's Reducer to open these negatives up. Here is how I mix this:
You need: Bleach: 1 mL (or 1 g) potassium ferricyanide for each 25 mL water (this chemical is close to the same for both volume and mass measurement). (NOTE: Keep bleach solution in the dark for continued longevity. (In room light the bleach solution will start deteriorating within one week. I keep my bottle in a black plastic bag used for photo paper.) It is NOT necessary to keep the dry potassium ferricyanide in darkness.
You need: Unused paper strength fixer: (This is the same as fresh film strength fixer, diluted 1 + 1)
Mix BLIX just before use as it will not last for hours: 1 part bleach + 1 part paper strength fixer = 2 parts BLIX.
For the fresh film ('100'): use 20% BLIX: 1 part BLIX + 4 parts water. I usually cut the fixed film into 5 or 6 frame lengths and do this separately in a longer, but narrow, container. (If you cannot see the spacing between frames, blix until the base just becomes visible, then continue to blix each strip separately after cutting.) That way I get to see what is happening and when to stop blixing. (Keep the film fully immersed so as to reduce evenly, and agitate frequently.) After some time (ideally, about 5 to 10 minutes) you will begin to see the orange base begin to emerge. First, it will be a dirty orange, then cleaner, then cleaner yet, then bright orange with no other density. At this point look carefully at the image. because it will be the next to fade if you continue for too long. If the negative has been overexposed, you can continue to let the reducer fade the image a little bit in order to make the negative easier to print. But watch carefully, or you might end up with a weak image. When you take the film out of the blix reducer, plunge it into the original fixer you used when you originally developed the film. If you are happy, wash and dry normally.
For the age-fogged Superia 1600 film: use a stronger BLIX: use 50% BLIX: 1 part BLIX + 1 part water. Follow the same procedure, again ideally, BLIX for 5 to 10 minutes. Shorter blix times are more difficult to manage; longer ones are more tedious. Some films will require full strength blix, i.e., 1 part fix and 1 part bleach, no extra water.
SOME TIPS: I have used extreme examples in order to cover all bases. Your films might be different and you will have to experiment. HOW you experiment will determine your frustration level. I recommend doing this: If you have a roll, the fog/speed of which is unknown to you, instead of shooting the whole roll, cut off the leader almost completely, leaving only a tiny bit you can pull out. Then in total darkness, pull out an inch or two and carefully place/tape it onto your SLR's film aperture gate, close the back, and take one educated guess as to exposure. (Make certain to write it down). I NEVER test whole rolls; that is terribly wasteful. Instead, I do this testing piecemeal, processing the single frame of film in a plastic film cassette-can in total darkness. Using a 10 mL working solution of developer inside the can, I roll the can throughout the development time in a small, tempered water bath. I then take the film out and use tiny trays (1.5"X 2") (bought at Dollar Tree) for stop and fix. You might have to do this several times in order to zero onto the precise exposure and development. It is worth it. If, after you have fully determined what that roll is all about, you load your camera with the remainder of the roll, of course in total darkness, happily knowing that you NOW KNOW that film. Use tape as an aid when loading the film; when attached to the take-up spool, in total darkness, you can get away with wasting only about two frames per loading, as compared to about five frames with 'normal' loading. Film is expensive.
My negative examples are half-frame. The paper was Multigrade IV. The negatives and prints are a bit sharper than they appear here because I might have quavered a bit when I took the pictures with my phone. (Last year I was diagnosed with Parkinson's.) But do persevere with this testing and, soon, you will never understand why you ever had used expensive full rolls of film in order to conduct a single test. – David Lyga
First, this thread is NOT about making B&W prints from extant color negatives. Instead, it is about processing C-41 color print film in B&W chemicals in order to create monochrome negatives (which then can be printed onto B&W paper). Twice before, during the past several years, I had written on Photrio about this. But, to tell the truth, every once in a while when I read either Photrio or another photography forum I see that when the question comes up, invariably, the response is that only bad negatives will manifest (i.e., very foggy and of low contrast). Why am I not able to get across? That inability becomes interesting to me.
I think the problem is not endemic to photography. *****
{Moderator's note - we have redacted a small portion of this paragraph because of the inclusion of arguably reasonable points that are in essence, political and controversial outside the area of photography, thus not consistent with the Photrio rules.}
So we have it. For some, truth will forever be subordinate to ... mental inertia? I cannot cure this; I am able only to note this and try to lead the way forward.
Thus, I am asking for moderator approval for yet another iteration of this topic. I guess all that I can hope to be able to do is to instruct the NEWER members, the ones whose minds are not as rigid and are still open to alternative methods. That way they might learn this useful material in order to reap a greater artistic flexibility.
There are two bonuses in store for these newbie trailblazers. First benefit, C-41 color negative film is completely panchromatic, unlike regular B&W film which is only partially so because of its blue bias. Thus, if there are clouds in the sky, no filter is needed in order to capture those clouds. Second benefit, no matter how much age-fog the old color negative film has, ALL that nasty fog will be completely eliminated with this process. Yes, with both new film and old film, you will end up with clean negatives.
I present two extreme examples of films: The Fujicolor negative films I am using for this demonstration are Super G+ ISO 100 and Superia ISO 1600. The '100' is about 20 years old but was always kept frozen and still records at full box speed; thus,I call this film fresh. Since I rate ALL negative films at slightly below box speed, I rate this ‘100’ at EI 64. The 'Superia 1600' is even older, had always been kept at room temperature and, since it also was a far faster film, it is extremely age-fogged. i doubt that it could now even be used to make a color negative, so badly is it fogged. This '1600' film I rate at a lowly EI 32.
For ALL B&W work (negs and paper) I use 80 F (26.7 C).( I have included, below, a temperature factor chart for your convenience, since you probably work at a different temperature.) Simply multiply MY time by the factor for YOUR temperature.
|
BW Fahr Dev |
65F 2.23 |
66F 2.12 |
67F 2 |
68F 1.9 |
69F 1.8 |
70F 1.71 |
71F 1.62 |
72F 1.53 |
73F 1.45 |
74F 1.38 |
75F 1.31 |
76F 1.24 |
77F 1.17 |
78F 1.11 |
|
Factor: 1.055 |
79F 1.06 |
80F 1 |
81F 0.95 |
82F 0.9 |
83F 0.85 |
84F 0.81 |
85F 0.77 |
86F 0.73 |
87F 0.69 |
88F 0.65 |
89F 0.62 |
90F 0.59 |
91F 0.55 |
92F 0.53 |
I developed the '100' film in Dektol (1+9) for 8 minutes. For the '1600' film I developed in Dektol (1+4) also for 8 minutes. (Note that the film that is more age-fogged requires a stronger, less diluted developer.) After development, stop bath, and fixer (fix like you would fix TMAX 400) you are greeted by the ugliest negatives you have ever seen: almost totally black, including the base.
Next, you will use Farmer's Reducer to open these negatives up. Here is how I mix this:
You need: Bleach: 1 mL (or 1 g) potassium ferricyanide for each 25 mL water (this chemical is close to the same for both volume and mass measurement). (NOTE: Keep bleach solution in the dark for continued longevity. (In room light the bleach solution will start deteriorating within one week. I keep my bottle in a black plastic bag used for photo paper.) It is NOT necessary to keep the dry potassium ferricyanide in darkness.
You need: Unused paper strength fixer: (This is the same as fresh film strength fixer, diluted 1 + 1)
Mix BLIX just before use as it will not last for hours: 1 part bleach + 1 part paper strength fixer = 2 parts BLIX.
For the fresh film ('100'): use 20% BLIX: 1 part BLIX + 4 parts water. I usually cut the fixed film into 5 or 6 frame lengths and do this separately in a longer, but narrow, container. (If you cannot see the spacing between frames, blix until the base just becomes visible, then continue to blix each strip separately after cutting.) That way I get to see what is happening and when to stop blixing. (Keep the film fully immersed so as to reduce evenly, and agitate frequently.) After some time (ideally, about 5 to 10 minutes) you will begin to see the orange base begin to emerge. First, it will be a dirty orange, then cleaner, then cleaner yet, then bright orange with no other density. At this point look carefully at the image. because it will be the next to fade if you continue for too long. If the negative has been overexposed, you can continue to let the reducer fade the image a little bit in order to make the negative easier to print. But watch carefully, or you might end up with a weak image. When you take the film out of the blix reducer, plunge it into the original fixer you used when you originally developed the film. If you are happy, wash and dry normally.
For the age-fogged Superia 1600 film: use a stronger BLIX: use 50% BLIX: 1 part BLIX + 1 part water. Follow the same procedure, again ideally, BLIX for 5 to 10 minutes. Shorter blix times are more difficult to manage; longer ones are more tedious. Some films will require full strength blix, i.e., 1 part fix and 1 part bleach, no extra water.
SOME TIPS: I have used extreme examples in order to cover all bases. Your films might be different and you will have to experiment. HOW you experiment will determine your frustration level. I recommend doing this: If you have a roll, the fog/speed of which is unknown to you, instead of shooting the whole roll, cut off the leader almost completely, leaving only a tiny bit you can pull out. Then in total darkness, pull out an inch or two and carefully place/tape it onto your SLR's film aperture gate, close the back, and take one educated guess as to exposure. (Make certain to write it down). I NEVER test whole rolls; that is terribly wasteful. Instead, I do this testing piecemeal, processing the single frame of film in a plastic film cassette-can in total darkness. Using a 10 mL working solution of developer inside the can, I roll the can throughout the development time in a small, tempered water bath. I then take the film out and use tiny trays (1.5"X 2") (bought at Dollar Tree) for stop and fix. You might have to do this several times in order to zero onto the precise exposure and development. It is worth it. If, after you have fully determined what that roll is all about, you load your camera with the remainder of the roll, of course in total darkness, happily knowing that you NOW KNOW that film. Use tape as an aid when loading the film; when attached to the take-up spool, in total darkness, you can get away with wasting only about two frames per loading, as compared to about five frames with 'normal' loading. Film is expensive.
My negative examples are half-frame. The paper was Multigrade IV. The negatives and prints are a bit sharper than they appear here because I might have quavered a bit when I took the pictures with my phone. (Last year I was diagnosed with Parkinson's.) But do persevere with this testing and, soon, you will never understand why you ever had used expensive full rolls of film in order to conduct a single test. – David Lyga
Attachments
Last edited by a moderator:

