• Welcome to Photrio!
    Registration is fast and free. Join today to unlock search, see fewer ads, and access all forum features.
    Click here to sign up

Carbon Printing - Final Support Paper Issue

The Hot Waters

A
The Hot Waters

  • 0
  • 0
  • 22
Dump Truck Hat Trick

D
Dump Truck Hat Trick

  • 1
  • 0
  • 78

Recent Classifieds

Forum statistics

Threads
204,313
Messages
2,867,031
Members
102,221
Latest member
GarMc
Recent bookmarks
0

klawless

Member
Joined
Feb 9, 2026
Messages
6
Location
Kaslo, BC
Format
Multi Format
Hello everyone (long-time lurker here).

I recently got back into carbon transfer printing after nearly 20 years. And I'm so excited about all the new innovations and ideas out there now. I'm trying to restart my old hobby and have found nothing but headaches. For some reason, none of my final support paper recipes work anymore. I've looked at the variety of new ideas out there and have experimented with a number of them.

Currently, I am using 300 gsm hot-press Arches with a 4% gelatin layer coating, using Sandy King's new method with a Mayer rod (I'm a fan of his, since I bought his old coil-bound book 20 years ago). I used to use Chrome Alum for a hardener, but that doesn't seem to work anymore (don't know why). So now I'm trying King's 1% formalin solution. But I'm getting the same issues. The image is not setting/adhering to the final support.

Both the tissue and the support paper are soaked in cool water (~16°C) for 3 minutes, then squeegeed together, placed under two glass plates and a 4L jug of water for 30 minutes. Then, when it comes to developing it (at 40°C), it just floats away. I've tried using cooler water at ~35°C, but the issue persists. My support tissue is not holding onto its own gelatin layer, much less the image's gelatin.

Would love to get feedback and ideas.
Thanks

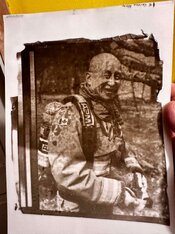
(Below is a test strip sample of one of the better prints. This carbon print was more akin to polaroid transfer as it kept floating off like an onion skin, and I had to recapture it multiple times.)
 

Attachments

  • IMG_1232.jpeg
    IMG_1232.jpeg
    358.1 KB · Views: 67
I use fixed out Xray film for temporary support, and fixed out photo paper for final support. I pour my glop 150ml for 8x10 using magnetic tape as a border. Mating bath is between 50-55f for 4 minutes and final transfer bath no hotter than 120f. for 3-4 minutes. I use rubylith tape for my safety edge.
 
Try reducing the soak time of the final support during transfer (1 minute or less).

The issue with using watercolor paper as a final support is that the paper can absorb a lot of water. Excess water can interfer with the creation of the 'glue' that holds everything together (the gelatin getting hot in the development bath becomes the glue). Frilling and the lack of adhesion of the print is caused when the gelatin that is suppose to form the glue is diluted by excess water getting between the final support and the tissue during development.

This can happens if:

One does not sufficiently squeeze the water out between the two during transfer.
One bends the mated tissue/final support package too much before development -- this can break the seal between the two, and allow water to get in between the two.
The watercolor paper had too much time in the mating bath and soaked up too much water, thinning the glue.

Thank you. That's a great point I had not considered. I will definitely change my soak time and see if that helps. But I'm guessing that if you are right, then the final wash in hot water might also have the same detrimental effect.

What would you recommend instead for a final support material? That said, I live in a fairly remote area, where rare and specialized materials are hard to come by.
 
I second @Vaughn's suggestion of reducing the soak time.
Also, be sure to print a safety border around the image (see @Rick A's suggestion as well) where you mask the tissue so it receives no exposure. If you try to print to the edge of the tissue, you risk losing the whole transfer due to flagging; it starts to peel off around the edges and ends up taking out the entire image.

Overall I've never had much problems with a single transfer using dichromate as a sensitizer and a 'fine art' paper sized (heavily) with gelatin and hardened with chrome alum. Btw, chrome alum doesn't go bad. I expect the hardening of your final support is just fine and this isn't the source of the problem.
 
I also use fixed-out photopaper as my final support for a few reasons. One, that it is easy and fool-proof (well, for this fool, anyway), so it is easy to check on the other aspects of the process without the final support and its preperation becoming a variable if/when things go wrong.

But I also like the surface of glossy fiber-based photopaper, and have included the paper's surface as part of my image-making. The gloss of the paper is more evident in the high values and the gloss of the gelatin in the low values. This difference and the more evident high relief seen on a smooth surfaces, gives the print the depth I am aiming for.

People I know who use watercolor paper with coatings do use a lower development temperature than those of us using photopaper (I start at 120F and can agitate strongly, and still have everything hold together).

Chrome alum does harden gelatin, but I believe it is not instanteous and one needs to wait a day or two for the hardening to be complete. Perhaps Zoraks knows more about this aspect.
 
Last edited:
Chrome alum does harden gelatin, but I believe it is not instanteous
Yes, chrome alum offers instant hardening, which is an advantage or a drawback, depending on how you look at it. The drawback is if you add it to the warm gelatin, it'll start to congeal within a very short period of time - so only add it right before coating and only to the volume needed to coat a single sheet. The advantage is that the paper is ready to go as soon as it's dry. Chrome alum imparts a subtle greyish-lilac color unless a lot is used, in which case the color is quite pronounced.

Formalin does indeed take some time to fully harden; the process continues for weeks, in fact, but the paper is generally usable after 1-2 weeks. Formalin has the drawback that it evaporates and therefore can harden other gelatin nearby (such as unsensitized carbon tissue). However, concentrations need to be fairly high. The vapors are of course decidedly unhealthy.
 
Ah...I was using Potassium chrome alum...might be the difference.
 
Thanks, everyone. These are great ideas to work with.

My to-do list to investigate:
- letting the final supports harden longer (1-2 weeks formalin)
- ensuring the area around image is 'blocked out' to create firm border
- shortening the final soak with the watercolour paper
- lower development temperature ( ~35°C ?)
- work on creating a firmer bond in contact stage with less manipulation, even squeegee pressure, and keeping as much water out of the bond as possible.

Long-term ideas:
- exploring different amounts of hardener solution and gelatin combinations
- acrylic matte medium instead of gelatin
 
- lower development temperature ( ~35°C ?)
35C will be slow. Also, if this is needed and you still get problems at around 40-42C then it shows the process only borderline works. Carbon transfer is reasonably robust once you've dialed it in and doesn't really need very delicate temperature control in my experience.

- work on creating a firmer bond in contact stage with less manipulation, even squeegee pressure, and keeping as much water out of the bond as possible.

There's an interesting post by Calvin Grier on the groups.io where he summarizes his literature research if I recall correctly. The conclusion was that the bonding happens mostly/entirely at the moment the sandwich hits the hot water. The implication is that the squeegeeing step really isn't all that critical, as long as you get the air out. It doesn't have to be particularly firm or anything.
Personally I don't do dichromate direct transfers anymore, but always with with DAS (which gives less robust hardening than dichromate). I find it's just not necessary to let the sandwich wait for a long time etc. Just squeegee, fill tray with warm water and develop.
Excess moisture in the sandwich will make the bond less firm, which you catch by reducing the soak time of the tissue.

- exploring different amounts of hardener solution and gelatin combinations
This is also pretty robust as long as there's enough hardener to get the job done, and it really doesn't take all that much. The bandwidth is quite huge; just don't skimp on the hardener.
Again, do a search on groups.io where Calvin has summarized the ratios of various hardeners to gelatin if I recall correctly.

- acrylic matte medium instead of gelatin
I never had much luck with this but for others it works great.
 
There's an interesting post by Calvin Grier on the groups.io where he summarizes his literature research if I recall correctly. The conclusion was that the bonding happens mostly/entirely at the moment the sandwich hits the hot water. The implication is that the squeegeeing step really isn't all that critical, as long as you get the air out. It doesn't have to be particularly firm or anything.
That is really interesting. I've shortend my 'press' time from 1 hour to 30 minutes. But you say that it doesn't matter at all. I will track that post down. It sounds fascinating.
 
I also just looked at my old notes and noticed that my old gelatin support paper was 2% while the new one is 4%. Could this be an issue?

  • Gelatin concentration too high — counterintuitively, over-sizing creates a surface that's too dense and glassy for the transfer gelatin to penetrate and grip. Try 2–3% rather than anything stronger.
 
The problem with expressing the gelatin load in a percentage solution is that it still depends on how much you apply on a given surface. I always calculate it back to dry gelatin mass per surface area. For double transfer final supports I use 30g/m2 and upwards. That's quite heavy. I don't recognize that too much gelatin would be a problem; what was the source for the quote above?
 
I don't recognize that too much gelatin would be a problem; what was the source for the quote above?

That quote was from a chemistry student friend who was trying to help me trouble shoot the issues.


I always calculate it back to dry gelatin mass per surface area. For double transfer final supports I use 30g/m2 and upwards. That's quite heavy. I don't recognize that too much gelatin would be a problem; what was the source for the quote above
How thick would you apply the final coating? As I mentioned before I've trying to follow S.King's Meyer rod method with a thickness of 5mL per 10cm2.
 
The wait-time between mating the tissue and final support varies a little between practitioners working with their materials.

In the early 1990s I from an article that suggested a 30-minute 'press time', which I have kept as the minimum, too religiously I must admit. I am shortening that time for test prints...the last 8x10 did as expected after just 15 minutes. but it was fresh tissue, not the year-old I sometimes work with which could have different results.

Others have reported success with no waiting period with small prints, but found some issues with larger prints. Larger tissues have longer edges, so perhaps need more careful handling.

The biggest factor, I feel, is water penetration from the edge of the tissue inward towards the image area...especially where two edges come together at the corners. The safe edge is a big part of protecting the glue formation under the image area so that it can remain after the safe edge melts away. A half-inch (13mm) is a good width for that.

The gelatin of fixed-out photopaper is excellent as a water barrier. But from my and others experiences, even photopaper can have issues with prints frilling during development if left in water too long before being used for the transfer. But I am talking hours (or sometimes freshly fixed and washed paper). My only guess is that the paper's emulsion has absorbed its maximum amount of water and while this extra water does not stop the glue formation, it can weaken it enough for occasional minor frilling.

Glue formation may be immediate, but not as strong, or not at all, if there is too much water at the bonding site. From the way frilling can spread, the bond is not very strong to begin with. I think a good squeegee-ing followed by a good hand-drying with a paper towel or cloth, especially around the edge where the tissue meets the final support, is important.

Pardon me, though. I just gave a 4-day carbon workshop in Yosemite, and I think I just slipped back into workshop-mode. What I wrote above works best for me in a workshop situation where consistancy in method, even if over-kill, makes trouble-shooting student work easier, thus faster for the limited time one has.

What is great about carbon printing is that it can be done in ways that best fits the practitioner and the space she or he might be working in, and the vision they may have.

I tried to attach a pdf image of me doing a demo of a tissue pour with my assistant instructor, Jim, watching. Not much to look at if you can't see it.
 

Attachments

  • Vaughn Hutchins Carbon Printing ©Elizabeth Opalenik 2026 (dragged) 2.pdf
    1.1 MB · Views: 94
Last edited:
You and I could be the only carbon printers in BC...
When I was using gelatin sized papers, I was very careful with how long I let it soak in the mating bath for, and at what temperature. If I recall, it soaked for 3 minutes, at 15C. My tissue got 4 minutes. I don't leave the mated sandwich under glass, unless larger than 8x10...and they would only stay there, until I got the hot water development bath ready. Development bath is 45C. I use the drift down method. After three minutes, the tissue is separated from the substrate. The print should be completely cleared in another 3 minutes.
As mentioned, use a safe edge! I like to use lithographer's tape.
Make sure that you are not over exposing.
Cheers and welcome back to Carbon!
 
I use Kraft paper as the base for the tissue, which makes it very thing but resistant to water due to the paper being supercalandered. For final support I use a variety of wc papers from Fabriano, Canson, St. Cuthbert's, etc... size them with mate acrylic varnish (I use "La Pajarita", a spanish brand), never had any problem whatsoever.

---
My glop:
10g gelatin (sheet, gold)
6g sugar candy
4cc Indian Ink (I use D. Torrejano, made in portugal, it has a very interesting violet undertone...)
100cc water
----
 
10g gelatin (sheet, gold)
6g sugar candy
4cc Indian Ink (I use D. Torrejano, made in portugal, it has a very interesting violet undertone...)
100cc water
That's a very high ink load, it seems to me. When I use India ink, I use something like 10-12% w/w to gelatin, so 10g gelatin would be ca. 1-1.2g ink. That's with Talens ink.

I use Yupo as well for the tissue support, like @Andrew O'Neill Lots of materials can work, but Yupo is easy, dependable and reusable.
 
When I first was printing carbon, I would pick sheets of 11x14 litho film out of the trash that students would toss as rejects. It was 0.004" thick and lasted for hundreds of prints.

One advantage of using a clear tissue support is that the tissue can be examined for defects, depending on the pigment density and thickness of the gelatin layer. I can see easily see defects with a bright back-light. Thinly pour areas, pinholes, artifacts (beard hairs), uneven mixing of t he pigment, etc. A good learning tool. I use lampblack watercolor paint in tubes at 5-6% w/w to gelatin.

I have been using Yupo for awhile. There is one thing I have been questioning about using white Yupo vs. a clear tissue support material backed by black in the printing frame. Has anyone noticed any issue with UV reflecting off the Yupo and producing any effect in the print?

I ask because back in the 90s my used litho film all of it had images on them. When I would use a white backing board in the contact printing frame, I could feel a slight pattern in the soft gelatin on the litho film support after I peeled it off that matched the image on the used litho. Not enough to harden it, but just slightly higher than unexposed gelatin. I switched to a black backing board and had no issues.
 
That's a very high ink load, it seems to me. When I use India ink, I use something like 10-12% w/w to gelatin, so 10g gelatin would be ca. 1-1.2g ink. That's with Talens ink.

I use Yupo as well for the tissue support, like @Andrew O'Neill Lots of materials can work, but Yupo is easy, dependable and reusable.

I don't like to reuse my tissue as I prefer to prepare large sheets and then cut (really) down to my purpose, that's why. I also used Yupo in the past and it's a cool support if you always do you carbons the same size.
Perhaps my ink has slightly less pigment? 4cc for me is the sweat spot, and sometimes I add a bit of sepia to it.

I have several cut sizes of Yupo, for 4x5 prints, all the way up to 14x17. I think using tissue support only once is a tremendous waste, but to each his own!
 
I have several cut sizes of Yupo, for 4x5 prints, all the way up to 14x17. I think using tissue support only once is a tremendous waste, but to each his own!

Pouring tissues, I use 12.5"x19" (32x48cm) Yupo I bought at a buck a sheet which can yield one 11x14 print, two 8x10 prints, four 5x7, four 4x10, or eight 4x5s -- or combos there of.

I use all those formats, so I can pour a bunch of 12.5x19s, store them, and print any size negative I have.

I do the same for workshop use. If I pour 36 tissues on 12.5x19" yupo for a 6-person workshop -- it is a heck of a lot easier than pouring and hanging 72 9"x11" tissues!!!

But one of the advantages in a workshop is that I have students sensitize a full sheet (we use 8x10 camera negatives), make their full-negative test, then use the other half of the tissue to make their final -- using same exact tissue sensitized exactly the same way. This eliminates some factors when fine-tuning the print.

This might have to change, as I don't think I can find Yupo for a buck a sheet anymore. I had ordered from the company direct both 86 and 100 weight (250 shts each).

I have quite a bit of 14x17 inch x-ray film I can fix out (it went thru check-in baggage, so I am making an assumption it is fogged). A sheet can make an 8x10 print and a 4x10 print print (or test), but not as versitile as the 12.5x19 (but both are the same area).
 
Photrio.com contains affiliate links to products. We may receive a commission for purchases made through these links.
To read our full affiliate disclosure statement please click Here.

PHOTRIO PARTNERS EQUALLY FUNDING OUR COMMUNITY:


Ilford ADOX Freestyle Photographic Stearman Press Weldon Color Lab Blue Moon Camera & Machine
Top Bottom