• Welcome to Photrio!
    Registration is fast and free. Join today to unlock search, see fewer ads, and access all forum features.
    Click here to sign up

I'm making a giant film slitter!

Tree, California Desert

A
Tree, California Desert

  • 2
  • 1
  • 31
bessa2_on_desk_sm.jpeg

A
bessa2_on_desk_sm.jpeg

  • 1
  • 0
  • 28

Recent Classifieds

Forum statistics

Threads
202,470
Messages
2,841,210
Members
101,341
Latest member
Yusu
Recent bookmarks
5

MCB18

Subscriber
Allowing Ads
Joined
Jan 16, 2023
Messages
1,468
Location
Colorado
Format
Medium Format
As the title says, I’m designing a film slitter. The capacity will be 14”x1000’, or way more than I’ll ever reasonably need. But I’m building it to try and make it as futureproof as I can.

image.pngimage.png
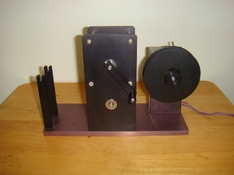
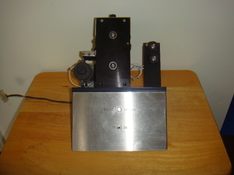
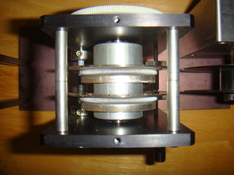
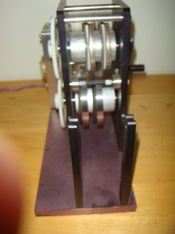
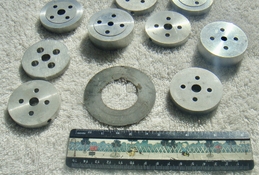
This is the takeup assembly. The shaft will fit cores with a 1” ID and keyway, like most 2-3” OD cine cores. To allow for removal of the film, the shaft is 3 parts. The flanges and cores just slide on and off. The handle has a free spinning grip. Shown here is a setup for 240mm to 70mm.
 
Have you tried the concept in smaller size with a single blade yet? I can see many ways in which this can go wrong, esp. the film folding instead of cutting, then going off-kilter with ugly scratches all over the place.
 
So I assume next step is double perforation 70mm and 220 ☺️ Looks like a nice design. I worked around huge extrusion equipment for making large sheets of ABS for appliances. As the molten plastic was pulled from the die lips, after it would stabilize going forward, the production folks would lower knives into the still soft plastic, worked slick. IIRC the sheet was about 65-70 inches wide, once cool enough it would be sheared to proper length with a quick chop of a huge blade. It was quite rigid when chopped.
The width was super critical as this sheet would eventually go into a vacuum thermoforming machine that would form an entire interior of a US style refrigerator/freezer.

Looking forward to seeing how you get along.!!!

Just remembered I saw slitting operations for the horrible fruit leather candy Fruit by the Foot. The strawberry goo was extruded into a width of about 2 feet, knives were dropped to slit this stuff, and it would be chopped and rolled up like a tape measure. Smelled amazing.
 
Have you tried the concept in smaller size with a single blade yet? I can see many ways in which this can go wrong, esp. the film folding instead of cutting, then going off-kilter with ugly scratches all over the place.
I have tried a smaller version yes, it works well although in its current configuration it is rather annoying to use. I need to wind the film and hold the slitter block, something I intend to solve with this.

As far as scratching, the film will go over a couple of idler rollers just to ensure it goes straight through the slitter, as well as the slitter block. I’ll be touching the emulsion as little as possible. The idlers will only touch the back of the film, and ideally the slitter shouldn’t touch the film at all, only the blades.
 
So I assume next step is double perforation 70mm and 220 ☺️ Looks like a nice design.
Thanks!

I already make 220, and I hope at some point type II 70mm perfs are possible, but that will definitely take a bit. And it won’t be something I can do in-house.
 
In my past life I designed and built film slitters for a living. From specialized table top models to large commercial ones. If I can be of any help let me know.
 

Attachments

  • 375663036_10228247744445983_8928940285710197244_n.jpg
    375663036_10228247744445983_8928940285710197244_n.jpg
    60.4 KB · Views: 65
  • DSC02490.jpeg
    DSC02490.jpeg
    1.7 MB · Views: 67
  • DSC02487.jpeg
    DSC02487.jpeg
    1.9 MB · Views: 68
  • 375650845_10228247746326030_5167514452622964366_n.jpg
    375650845_10228247746326030_5167514452622964366_n.jpg
    60.2 KB · Views: 69
I have an update, the actual slitting part where the blades go is now modeled, although unfortunately, it is going to be rather hard to print just because of how long it is.
image.png

In my past life I designed and built film slitters for a living. From specialized table top models to large commercial ones. If I can be of any help let me know.
That is actually super cool, although I will be completely honest and say I’m not exactly sure what’s going on with the slitter in your images. Looks like something far more complicated than what I’m trying to design.
 
I have an update, the actual slitting part where the blades go is now modeled, although unfortunately, it is going to be rather hard to print just because of how long it is.
View attachment 417000


That is actually super cool, although I will be completely honest and say I’m not exactly sure what’s going on with the slitter in your images. Looks like something far more complicated than what I’m trying to design.
Just a few thoughts

1. You will want to shear the film using two apposed circular knives. The last time I bought a set was from a company called Dienes. Try www.Dienesusa.com.

2. You are either going to be working in total darkness or through an IR glove box setup. You will need a good set of IR inspections goggles. The last pair I was using was from a company called Oldelft. They were $ 10K a pop 40 years ago. God know how much they are now. Cheap ones don't work. They have to close focus.

3. I also used a IR glove box with a camera inside the box and a monitor outside to watch. Mine cost $ 20K 40 years ago.
I'll try and get you some better pics later tonight which should help.
 
Last edited:
Just a few thoughts

1. You will want to shear the film using two apposed circular knives. The last time I bought a set was from a company called Dienes. I don't know if they are still in that business or not but it would be a good place to start.
That is an option, I believe that’s called shear knife slitting. Looking into it though, that offers a lot less flexibility than I’d like, and it’s also very expensive. I have used razor blade type slitters before and they do work well so long as you pull the film straight through the slitter. Most of the parts needed for this design are just to ensure that the film gets pulled straight through the blades.

2. You are either going to be working in total darkness or through an IR glove box setup. You will need a good set of IR inspections goggles. The last pair I was using was from a company called Oldelft. They were $ 10K a pop 40 years ago. God know how much they are now. Cheap ones don't work. They have to close focus.

3. I also used a IR glove box with a camera inside the box and a monitor outside to watch. Mine cost $ 20K 40 years ago.
I'll try and get you some better pics later tonight which should help.
I have tried doing the IR goggles thing, but honestly, I found it more of a pain in the ass than anything else, so I’ve just been doing all of my stuff in the dark. It’s worked well enough for the past few years.
 
In my past life I designed and built film slitters for a living. From specialized table top models to large commercial ones.

Cool! I used to work in a large photo lab where we would slit our own paper (when it was economically worthwhile). We had a couple of Dusenberry slitters that could handle 50 inch master rolls, of which we used to go through about a dozen per day. Cutting down to 10 inch by nominal 575 foot rolls - a more or less standard size for so-called package printers.

I used to be fairly conversant with the operation. My department used to oversee "quality" issues with things, making sure that both the paper widths and cut quality were ok. (If the cuts are not super clean then emulsion skivings and loose fibers can fall off every time the edge touches a paper guide in a printer.)

1. You will want to shear the film using two apposed circular knives.
That is an option, I believe that’s called shear knife slitting.
We just called them rotary knives, but they do indeed shear the material. Our setups used female knives mounted on a mandrel, precision-ground spacers control the width. (The female knife is essentially like a smooth collar with a sort of groove in it; the groove has a precise square edge on one side for cutting.)

The disk-shaped male knives are on another mandrel - one that can be precisely lowered down so that the sharp cutting edge can meet up with the female knife. The disk-shaped male knives are slightly dished in near the cutting edge so that a final adjustment (by the slitter operator) of the male-knife mandrel can slightly distort the male knives by pressing against the female cutting edge. This helps give a very clean cut. I know it sounds complicated but if you can visualize a conventional paper trimmer with a rotary blade, it's very much like that. Except that the flat base of the trimmer has become a rotating cylinder.

Everything is geared together to match speeds; there is no slippage of the paper against the knives, etc.

I'm not saying it's worth doing... just sorta explaining the mechanism.
 
That’s fascinating! I don’t have the room, or wallet, to buy anything like that. If I (somehow) end up with a master roll, it’s getting sent to a 3rd party for slitting.

This little 14” slitter is already quite a complex project for me, and it’s not gonna be anything like the big ones. Basically no tension control, powered by a hand crank, and any time I have to change widths or formats, I will have to disassemble a decent amount of it. This will just be a couple idlers, a slitter, some kind of supply roll holder, and the takeup assembly I showed above.
 
Last edited:
As promised here is a picture of a Dienes film slitter blade and some spacers. Pardon the rust. It has been in my garage for 40 years. The spacers were for 16mm and Minox format film widths.
 

Attachments

  • DSC02603 5.jpeg
    DSC02603 5.jpeg
    1.6 MB · Views: 43
Photrio.com contains affiliate links to products. We may receive a commission for purchases made through these links.
To read our full affiliate disclosure statement please click Here.

PHOTRIO PARTNERS EQUALLY FUNDING OUR COMMUNITY:


Ilford ADOX Freestyle Photographic Stearman Press Weldon Color Lab Blue Moon Camera & Machine
Top Bottom