
stormpetrel
Group owner
Previous thread: hardware description
When I used my durst 138/139 VC LED head for the first time, I could not get proper results. I had no idea how to set the level of blue & green to get the proper grade and my results where all around the place: under exposed, over exposed, too soft, too hard. Every time, it took me a hell of effort to come close to a proper exposed print.
I quickly realized that I could not escape to a proper calibration if I wanted to have an operational light source I could rely on.
There are different approaches to calibration. The first one would involve a Stouffer chart which I don’t have. The second one by simply measuring the density of spots printed with different level of blue & green. I should say blue, green & cyan but I have skipped the cyan for the moment.
A proper calibration starts with the definition of paper grade which is described in the ISO 6846 standard. The grade is based on the LER (log exposure range) which is defined as the difference of exposure between the Dmin of the paper+0.4 and 90% of the Dmax

Durst 138/139 VC LED head calibration - LER vs ISO paper grade
by Dominique Filippi, on Flickr

Durst 138/139 VC LED head calibration - paper grade ISO standard
by Dominique Filippi, on Flickr
Dmin is the minimum density of the paper (fog+paper base). Dmax is the deepest black of your paper (usually ranged between 2.1 and 2.4).
Now we know how to get the paper grade, we need to measure the density vs exposure. In our case the changes of exposure are obtained not by changing the exposure time, but by changing the light intensity.
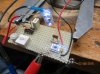
As I have mostly Adox paper, I have run the first calibration for this paper. The calibration consisted in making test strips by changing the level of blue and green (32 values of each = 32x32=1024 spots). I’m not mad enough do it manually so I made a dedicated USB device which runs with my enlarger. I just have to put a square piece of paper in the device, push a button et voila! The enlarger takes control of the device and does all the spots for me. It can fit ~300 6mm spots on a 13cmx13cm piece of paper.
Video of this device at work can be watched here (no paper loaded)
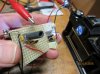
The exposure time was set to 3 seconds for the calibration, and light exposure changed of ~0.2 fstop. Here is one of the test strip obtained with the USB device (developed in Ansco 130)

Durst 138/139 VC LED head calibration - test strip
by Dominique Filippi, on Flickr
Measurements were done with a scanner in B&W 16 bits mode (linear curves) and a piece of code I wrote under Matlab which recognizes all the spots and performs all the measurements.
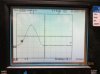
Here is the 3D curve of density vs green and blue done with the 1000 spots of the test strips.

Durst 138/139 VC LED head calibration - 1024 spots
by Dominique Filippi, on Flickr
For each value of green, we get a blue exposure vs density 2D curve.
The Matlab code looks for the T and S points, computes the LER and then turns them into ISO paper grade.
The next step is to convert the ISO paper grade into light intensity (current intensity in my case) but for this operation, it is necessary to set a speed point.
The speed point defines the tones which are not affected by a change of grade. Conventional multigrade enlargers (colour head or multigrade filter) have their speed point placed in the mid tone (which is defined by an ISO standard) however there are many good reason to have the speed point placed in other zones, like zone 8 for example (highlights).
My Matlab code generates calibration curves for speed point placed from zone 5 to zone 8. Those calibrations files are used by my enlarger software which allows me to choose the grade and the speedpoint when printing.

Durst 138/139 VC LED head calibration - calibration curves
by Dominique Filippi, on Flickr
New printing methods can be used thanks to a change of speed point.
I now set the speed point to zone 8, set the grade to the max. I do a strip chart to find the right exposure time. A good exposure time is when I have the right highlights (zone 8) and deepest black I want to have on my final print (the sample could be at this stage far too dark).
Once the right exposure time is found, I do a strip test by changing the grade from 1 to 5 by step of 0.5 to find the shadows of the final print (straightforward operation on my enlarger). The highlights do not change thanks to the speed point set at zone 8.
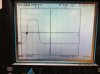
Here is a screen shot of the PC software which controls the enlarger:

Durst 138/139: "Chambre noire" Pc-software
by Dominique Filippi, on Flickr
It looks like the space shuttle dashboard but it is very easy to use indeed.
You will notice the grade buttons to change the grade quickly, the light intensity buttons, the roll menu to select paper / speed point combo, test strip function based on time change or grade change…
I have to set up those special functions with a mouse but at the end I use a simple remote to do the basic operation.

Durst 138/139 - remote control
by Dominique Filippi, on Flickr
Note that my monitor is perfectly safe (I have replaced the white side neon tubes with Red LEDs and white LEDs. I use the white LEDs for normal use and swap to red LEDs for a perfectly safe back light in darkroom mode.
Unfortunately I lack of free time to fiddle with the calibration but I plan to do the following upgrades soon:
*Minor modification of the USB test strip device (paint the plate in black and reduce light reflection)
*Make a 3x wavelength enlarger light meter (blue green and cyan)
*Use this light meter during the calibration process but also as a mobile tool when printing
*Include film base correction (including pyro-stained negatives)
*Zone system (set zones with the light meter, create a model which will propose grade/exposure solution to achieve the desired result)
More information about paper calibration, ISO standard, can be found in “Way beyond monochrome 2nd edition” and “The Manual of Photography” both edited by Focal Press
When I used my durst 138/139 VC LED head for the first time, I could not get proper results. I had no idea how to set the level of blue & green to get the proper grade and my results where all around the place: under exposed, over exposed, too soft, too hard. Every time, it took me a hell of effort to come close to a proper exposed print.
I quickly realized that I could not escape to a proper calibration if I wanted to have an operational light source I could rely on.
There are different approaches to calibration. The first one would involve a Stouffer chart which I don’t have. The second one by simply measuring the density of spots printed with different level of blue & green. I should say blue, green & cyan but I have skipped the cyan for the moment.
A proper calibration starts with the definition of paper grade which is described in the ISO 6846 standard. The grade is based on the LER (log exposure range) which is defined as the difference of exposure between the Dmin of the paper+0.4 and 90% of the Dmax
Durst 138/139 VC LED head calibration - LER vs ISO paper grade
by Dominique Filippi, on Flickr
Durst 138/139 VC LED head calibration - paper grade ISO standard
by Dominique Filippi, on Flickr
Dmin is the minimum density of the paper (fog+paper base). Dmax is the deepest black of your paper (usually ranged between 2.1 and 2.4).
Now we know how to get the paper grade, we need to measure the density vs exposure. In our case the changes of exposure are obtained not by changing the exposure time, but by changing the light intensity.
As I have mostly Adox paper, I have run the first calibration for this paper. The calibration consisted in making test strips by changing the level of blue and green (32 values of each = 32x32=1024 spots). I’m not mad enough do it manually so I made a dedicated USB device which runs with my enlarger. I just have to put a square piece of paper in the device, push a button et voila! The enlarger takes control of the device and does all the spots for me. It can fit ~300 6mm spots on a 13cmx13cm piece of paper.
Video of this device at work can be watched here (no paper loaded)
The exposure time was set to 3 seconds for the calibration, and light exposure changed of ~0.2 fstop. Here is one of the test strip obtained with the USB device (developed in Ansco 130)
Durst 138/139 VC LED head calibration - test strip
by Dominique Filippi, on Flickr
Measurements were done with a scanner in B&W 16 bits mode (linear curves) and a piece of code I wrote under Matlab which recognizes all the spots and performs all the measurements.
Here is the 3D curve of density vs green and blue done with the 1000 spots of the test strips.
Durst 138/139 VC LED head calibration - 1024 spots
by Dominique Filippi, on Flickr
For each value of green, we get a blue exposure vs density 2D curve.
The Matlab code looks for the T and S points, computes the LER and then turns them into ISO paper grade.
The next step is to convert the ISO paper grade into light intensity (current intensity in my case) but for this operation, it is necessary to set a speed point.
The speed point defines the tones which are not affected by a change of grade. Conventional multigrade enlargers (colour head or multigrade filter) have their speed point placed in the mid tone (which is defined by an ISO standard) however there are many good reason to have the speed point placed in other zones, like zone 8 for example (highlights).
My Matlab code generates calibration curves for speed point placed from zone 5 to zone 8. Those calibrations files are used by my enlarger software which allows me to choose the grade and the speedpoint when printing.
Durst 138/139 VC LED head calibration - calibration curves
by Dominique Filippi, on Flickr
New printing methods can be used thanks to a change of speed point.
I now set the speed point to zone 8, set the grade to the max. I do a strip chart to find the right exposure time. A good exposure time is when I have the right highlights (zone 8) and deepest black I want to have on my final print (the sample could be at this stage far too dark).
Once the right exposure time is found, I do a strip test by changing the grade from 1 to 5 by step of 0.5 to find the shadows of the final print (straightforward operation on my enlarger). The highlights do not change thanks to the speed point set at zone 8.
Here is a screen shot of the PC software which controls the enlarger:
Durst 138/139: "Chambre noire" Pc-software
by Dominique Filippi, on Flickr
It looks like the space shuttle dashboard but it is very easy to use indeed.
You will notice the grade buttons to change the grade quickly, the light intensity buttons, the roll menu to select paper / speed point combo, test strip function based on time change or grade change…
I have to set up those special functions with a mouse but at the end I use a simple remote to do the basic operation.
Durst 138/139 - remote control
by Dominique Filippi, on Flickr
Note that my monitor is perfectly safe (I have replaced the white side neon tubes with Red LEDs and white LEDs. I use the white LEDs for normal use and swap to red LEDs for a perfectly safe back light in darkroom mode.
Unfortunately I lack of free time to fiddle with the calibration but I plan to do the following upgrades soon:
*Minor modification of the USB test strip device (paint the plate in black and reduce light reflection)
*Make a 3x wavelength enlarger light meter (blue green and cyan)
*Use this light meter during the calibration process but also as a mobile tool when printing
*Include film base correction (including pyro-stained negatives)
*Zone system (set zones with the light meter, create a model which will propose grade/exposure solution to achieve the desired result)
More information about paper calibration, ISO standard, can be found in “Way beyond monochrome 2nd edition” and “The Manual of Photography” both edited by Focal Press
