Contact Proof Printing with Enlarger

Brentwood Kebab!

A
Brentwood Kebab!

  • 1
  • 1
  • 61
Summer Lady

A
Summer Lady

  • 2
  • 1
  • 84
DINO Acting Up !

A
DINO Acting Up !

  • 2
  • 0
  • 47
What Have They Seen?

A
What Have They Seen?

  • 0
  • 0
  • 63
Lady With Attitude !

A
Lady With Attitude !

  • 0
  • 0
  • 53

Forum statistics

Threads
198,774
Messages
2,780,695
Members
99,701
Latest member
XyDark
Recent bookmarks
0

RedSun

Member
Joined
Aug 27, 2012
Messages
680
Location
New Jersey,
Format
Multi Format
I'm doing contact proof printing with my 4x5 enlarger. Some questions:
1. Do you focus the light on the proofer, then remove the negative? Or focus is not required?
2. What lens do you normally use? short or long? With short focus length, the lens is closer, but light spreads out. Long focus length lens tends to be stronger.
3. What aperture and exposure time do you recommend? Small aperture and longer exposure time for sharper images?
4. Since this is using enlarger, I figure enlarger paper is needed.

Thx.
 

cliveh

Subscriber
Joined
Oct 9, 2010
Messages
7,523
Format
35mm RF
I would make a rectangle of light a bit larger than your proof printer, focus on the baseboard, normal lens, stop down about two stops and make test strips. You could try about 6 seconds, but you need to test.
 
OP
OP
RedSun

RedSun

Member
Joined
Aug 27, 2012
Messages
680
Location
New Jersey,
Format
Multi Format
When I used 50mm lens, I had to open the lens to F8 and 14 sec. It was faster when I used the 80mm lens. Of course, there are other variables.
 

bdial

Subscriber
Joined
Jan 2, 2005
Messages
7,465
Location
North East U.S.
Format
Multi Format
Use the same focal length you use for enlarging those negatives
Set the enlarger at the height it would be for your usual print from whatever size neg. I use the height needed for an 8x10
I have the heights marked on my column for each format I use.
Focus the lens using the edge of an empty carrier, expose with a carrier in place.
Use the same stop you normally use for printing, for me that's always 2 stops down from the lens's maximum.
Use the minimum exposure to get a maximum black through the film rebate
Yes, you use enlarging paper.

If you set things up this way then you will know how much exposure the negative will need when you enlarge it. If you use the same grade or filtration for all proofs then you can be in a better position to judge what grade you'll want for your initial test print.
Basically this is the procedure Fred Picker calls making a "proper proof".
 

jp498

Member
Joined
Oct 5, 2009
Messages
1,525
Location
Owls Head ME
Format
Multi Format
I've done pretty close to this, but purposely de-focus. Why would I want a sharp shape of light to hit the contact printing frame? It's all about even exposure.

I use my Chromega B enlarger (6x6) with a 80mm lens for contact prints and medium/small format enlarging. I set the height as described, then turn it 1/4 turn out of focus. I have penciled on my baseboard where to put the contact printing sandwich.
 
OP
OP
RedSun

RedSun

Member
Joined
Aug 27, 2012
Messages
680
Location
New Jersey,
Format
Multi Format
This makes sense. It takes out a lot of the variables and make this part of the enlarging process....
 

snapguy

Member
Joined
Jan 1, 2014
Messages
1,287
Location
California d
Format
35mm
sharp shape of light

My head hurts. A sharp shape of light and uneven exposure. Do you de-focus when you make a photo print so you won't get uneven exposure? Hummm. Well, WHATEVER WORKS FOR YOU. I'm going to crack a photo book and read up on "circles of confusion." I'm confoosed.
 

jp498

Member
Joined
Oct 5, 2009
Messages
1,525
Location
Owls Head ME
Format
Multi Format
If there is absolutely nothing in the film carrier, there should be no need to focus or defocus.
Except moving the lens in and out focusing does affect exposure (aka bellows factor), so some consistency is good.
If there are any reflections (or stray hairs/lint or whatever) with regard to the film carrier, it seems having it out of focus would be preferable to me. My film carrier is plain unpainted aluminum. Having no film carrier would create gaps beaming light out all over the darkroom.
 
Joined
Dec 10, 2009
Messages
6,297
Format
Multi Format
If you plan to do a lot of contact printing, you can also process a piece of unexposed film. You then use the neg to determine a standard print time. You do this by doing a series of exposures with the blank neg on your print. You pick the exposure time where you start to get total black on the print. Basically, you want to expose just enough to achieve your Dmax. Make some notes on the height of the enlarger, exposure time and what f stop you used. This will make contacting more efficient if you plan to do a bunch.
 

ic-racer

Member
Joined
Feb 25, 2007
Messages
16,544
Location
USA
Format
Multi Format
You will want to stopdown about 3 stops to improve evenness. Longer lens is better. You want to focus the light, otherwise there can be too much light falloff. Also, if using a condenser enlarger, you certainly need to focus the lens, otherwise the lighting will be uneven.
 

MattKing

Moderator
Moderator
Joined
Apr 24, 2005
Messages
52,889
Location
Delta, BC Canada
Format
Medium Format
With respect to standardizing exposure, this is a great opportunity to make use of an enlarging meter. I use an Ilford EM10 just for this purpose.
 

winger

Subscriber
Joined
Jan 13, 2005
Messages
3,975
Location
southwest PA
Format
Multi Format
My set way of doing contacts is the same for every size of negative. I use the 50mm enlarging lens and put it at the right height so a 35mm carrier (the edges) will be in focus and a little larger than 8x10. I have the spot marked on the enlarger support. The negs are in PrintFile sheets and held down by a piece of glass from a frame (thin and not UV protective). I use the #2 filter and f8 for 8 seconds. This works for me and my enlarger (Beseler 23CIII), but I can't guarantee it'll work for others. Since I ALWAYS do them this way, I can spot under and over exposed frames easily.
 

MSchuler

Member
Joined
Oct 20, 2004
Messages
141
Location
Seattle
Format
Multi Format
I do the same thing as winger, except without a carrier in place and with the lens defocused. I've never noticed uneven lighting being an issue. It is more important to me to have all proof sheets receive identical exposure so that I can compare film development results and identify issues with the paper developer (i.e., degrading). I set the aperture so that the printing time for a good negative is about 15 seconds with a #2 filter.
 

ic-racer

Member
Joined
Feb 25, 2007
Messages
16,544
Location
USA
Format
Multi Format
with the lens defocused. I've never noticed uneven lighting being an issue. It is more important to me to have all proof sheets receive identical exposure

Defocusing changes the effective aperture. Focusing on the edge of the negative frame is a super-easy way to ensure the same aperture between prints.
 

summicron1

Subscriber
Joined
Jul 28, 2010
Messages
2,920
Location
Ogden, Utah
Format
Multi Format
not sure why which lens you use matters -- light is light, the paper doesn't know where it's coming from, use a lens that lets you set the enlarger head at a convenient height. When I use my Focomat to make contact prints I leave the 50 on and set the height so it covers the contact printer.

Then do a coupla test exposures to get proper time and away you go. Using an enlarger DOES let you use multi-grade paper and filters if you want.

Same thing with the "enlarging paper" question -- the paper doesn't know where it is, all it knows is that it is exposed to light, so use whatever paper you have.

If your light is uneven across the space, you need to look at your bulb's placement in the enlarger head so that exposure is even when you are making enlargements too.
 

ic-racer

Member
Joined
Feb 25, 2007
Messages
16,544
Location
USA
Format
Multi Format
could that be explained in more detail please?

The farther the iris is from the paper, the smaller the effective aperture.

It is the same mathematics for 'bellows factor.' Just imagine the subject as the negative and the paper as the film. If the bellows were around the lens and paper, you'd have a view camera. All the equations for view cameras apply to enlargers.

If you want a simpler explanation, try this: as you move the enlarger lens closer to the negative (farther from the paper) you will see the size of the projected image gets larger. If you have an enlarger meter you will also see that the image gets dimmer, which has to happen to conserve matter and energy.
 
Last edited by a moderator:

pdeeh

Member
Joined
Jun 8, 2012
Messages
4,765
Location
UK
Format
Multi Format
The farther the iris is from the paper, the smaller the effective aperture.

It is the same mathematics for 'bellows factor.' Just imagine the subject as the negative and the paper as the film. If the bellows were around the lens and paper, you'd have a view camera. All the equations for view cameras apply to enlargers.

Ah yes, I see. Inverse square law? It doesn't change the aperture, but lowers the intensity of the light at the paper surface; However you can also defocus "the other way" (bringing the iris nearer to the paper surface), and so "opening" the aperture?

Presumably though, if you always close the bellows up the same amount as well as maintain the same head height and lens aperture, you will always have the same light intensity at the paper surface anyway (all other things being equal)
 

ic-racer

Member
Joined
Feb 25, 2007
Messages
16,544
Location
USA
Format
Multi Format
Ah yes, I see. Inverse square law? It doesn't change the aperture, but lowers the intensity of the light at the paper surface; However you can also defocus "the other way" (bringing the iris nearer to the paper surface), and so "opening" the aperture?

Presumably though, if you always close the bellows up the same amount as well as maintain the same head height and lens aperture, you will always have the same light intensity at the paper surface anyway (all other things being equal)

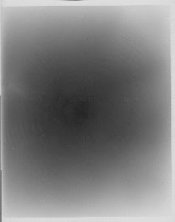
If I were to use enlarger light to make 'standard' contacts, I'd experiment with various lenses, apertures, condenser settings and lens distances to find an optimum by printing the light source onto a piece of paper. Then record everything, including measuring the bellows extension. It is a lot of work; a bulb from across the room is almost always going to be more even. This is how poorly my 8x10 enlarger performed when I first got it:
Centerfilter.jpg
 

NedL

Subscriber
Joined
Aug 23, 2012
Messages
3,388
Location
Sonoma County, California
Format
Multi Format
There may be a difference between making the best possible contact print and making a proof sheet that provides the most information for future printing needs.
 
Joined
Feb 23, 2006
Messages
789
Location
Wicklow, Ireland
Format
Multi Format
I prefer softer proofs, around grade 1. They do not look pretty, dull actually, but this way I get to see more data contained on the negative, later available for D&B manipulation. I also prefer when the print looks better than the proof. :smile:
 
Joined
Dec 10, 2009
Messages
6,297
Format
Multi Format
Ed Weston just used a light bulb.
 
Photrio.com contains affiliate links to products. We may receive a commission for purchases made through these links.
To read our full affiliate disclosure statement please click Here.

PHOTRIO PARTNERS EQUALLY FUNDING OUR COMMUNITY:


Ilford ADOX Freestyle Photographic Stearman Press Weldon Color Lab Blue Moon Camera & Machine
Top Bottom