Beseler 45MX Enlarger Alignment

Banana

H
Banana

  • 0
  • 0
  • 9
Higher ups

D
Higher ups

  • 3
  • 0
  • 61

Forum statistics

Threads
200,589
Messages
2,810,561
Members
100,308
Latest member
Sverre gjesdal
Recent bookmarks
0

faberryman

Subscriber
Joined
Jun 4, 2016
Messages
6,048
Location
Wherever
Format
Multi Format
I have been able to align my Beseler 45MX enlarger side-to-side and front-to-back with respect to the baseboard per the instruction manual, but I still have some un-uniformity in focus. I haven't been able to find any adjustment screws or instructions on how to adjust the lens board and negative carrier so they are absolutely parallel side-to-side and front-to-back. Any ideas.
 

Alan9940

Member
Joined
Jun 17, 2006
Messages
2,463
Location
Arizona
Format
Multi Format
Without something like an adjustable lensboard there is no way that I'm aware of to adjust either the lens stage or negative stage on a Beseler 45 series. I've had mine for nearly 40 years, but never had any focus issues after the basic adjustments.
 
OP
OP

faberryman

Subscriber
Joined
Jun 4, 2016
Messages
6,048
Location
Wherever
Format
Multi Format
I have seen reference to those but never seen one in the wild. I'll add it to my eBay search list. Thanks.
 
OP
OP

faberryman

Subscriber
Joined
Jun 4, 2016
Messages
6,048
Location
Wherever
Format
Multi Format
After a couple of frustrating days, I have determined that my enlarger is actually in alignment. I finally went out and got a couple of pieces of glass, sandwiched a strip of 35mm negatives between them, and voila, the projected image is sharp corner to corner. Neither the 35mm metal negative carrier nor the 35mm Negatrans were holding the negative sufficiently flat. The negative carriers are "good enough" if I stop down to f11/16/22, but for the best print, I'll just need to use the glass sandwich.
 

kreeger

Member
Joined
Jun 21, 2009
Messages
207
Location
Missouri
Format
Multi Format
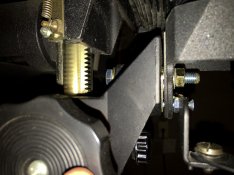
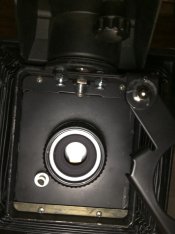
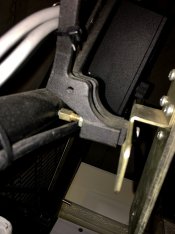
I modified my lens stage on my 45mx to get rid of the ball bearing movement of left to right with a lag bolt of the right length and a nylock nut to hold it solid without moving.

Then I used a bubble level to ensure it was level light the baseboard.

After that is solid and non moving, remove the head of the enlarger. I then put a small level on the negative carrier and adjust the
fore/aft adjustment of the head until it's level.

It's been perfect for the last 5 years, never had a problem after that.

IMG_1512.jpg IMG_1514.jpg IMG_1515.jpg
 
Last edited:
OP
OP

faberryman

Subscriber
Joined
Jun 4, 2016
Messages
6,048
Location
Wherever
Format
Multi Format
I modified my lens stage on my 45mx to get rid of the ball bearing movement of left to right with a lag bolt of the right length and a nylock nut to hold it solid without moving.

My version of the 45MXT (straight vs tapered bellows) does not have the left-right adjustable lens stage.
 
Photrio.com contains affiliate links to products. We may receive a commission for purchases made through these links.
To read our full affiliate disclosure statement please click Here.

PHOTRIO PARTNERS EQUALLY FUNDING OUR COMMUNITY:


Ilford ADOX Freestyle Photographic Stearman Press Weldon Color Lab Blue Moon Camera & Machine
Top Bottom