A Home Made Sink Question

Brentwood Kebab!

A
Brentwood Kebab!

  • 1
  • 1
  • 51
Summer Lady

A
Summer Lady

  • 1
  • 1
  • 59
DINO Acting Up !

A
DINO Acting Up !

  • 1
  • 0
  • 36
What Have They Seen?

A
What Have They Seen?

  • 0
  • 0
  • 51
Lady With Attitude !

A
Lady With Attitude !

  • 0
  • 0
  • 46

Recent Classifieds

Forum statistics

Threads
198,767
Messages
2,780,622
Members
99,701
Latest member
XyDark
Recent bookmarks
1

RDWestPR

Member
Joined
May 25, 2014
Messages
23
Location
Puerto Rico
Format
Hybrid
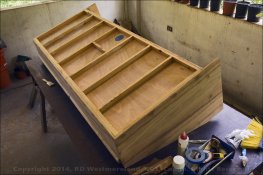
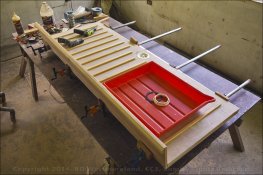
I'm nearly finished building my new plywood sink for Carbon Transfer Print making, but I have a question about finish. I plan to waterproof the thing with epoxy resin. My question is- Do I need to use a filler/sealer coat on the wood first or can I go straight to using the epoxy? I plan to put one coat on the bottom and 2 on top, but I'm open to ideas. I tried to score a used darkroom sink, but no luck finding one in Puerto Rico. Here are a couple of shots of it, as of yesterday. it's 27" x 6 feet on the inside.
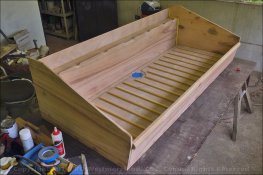
DarkroomSinkTopLG.jpg DarkroomSinkBottomLG.jpg
 

jeffreyg

Subscriber
Joined
Jun 12, 2008
Messages
2,639
Location
florida
Format
Medium Format
I just resurfaced my plywood sink after 38 years of the original resin. I did not use epoxy but rather a boat resin from a company called U S Composites (West Palm Beach, Fl). You might want to check their website and/or contact them as to what resin would be best for the chemicals you would be using. Consider sealing the seams with something like Dura Glass before coating.

http://www.jeffreyglasser.com/
sculptureandphotography.com/
 

Jim Noel

Member
Joined
Mar 6, 2005
Messages
2,261
Format
Large Format
Go to a marine supplier and get West Systems epoxy.It is made for sealing wooden boats. I built my snk with it in 1989 and it has never leaked.
 
Joined
Dec 10, 2009
Messages
6,297
Format
Multi Format
It is a nice sink! I made my own sink and I made the mistake of using a resin used for surf boards and boats. The sink smelled for a good part of a year. But I've been using the sink for over 30 years and never had a problem. I would use a low-odor resin.
 

DREW WILEY

Member
Joined
Jul 14, 2011
Messages
13,928
Format
8x10 Format
Use a two-part marine penetrating epoxy for all your coats. I don't know what brand they sell there, but it should be easy to locate a marine
supplier there. Here on the West Coast we have both West Marine and Smith epoxies available. Sometimes the corners of the sink need to be
reinforced with a more putty-like marine epoxy. Just be careful with the fumes. Nasty stuff! And obviously wear nitrile or neoprene gloves.
 
OP
OP
RDWestPR

RDWestPR

Member
Joined
May 25, 2014
Messages
23
Location
Puerto Rico
Format
Hybrid
Ralph L.- Do you ship to Puerto Rico?
 
Last edited by a moderator:
OP
OP
RDWestPR

RDWestPR

Member
Joined
May 25, 2014
Messages
23
Location
Puerto Rico
Format
Hybrid
Thanks for the comments and complements! There is a marine supply shop not far from us and we plan to go visit it tomorrow. I now know what I'm looking for. One more question- The inside corners do have strips of molding already in place. So how do you get strips of fiberglass cloth to 'stay put' when working in an inside corner? Or do you set the inside corners first with something thicker before proceeding with covering the whole thing? I think that's what was being suggested earlier. Thanx, Bob
 
OP
OP
RDWestPR

RDWestPR

Member
Joined
May 25, 2014
Messages
23
Location
Puerto Rico
Format
Hybrid
Eric- I retired from Alaska 5 years ago. After 46 winters I needed a break!
 

jpreston

Member
Joined
Dec 11, 2010
Messages
315
Location
Ohio, USA
Format
Multi Format
Did you print up some plans for building the sink? I would love o get a copy if you did!
 

frank

Member
Joined
Dec 6, 2002
Messages
4,359
Location
Canada
Format
Multi Format
Another approach to a homemade darkroom sink is to use a plastic under the bed storage container and build a wooden support for it, using it like a waterproof liner.
 

GeorgesGiralt

Member
Joined
Sep 16, 2004
Messages
523
Location
Toulouse, Fr
Format
Large Format
Hello !
It is a bit late now, but waterproofing the seams is easy IF you use a caulking curing compound on the wood prior to assembly.
The caulking compound gets extruded when assembling the boards and you make a seam of the extra product at the corner.This way, the corner and the boards are sealed.
Then you put epoxy on the whole surface to seal the wood and protect your seams...
I did mine like that some years ago ant is is still perfect. I got the inspiration from the sinks at my camera club which were more than 40 years old when the club darkroom closed.
 
OP
OP
RDWestPR

RDWestPR

Member
Joined
May 25, 2014
Messages
23
Location
Puerto Rico
Format
Hybrid
Update: I did score some marine grade slow set epoxy and 4" strips of fiberglass cloth to reinforce the corners. I started with the bottom and I'm glad I did as I did not use enough hardener in the first pass. It took over 48 hours for it to cure, but it finally did. The last time I messed with fiberglass and epoxy was 20 years a go. jpreston- I'll post up shots of my hand made mechanical drawings soon. My next project is an 8 drawer flat-file for storing Yupo, old x-ray film, fixed out RC photo paper, Pictorico, blotting paper and watercolor paper. Stuff used to do the Carbon Transfer process.
 

Old-N-Feeble

Member
Joined
Feb 22, 2012
Messages
6,805
Location
South Texas
Format
Multi Format
Please remember,Istill have two Delta darkroom sinks for sale.They are 4 and 6 feet long with byild-in drain and made of black poly carbonate,both looking like newand go for $80 and $100+shiprespectively.Take them before they end up in land fill.

How much would shipping be to 78114?
 

Speed Gray

Member
Joined
Jul 7, 2014
Messages
24
Location
Michigan
Format
Multi Format
RDWest:

Nice looking job on your sink, and thanks for the pictures. I too am in the process of building a sink for my darkroom, and the replies and comments to your post had some good information, also. I am constructing my sink with 2x8 pressure treated sides, and a sloping 3/4" plywood bottom, also made from pressure treated material. I have purchased the material, and actual building is in the early stages.

Please keep the postings coming, especially the pictures, as your sink project moves towards completion.

Thanks!

Speed Gray, K8SG
Grand Rapids, MI
USA
 
OP
OP
RDWestPR

RDWestPR

Member
Joined
May 25, 2014
Messages
23
Location
Puerto Rico
Format
Hybrid
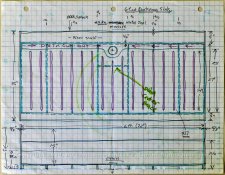
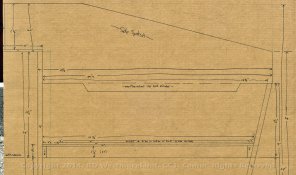
OK... I finally had some time to round up drawings. This shot is of the bottom of the sink with the 5/8" Face Board attached. The bottom and frame was completely assembled first and then a 10º trim was taken where the Face board would go. It was done by hand with a 'Skill saw'. The end Splash Boards were attached last, after the back board was attached. Because I need a perfectly flat surface to coat 'tissue' for making Carbon Transfer prints, there is no slope to the bottom. Also, the wood for this project was very 'whippy' so I had to work around those issues. Part of the reason the sink is only 6 feet long. Un-treated wood is very rare in Puerto Rico, but I did not want to use treated wood because it contains formaldehyde. Just the fumes from it can ruin the gelatin 'Glop'. Sealing the wood with epoxy might solve that problem, but I did not want to take a chance.

DarkroomSinkConstructionLG.jpg
 
OP
OP
RDWestPR

RDWestPR

Member
Joined
May 25, 2014
Messages
23
Location
Puerto Rico
Format
Hybrid
The very funky working drawings that follow are only a guide. I did fine tune measurements as I went along. The end boards were 'made to fit' after the bottom, front and back were added. So those drawings were done full scale on cardboard. The first drawing was done when I was still trying to build a 'combo' sink with attached 'washout' sink. I scrapped that idea once I decided I wanted a Sloped Front Face and the 2nd drawing reflects the redesign. The bottom is 2 sheets of 1/4" so I could incorporate drain channels. If I were to do it again, I would use 3" wide strips of 1'4" plywood spaced 1" apart instead of the 3/4" pine strips I used for tray 'standoffs'.

SinkBottomViewLG.jpg SinkEndView1LG.jpg SinkEndView2LG.jpg
 
OP
OP
RDWestPR

RDWestPR

Member
Joined
May 25, 2014
Messages
23
Location
Puerto Rico
Format
Hybrid
Last, but not least, here are the drawings for the metal stand the sink will set in. I scored 1.5"x2" angle iron and 1" flat bar (for cross braces) from a local source. It was very cheap. They even did the cuts for 50¢ per. I spent less than $30 for all the metal. Adjustable feet will be welded on by a pro. I will be using feet intended for pinball machines as they are very heavy duty, cheap, and easy to score from eBay. Like I say, the sink needs to stand perfectly level. One last point, the metal was measured to fit the finished sink. The drawings were just for structural reference. Apologies for the slightly out of focus image. I do not have the time to back up and shoot it again.

SinkStandLG.jpg
 
OP
OP
RDWestPR

RDWestPR

Member
Joined
May 25, 2014
Messages
23
Location
Puerto Rico
Format
Hybrid
The metal will be dressed, and painted with an iron oxide primer and finished with a cheap exterior house paint. I always check out the 'mis-mixed' paints at Home Despot!
 
Photrio.com contains affiliate links to products. We may receive a commission for purchases made through these links.
To read our full affiliate disclosure statement please click Here.

PHOTRIO PARTNERS EQUALLY FUNDING OUR COMMUNITY:


Ilford ADOX Freestyle Photographic Stearman Press Weldon Color Lab Blue Moon Camera & Machine
Top Bottom